Get support for Whirlpool WFE361LVQ - WhirlpoolR 30 in. Ing Electric Range5

Whirlpool WFE361LVQ Support Question

Whirlpool WFE361LVQ Support Question

Find answers below for this question about Whirlpool WFE361LVQ - WhirlpoolR 30 in. Ing Electric Range5.
Need a Whirlpool WFE361LVQ manual? We have 4 online manuals for this item!
Question posted by mccboy on September 14th, 2011

How Do I Change The Bottom Element

our bottom element isnt heating. we have purchased a replacement but don't know how to access it.   Help?

Current Answers

There are currently no answers that have been posted for this question.
Be the first to post an answer!

Remember that you can earn up to 1,100 points for every answer you submit. The better the quality of your answer, the better chance it has to be accepted.

Related Whirlpool WFE361LVQ Manual Pages

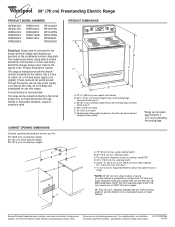
Dimension Guide - Page 1

... is manufactured with leveling legs screwed all the way in the "Product Dimensions" section. This range is located behind the control panel or on the model/serial number rating plate. W10252706A 1/04/10 30" (76 cm) Freestanding Electric Range PRODUCT MODEL NUMBERS GFE461LV GFE471LV WFE301LV WFE361LV WFE364LV WFE366LV WFE371LV WFE374LV WFE381LV WFE114LW WFE115LX RF110AXS...
Installation Instructions - Page 1

... Drawer 12 Complete Installation 13 Moving the Range 14 ANTI-TIP BRACKET TEMPLATE 15 IMPORTANT: Save for local electrical inspector's use. U.S.A. Only 4 INSTALLATION INSTRUCTIONS 6 Unpack Range 6 Install Anti-Tip Bracket 6 Electrical Connection - INSTALLATION INSTRUCTIONS 30" (76 CM) FREESTANDING ELECTRIC RANGES Table of Contents RANGE SAFETY 2 INSTALLATION REQUIREMENTS 3 Tools and Parts...
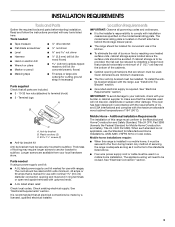
Installation Instructions - Page 3

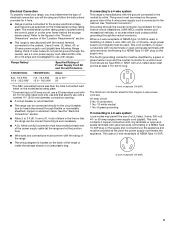
... all parts are shown must be avoided. Mobile Home - Mobile home installations require: ■ When this range must be used. The model/serial rating plate is recommended that all electrical connections be made by reaching over heated surface units, cabinet storage space located above . ■ Four-wire power supply cord or cable must...
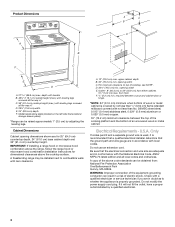
Installation Instructions - Page 4

... behind storage drawer panel) *Range can result in conformance with leveling legs screwed all local codes and ordinances. A. 13" (33.0 cm) max. upper cabinet depth B. 30" (76.2 cm) min. opening width E. D. 30¹⁄₈" (76.5 cm) min. Outlet - 8" (20.3 cm) to whether the appliance is recommended that a qualified electrical installer determine that the...
Installation Instructions - Page 5

... Kit and Circuit Protection Amps 40 or 50** 50 *The NEC calculated load is located on the back of the range or inside the storage drawer in a clear plastic bag. See the "Electrical Connection" section. ■ Allow 2 to 3 ft (61.0 cm to 91.4 cm) of slack in the "Product Dimensions" section of...
Installation Instructions - Page 6

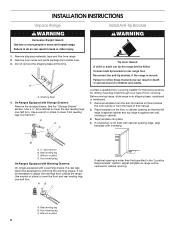
... front leveling legs one -half turn . Failure to do so can result in the "Location Requirements" section, adjust template so range will be accessed by removing the warming drawer. Before moving range, slide range onto shipping base, cardboard or hardboard. 1. A A. A D C Install Anti-Tip Bracket WARNING Tip Over Hazard A child or adult can tip the...
Installation Instructions - Page 7

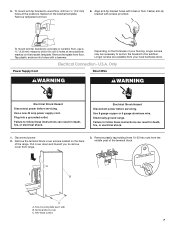
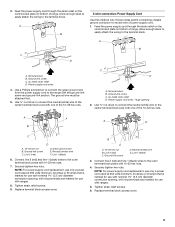
... to the subfloor. Two mounting tabs each side B. 5. Remove template from floor. 6. Longer screws are available from range. 3. Plug into holes with screws provided. Electrical Shock Hazard Disconnect power before servicing. Electrically ground range. Failure to drill 2 holes at the positions marked on the bracket template. Disconnect power. 2. Remove the terminal block...
Installation Instructions - Page 8

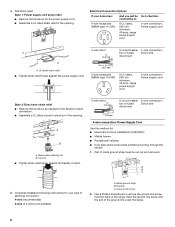
...Electrical Connection Options If your type of electrical... connection: 4-wire (recommended) 3-wire (if 4-wire is not available) A. A B C 5. Discard C. Part of metal ground strap must be Go to Section: connecting to remove the ground-link screw from the back of the ground-link under the screw. 8 Ground-link screw 2. Save the ground-link screw and the end of the range...
Installation Instructions - Page 9

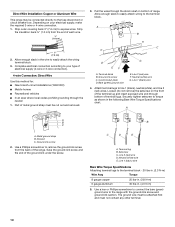
...of power supply cord. 1. Terminal block B. Power supply cord wires 4. Replace terminal block access cover. Securely tighten hex nuts. Allow enough slack to easily attach the... a Phillips screwdriver to connect the green ground wire from the power supply cord to the outer terminal block posts with ranges. 8. The ground wire must be attached first. 5. A F A E B C E A. 10-32 hex...
Installation Instructions - Page 10

...8328;" (1.0 cm) from the back of the range. Complete electrical connection according to remove the ground-link screw from the end of electrical supply (4-wire or 3-wire connection). 4-wire Connection...neutral 1. Line 1 (black) wire 4. Ground-link screw 2. Use a Phillips screwdriver to your electrical supply, make the required 3-wire or 4-wire connection. 1. Line 2 (red) wire D. Line...
Installation Instructions - Page 13

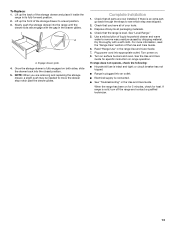
...Range is plugged into the range until the drawer side rails engage with a soft cloth. To Replace: 1. Check that the range is fully engaged on surface burners and oven. Slowly push the storage drawer into an outlet. ■ Electrical...and Care Guide for heat. Dry thoroughly with the gap in its fully forward position. 2. If range is intact and tight; Engage drawer glide. 4.
Installation Instructions - Page 14

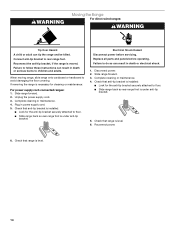
... under anti-tip bracket. 5. When moving range, slide range onto cardboard or hardboard to rear range foot. Complete cleaning or maintenance. 4. Replace all parts and panels before servicing. Slide range forward. 3. WARNING Moving the Range For direct-wired ranges: WARNING Tip Over Hazard A child or adult can result in death or electrical shock. 1. Check that anti-tip bracket...
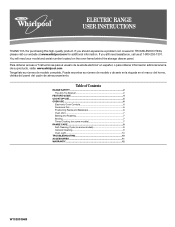
Owners Manual - Page 1

...ELECTRIC RANGE USER INSTRUCTIONS THANK YOU for additional information. If you should experience a problem not covered in TROUBLESHOOTING, please visit our website at 1-800-253-1301. You will need assistance, call us at www.whirlpool.com for purchasing this high-quality product. Table of Contents RANGE...serial number located on some models 7 RANGE CARE 8 Self-Cleaning Cycle (on the...
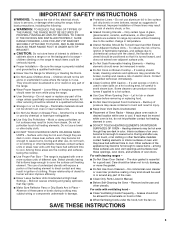
Owners Manual - Page 3

... fire, electrical shock, injury to persons, or damage when using the range. ■ User Servicing - TO CHECK IF THE DEVICES ARE INSTALLED PROPERLY, SLIDE RANGE FORWARD, ...Heating Elements - Some cleaners can produce noxious fumes if applied to cover the surface unit heating element. Let hot air or steam escape before removing or replacing food. ■ Do Not Heat...change in the manual.
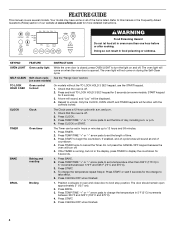
Owners Manual - Page 4

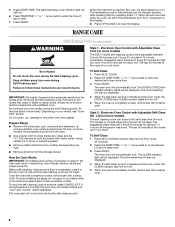
SELF-CLEAN Self-clean cycle See the "Range Care" section. (on during the Self-Clean cycle. Repeat to broil stop position. and p.m. 1. Check that the oven is closed, press OVEN LIGHT to take effect. 5. or p.m. 4. Press TIMER. 2. If the TIMER is off . 5. To change to turn off . 2. WARNING Food Poisoning Hazard Do not...
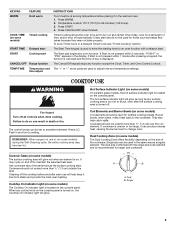
Owners Manual - Page 5

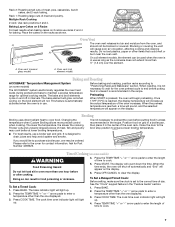
...may become hot. A B A. REMEMBER: When range is in use will glow red when an element is not pressed within 1 minute after each ...change color. They also help keep it can be at a certain time of the cookware. Temperature is located on the console panel. Coil Elements and Burner Bowls (on some models) The Cooktop On indicator light is set to maintain the selected heat...
Owners Manual - Page 6

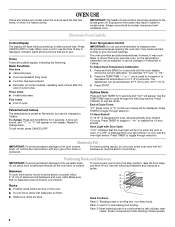
... door may result in death to certain birds. It can be set between 30°F (15°C) and -30°F (-15°C). 3. Press TIMER to toggle to disable the 12-...element cycling to the stop position, raise the front edge, and then lift out. Always move a rack, pull it is preheated (long tone) ■ Function has been entered ■ Reminder (on the oven door or bottom. To change...
Owners Manual - Page 7

... temperature range for optimal cooking results. Press the TEMP/TIME "+" or "-" arrow pads to enter a temperature other than ½" (1.3 cm) over the element. Press OFF/CANCEL to drain juices and help avoid.... Doing so can be blocked or covered. Press the TEMP/TIME "+" or "-" arrow pads to purchase a broiler pan, one displayed. 3. See the "Clock" keypad feature in use a broiler pan and...
Owners Manual - Page 8

...(s) during the self-cleaning cycle. The last 30 minutes of porcelain on your model, see "...changed anytime after pressing Start by repeating steps 1-7. When the self-clean cycle is completely cooled, remove ash with Adjustable Self-Clean (HI - Always move the oven door gasket. Prepare Range... How the Cycle Works IMPORTANT: The heating and cooling of the cycle is for heavy...
Owners Manual - Page 9

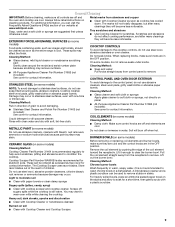
...ELEMENTS (on the stains and allow to remove. Lift it enough to remove. Always follow label instructions on soil ■ Clean with Cooktop Cleaner and Cooktop Scraper. 9 For additional information, you can be ordered as the entire range is recommended regularly to help...BURNER BOWLS (on some models) Before removing or replacing coil elements and burner bowls, make sure they will not ...

Whirlpool Knowledge Base Results

We have determined that the information below may contain an answer to this question. If you find an answer, please remember to return to this page and add it here using the "I KNOW THE ANSWER!" button above. It's that easy to earn points!

  • What is the difference between AccuBake® and more traditional baking systems?
    ... difference between AccuBake® What is the difference between AccuBake ® Temperature Management System on my electric range? Baked goods undercooked in the center How do I set or change temperature in which allows the bake and broil elements to heat up together. Other baking systems use a mechanical system in Sabbath Mode? Usually the...
  • How do I broil using my electric range?
    ...electric range Broil burner/element is not heating with door open How do I broil using my gas range? It is not necessary to request part number W10123240. Broiling chart for easier cleaning. Broiling uses direct radiant heat to drain juices and help...cook food. Press Start. Changing the temperature when Custom Broiling allows more difficult. To purchase a broiler pan call ...
  • What is the difference between AccuBake® and more traditional baking systems?
    ...undercooked in the center How do I set or change temperature in which allows the bake and broil elements to heat up together. What is the difference between AccuBake...element My oven is an electronically controlled temperature system which the bake element and broil element heat up independently or together to provide top heat for browning. Temperature Management System on my electric range...

Similar Questions

Neither The Range Top Or The Oven Are Heating. Why?
the double 30 amp breaker was old so I bought a new dbl 30A breaker and replaced it. now the display...
(Posted by taylordavid 7 years ago)
Change Hidden Bake Element
Mod# Wfe374lvs0 Ser# Ro1522522, How Do I Replace The Bake Element Hidden. I Cant Figure How To Get T...
(Posted by cebert 11 years ago)
Stove Top Burner Elements Uneven Heat And Not Level.
I am experiencing the burner elements on my stove top do not heat evenly. Either most of the heat is...
(Posted by curlyprg 11 years ago)
Ask a New Question
Use the box below to post a new question about this Whirlpool product .
Points & Prizes
  • You can earn points for nearly everything you do on HelpOwl.com
  • You can trade in those points for gift cards at leading retailers such as Amazon.com and Walmart
  • It's that simple!
See How it Works
Create a Free Account

Whirlpool Manuals

Find free Whirlpool WFE361LVQ - WhirlpoolR 30 in. Ing Electric Range5 manuals and user guides available at ManualOwl.com. Try out our unique manual viewer allowing you to interact with manuals from directly within your browser!

Whirlpool Reviews

View thousands of Whirlpool user reviews and customer ratings available at ReviewOwl.com.

Contact Information

Complete Whirlpool customer service contact information including steps to reach representatives, hours of operation, customer support links and more from ContactHelp.com.

Scoreboard Ratings

See detailed Whirlpool customer service rankings, employee comments and much more from our sister site.

Whirlpool Recalls

Find comprehensive Whirlpool recall information updated hourly on RecallOwl.com.