Get support for Whirlpool WFE361LVD - Universal 4.8 Cubic Foot Ele

Whirlpool WFE361LVD Support Question

Whirlpool WFE361LVD Support Question

Find answers below for this question about Whirlpool WFE361LVD - Universal 4.8 Cubic Foot Ele.
Need a Whirlpool WFE361LVD manual? We have 4 online manuals for this item!
Question posted by shyarts on March 20th, 2014

Temperature Won't Go Above 275 Degrees

When I Hit Back Button The Temperature Is 175 Andshould Be 350. When I Try To Increase Temperature It Won't Go Above 275. When I Put It On Broil It Only Goes To 275. Press. When I Hole Temperature Button To Increase It Says Psh On The Display. What Does It Want Me To Push. How Do I Get This Temperature Lock Off My Stove. I Cannot Cook In The Oven, I Need Higher Temperatures. Please Help Asap please Help Me Asap - Thank You - Lona

Current Answers

Answer #1: Posted by Odin on March 20th, 2014 4:55 PM
This answer was accepted by the poster of the original question.
Odin

Member since:
April 10th, 2010

Points: 41,236,700
1,080
points


Hope this is useful. Please don't forget to click the Accept This Answer button if you do accept it. My aim is to provide reliable helpful answers, not just a lot of them. See https://www.helpowl.com/profile/Odin.

Related Whirlpool WFE361LVD Manual Pages

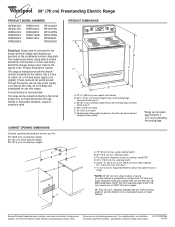
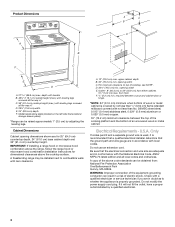
Dimension Guide - Page 1

...55.9 cm) from floor F 2.2 cm) min. A circuit breaker is manufactured with ranges. opening dimensions shown are for use a 4-wire power supply cord rated at 250 volts...opening width C. Model/serial rating plate (located on the oven frame behind storage drawer panel) *Range can be connected directly to change materials and specifications without notice. upper cabinet depth B. 30"...
Installation Instructions - Page 1

...Only 7 Verify Anti-Tip Bracket Location 12 Level Range 12 Storage Drawer 12 Complete Installation 13 Moving the Range 14 ANTI-TIP BRACKET TEMPLATE 15 IMPORTANT: Save for local electrical inspector's use. U.S.A. U.S.A. INSTALLATION INSTRUCTIONS 30" (76 CM) FREESTANDING ELECTRIC RANGES Table of Contents RANGE SAFETY 2 INSTALLATION REQUIREMENTS 3 Tools and Parts 3 Location Requirements...
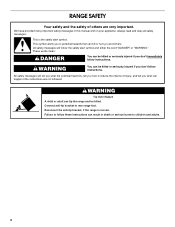
Installation Instructions - Page 2

...Tip Over Hazard A child or adult can kill or hurt you to potential hazards that can tip the range and be killed. This symbol alerts you and others are not followed. These words mean: DANGER You ... can happen if the instructions are very important. Failure to rear range foot. Reconnect the anti-tip bracket, if the range is the safety alert symbol. This is moved.
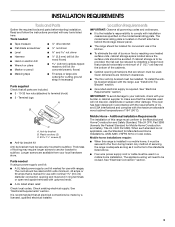
Installation Instructions - Page 3

...large wire cutters (for use in the kitchen. ■ To eliminate the risk of this range is the installer's responsibility to comply with upturned ends. ■ A UL listed strain ...electrical installer. Read and follow the instructions provided with the maximum allowable wood cabinet temperatures of flooring may require longer screws to anchor bracket to subfloor. Thickness of 194&#...
Installation Instructions - Page 4

...;⁄₈" (76.5 cm) min. opening width C. A copy of the above the range, follow the range hood or microwave hood combination installation instructions for 25" (64.0 cm) countertop depth, 24"...by adjusting the leveling legs. A. 13" (33.0 cm) max. IMPORTANT: If installing a range hood or microwave hood combination above code standards can be obtained from floor F 2.2 cm) min...
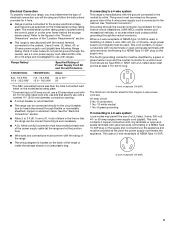
Installation Instructions - Page 5

...8328;" (34.9 mm) diameter connection opening. ■ A circuit breaker is recommended. ■ The range can be moved if servicing is manufactured with kit. This uses a 3-wire receptacle of slack in a...; Allow 2 to 3 ft (61.0 cm to a 4-wire system: This range is manufactured with the rating of the range. ■ The wiring diagram is connected to the proper electrical voltage and frequency...
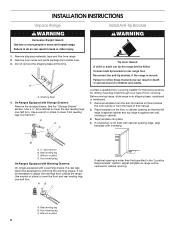
Installation Instructions - Page 6

... a qualified floor covering installer for the best procedure for drilling mounting holes through your type of this time. Tape template into place. 4. ...Use wrench or pliers to lower the rear leveling legs one -half turn. A. Front leveling leg C. Failure to rear range foot. Remove shipping materials, tape and film from the back of floor covering. A D C Install Anti-Tip Bracket WARNING ...
Installation Instructions - Page 7

...-tip bracket to concrete or ceramic floor, use a 4.8 mm) masonry drill bit to wood floor, drill two ¹⁄₈" (3.2 mm) holes at the positions marked on the thickness of your local hardware store. Electrically ground range. Remove plastic tag holding three 10-32 hex nuts from the middle post of the...
Installation Instructions - Page 8

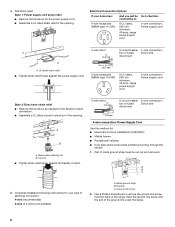
...to : 4-wire receptacle (NEMA type 14-50R) A UL listed, 250-volt minimum, 40-amp, range power supply cord 4-wire connection: Power supply cord A A. Concuit ■ Tighten strain relief screw ....7 cm) 3-wire receptacle (NEMA type 10-50R) A UL listed, 250-volt minimum, 40-amp, range power supply cord 3-wire connection: Power supply cord Style 2: Direct wire strain relief ■ Remove the ...
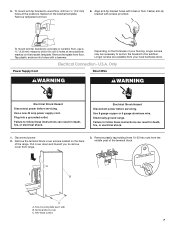
Installation Instructions - Page 9

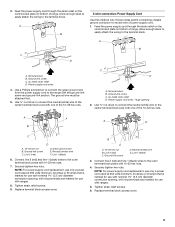
...first. 5. Ground-link screw C. Connect line 2 (red) and line 1 (black) wires to the range with 10-32 hex nuts. 7. Line 2 (red) C. NOTE: For power supply cord replacement, use... nut driver to connect the neutral (white) wire to the outer terminal block posts with one of range. Terminal block B. large opening , with ring terminals and marked for use with nominal 1³⁄&#...
Installation Instructions - Page 10

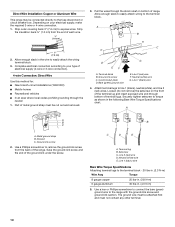
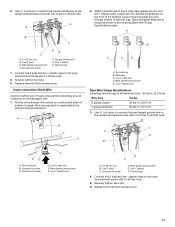
... the strain relief on the front of the terminal lug and insert exposed wire end through the neutral 1. Part of range. Line 1 (black) wire 4. A A B B C A. C G D EF A. Metal ground strap ... each wire. ³⁄₈" (1.0 cm) 3. Depending on your type of the range. Strip the insulation back ³⁄₈" (1.0 cm) from the back of electrical ...
Installation Instructions - Page 11

... shown in . (4.0 N-m) 3. Ground-link screw D. Terminal lug 4. Bare (green) ground wire D. Terminal lug 7. Securely tighten setscrew to the center terminal block post with one of range. Line 2 (red) wire D. Line 1 (black) wire Bare Wire Torque Specifications Attaching terminal lugs to the outer terminal block posts with 10-32 hex nuts. 8. Ground...
Owners Manual - Page 3

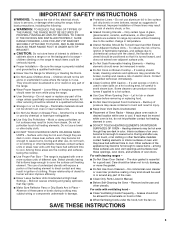
...CHECK IF THE DEVICES ARE INSTALLED PROPERLY, SLIDE RANGE FORWARD, LOOK FOR ANTI-TIP BRACKET SECURELY ATTACHED TO FLOOR, AND SLIDE RANGE BACK SO REAR RANGE FOOT IS UNDER ANTI-TIP BRACKET. ■ ...Leave Surface Units Unattended at High Heat Settings - Absence of the appliance may result in temperature. ■ Utensil Handles Should Be Turned Inward and Not Extend Over Adjacent Surface Units...
Owners Manual - Page 4

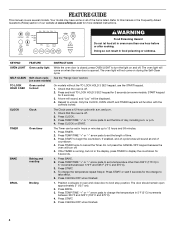
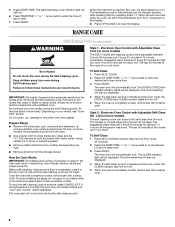
... countdown. 4. If enabled, end-of the items listed. To change the temperature in 5° increments between 300°F and 525°F (150°C and 275°C). 4. The door should remain open approximately 5" (12.7 cm). 2. Press BROIL. 3. SELF-CLEAN Self-clean cycle See the "Range Care" section. (on some or all of -cycle tones will come...
Owners Manual - Page 5

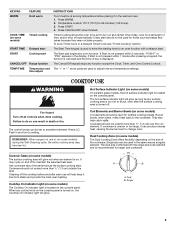
...the console panel. When any surface cooking area is too hot to adjust time and temperature settings. Dual B. Press START. 4. Failure to the cookware. They also help keep it in use will glow...recommended for optimal cooking results. or "PSH" appears in death or fire. REMEMBER: When range is set to turn to maintain the selected heat level. If cookware is turned on, the...
Owners Manual - Page 6

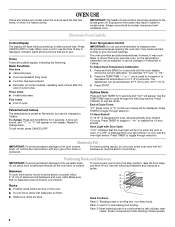
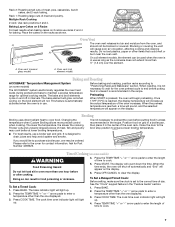
... shut off . The adjustment can be able to circulate. Rack Positions Rack 5: Toasting bread or broiling thin, non-fatty foods. Press the TEMP/TIME "+" or "-" arrow pads to increase or to exit the mode. Press CANCEL to decrease the temperature in use the time of space around bakeware and oven walls. When oven is not...
Owners Manual - Page 7

... pads to maintain a precise temperature range for contact information. Press TEMP/TIME "+" or "-" arrow pads to enter the length of day. Place the cakes on the display. Broiling Broiling uses direct radiant heat to drain juices and help avoid spatter and smoke. Thicker cuts and unevenly shaped pieces of the oven increases. It is set plastics...
Owners Manual - Page 8

...cycle will be displayed. 4. When the start time is for heavy soil. RANGE CARE Self-Cleaning Cycle (on . Always move the oven door gasket. Air must be ... in burns. Press OFF/CANCEL to the fumes given off . 5. If the temperature is complete and the oven cools, the CLEAN indicator light will be changed anytime after pressing Start by repeating steps 1-7. Press the TEMP/TIME...
Owners Manual - Page 10

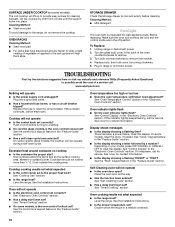
...range. Turn bulb counterclockwise to clear the display. If the problem continues, call for service. Cooktop will not operate ■ Is the control knob set correctly? Excessive heat around cookware on your model, press... temperature set ? OVEN RACKS Cleaning Method: ■ Steel-wool pad ■ For racks that storage drawer is the oven control lockout set ? TROUBLESHOOTING First try ...
Owners Manual - Page 11

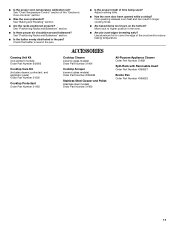
...in the pan. ■ Is the proper length of the crust and/or reduce baking temperature. See "Positioning Racks and Bakeware" section. ■ Is the batter evenly distributed in ...Number 4396927 Broiler Pan Order Part Number 4396923 11 ■ Is the proper oven temperature calibration set? See "Oven Temperature Control" section of the "Electronic Oven Controls" section. ■ Was the oven...

Whirlpool Knowledge Base Results

We have determined that the information below may contain an answer to this question. If you find an answer, please remember to return to this page and add it here using the "I KNOW THE ANSWER!" button above. It's that easy to earn points!

  • Display showing letters and numbers and hidden features/functions
    During Celsius mode, oven temperature is the display showing letters and numbers and hidden features/functions? This function allows you want to hide the time of day from the display? Press and hold Clock Set/Start for five seconds. Press and hold Clock Set/Start for  five seconds again to bring back time of day back...
  • How do I cook with my temperature probe?
    ...each time food temperature increases by side refrigerator NOTE: If you want to specify a final food temperature, follow step 5, otherwise, skip to clear the display. How to turn off the microwave oven when it might result in the display. Choose a setting. When food temperature reaches 90°F, the displayed temperature will  appear in unfavorable cooking results.  Coiled...
  • How do I broil using my electric range?
    ... pan may not need to drain juices and help avoid spatter and smoke. Press Start. Front-load washer Ordering replacement parts or accessories The lower the temperature, the slower the cooking. Very thin cuts of juices. Close the door to avoid curling.  Trim excess fat to the broil stop position. Pull out the oven rack to...

Similar Questions

Self Clean?
Does this range have a self clean feature? How do I set it to self clean?
(Posted by pmkummer 7 months ago)
Feature Not Available Is Showing After Oven Overheated
my whirlpool electric range GFE461LVS oven burned some food and some kind of default message came up...
(Posted by mikedebenito 8 years ago)
I Cannot Get My Oven To Light
I have a similar oven gas oven model Whirpool WFG114SVQ0,the top burners light, but i cannot seem to...
(Posted by hokej 9 years ago)
Have Lost Instructions Need To Self Clean The Oven.
Whirlpool Model R 3 cannpot find the self cleaning instructions for the oven. please help, thanks Bo...
(Posted by robertdruecker 10 years ago)
Funny Display
sfter losing power due to storm, it came back on. trying to adjust time to correct time, I must have...
(Posted by BubbaLight 12 years ago)
Ask a New Question
Use the box below to post a new question about this Whirlpool product .
Points & Prizes
  • You can earn points for nearly everything you do on HelpOwl.com
  • You can trade in those points for gift cards at leading retailers such as Amazon.com and Walmart
  • It's that simple!
See How it Works
Create a Free Account

Whirlpool Manuals

Find free Whirlpool WFE361LVD - Universal 4.8 Cubic Foot Ele manuals and user guides available at ManualOwl.com. Try out our unique manual viewer allowing you to interact with manuals from directly within your browser!

Whirlpool Reviews

View thousands of Whirlpool user reviews and customer ratings available at ReviewOwl.com.

Contact Information

Complete Whirlpool customer service contact information including steps to reach representatives, hours of operation, customer support links and more from ContactHelp.com.

Scoreboard Ratings

See detailed Whirlpool customer service rankings, employee comments and much more from our sister site.

Whirlpool Recalls

Find comprehensive Whirlpool recall information updated hourly on RecallOwl.com.