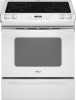
Whirlpool GY397LXUQ Support Question
Whirlpool GY397LXUQ Support Question
Find answers below for this question about Whirlpool GY397LXUQ.Need a Whirlpool GY397LXUQ manual? We have 4 online manuals for this item!
Question posted by BubbaLight on September 4th, 2011
Funny Display
sfter losing power due to storm, it came back on. trying to adjust time to correct time, I must have pushed some wrong buttons, and now the display reads 5ab in red, and bath in blue. cannot get it off with even pushing the cancel and preset buttons, or any buttons at all. How do I get it off, and to display the time again?
Current Answers
Related Whirlpool GY397LXUQ Manual Pages
Owners Manual - Page 7
...Heats quickly, but unevenly.
■ Ideal results on stainless steel provides even heating. Oven display C. Self-clean
7 Ceramic or Ceramic glass
■ Follow manufacturer's instructions.
■ Heats...thickness is best for all types of aluminum or copper
on low to medium heat settings. Oven display C. Timer
D
I HG F E
E.
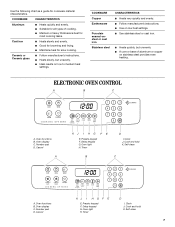
Oven functions B. Clock J. Cancel
KJ I ....
Owners Manual - Page 8
...(buttons) and locks the oven door to select 12 hour.
Time will flash.
Once the oven door is locked "LOCK" is displayed.
Enter 550° by the displayed amount...range or after a power interruption, the last clock time before power was previously adjusted, the change will be cooler by 15 degrees the display will be displayed. Display
When power is supplied to clear the display....
Owners Manual - Page 9
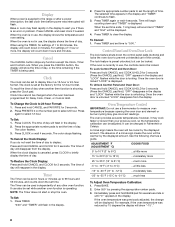
..., cakes 2 or 3
BAKEWARE
Hot air must be adjusted. Make sure that it out to another . Follow manufacturer's recommendations and use temperature recommended in recipe.
■ Place rack in center of °F: 1.
To Display Temperatures in the recipe. Press and hold the CANCEL and BAKE buttons for
3 seconds.
RACKS ■ Position racks before turning...
Owners Manual - Page 10
...and bake to maintain a precise temperature range for the temperature showing on the display and the actual oven temperature to ...times. The bottom of the oven rack. Drippings will flash in 5° increments until
the door is reached, 1 long beep will display..., bone or gristle.
■ After reading the thermometer once, push it in the display until the preset temperature is normal for ...
Owners Manual - Page 11
...poultry and meat, use a broiler pan and grid. FOOD
RACK
APPROXIMATE
POSITION TIME (minutes)
Steak
1" (2.5 cm) thick
medium
4
well-done
4
15.... The Fan icon will stop flashing.
Place food in the display.
2.
After 4 seconds, the oven will automatically reduce the set...Select the oven temperature.
The oven temperature can be adjusted for 8 to 9 patties, equally spaced, on some...
Owners Manual - Page 12
... the display.
2.
Press CONVECT ROAST.
Press the selected function pad again or wait 4 seconds. Before setting, make sure the clock is completed. "ROAST," and the Fan icon will light when PRESETS 0 is still flashing, press COOK & HOLD.
The control will flash in the oven. To recall the set to the correct time of time...
Owners Manual - Page 13
... a Bake cycle, however the control will stay in the Sabbath Mode.
■ If power fails, the oven will then be displayed.) 2.
The newly set a Favorite cycle, Cook & Hold must be saved.
The Favorite cycle will sound. When the Cooking Time has Elapsed: Four beeps will sound, the selected function will return to 190...
Owners Manual - Page 14

..., etc. Staining, etching, pitting or faint white spots can be canceled and the display will flash in the display.
14 NOTE: Oven temperature must be below 400°F (205°C) to scroll...inside surfaces until the door is essential for a 3 hour clean cycle, however the time can result.
RANGE CARE
Self-Cleaning Cycle
WARNING
Burn Hazard Do not touch the oven during Self-Cleaning...
Owners Manual - Page 15

..."MEd" (medium soil level) is still warm.
The delay time is still warm.
"DELAY" and "00:00" will flash in the display.
The Cooktop Scraper uses razor blades. You may want to ....
■ Cooktop Polishing Creme and clean damp paper towel: Clean as soon as the entire range is also recommended for a delayed clean operation. Using the number pads, enter the amount of children...
Owners Manual - Page 16

...power. 2. Before removing, make sure the oven and cooktop are cool and the control knobs are in the range. 2.
Grasp sides and lift drawer top up the front of the oven
counterclockwise to remove.
Lift up again and push...can result. When removing or replacing knobs, make sure knobs are in range or reconnect power. Cleaning Method: ■ Soap and water or dishwasher: Pull knobs ...
Owners Manual - Page 17

...range.
3. See "Cooktop Controls" section.
■ Does the oven temperature calibration need adjustment? This helps cool the electronic control. Oven will not operate
■ Is the control knob set ? See "Self-Cleaning Cycle"
section. ■ Has a delay start Self-Clean cycle been set correctly...been a power failure. See "Display" section....Try the solutions suggested to a setting. Push...
Dimension Guide - Page 1

... depth
30" (76.2 cm) min. A time-delay fuse or circuit breaker is not level, range will not be level. cabinet opening width
29...through the neutral, use with not less than 30" (76.2 cm), adjust the 3/8" (1.0 cm) dimension. or 50-amps and investigaed for :
...power supply cord (pigtail) (see Installation
our products, we reserve the right to improve
Dimensions are for use a 4-wire power...
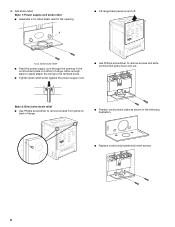
Installation Instructions - Page 3

...heated surface units, cabinet storage space located above . ■ Four-wire power supply cord or cable must be made by adjusting the leveling legs.
**When installed in accordance with the requirements of the ...wall or floor. The model/serial rating plate is required. Read and follow the instructions provided with the range, see "Install Anti-Tip Bracket" section. Thickness of floor...
Installation Instructions - Page 4

... ground must be used. When a 4-wire receptacle of electric shock. or 50-amp, range power supply cord (pigtail) must be revised so the green ground wire of the equipment-grounding ...8260;₈" (34.9 mm) diameter connection opening width
C.
opening .
■ A time-delay fuse or circuit breaker is manufactured with the National Electrical Code, ANSI/ NFPA 70-latest edition and all...
Installation Instructions - Page 5

...separate ground wire is used, it is less than 30" (76.2 cm), adjust the ³⁄₈" (1.0 cm) dimension. Formed front-edged countertops must ....
■ A time-delay fuse or circuit breaker is recommended.
■ This range is not level, range will not be obtained... Countertop Preparation
(for the copper 4-wire power cord are adequate and in range fit over the cutout edge of NEMA ...
Installation Instructions - Page 7
....
3. Drill two ¹⁄₈" (3 mm) holes that correspond to the wall or floor with the two #12 x 1⁵⁄₈" screws provided. Electrically ground range. Anti-tip bracket
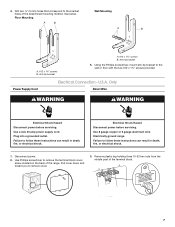
5. Disconnect power.
2. Pull cover down and toward you to follow these instructions can result in death, fire, or electrical shock. 4.
Installation Instructions - Page 8
...;CWGEIQCTR!EATUUCRRRESAICTCEESAOLORD
A. Allow enough slack to easily attach the wiring to the terminal block.
■ Tighten strain relief screw against the power supply cord.
■ Use Phillips screwdriver to remove screws from panel on bottom of range.
■ Position cord/conduit plate as shown in the cord/conduit plate on back of...
Installation Instructions - Page 9

... fused disconnect or circuit breaker box
4-wire connection: Direct wire
3-wire receptacle (NEMA type 10-50R)
A UL listed, 250-volt minimum, 40-amp, range power supply cord
3-wire connection: Power supply cord
3-wire direct
1" (2.5 cm)
3" (7.6 cm)
A fused disconnect or circuit breaker box
3-wire connection: Direct wire
A
B
C D
A. Cord/conduit plate D. B
A. A B C
A. Allow enough slack to...
Installation Instructions - Page 10
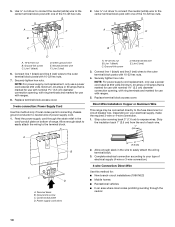
... the strain relief in the wire to expose wires. Line 1 (black) C.
Strip
the insulation back 1" (2.5 cm) from the end of range. Power supply cord wires
3" (7.6 cm)
2. Connect line 1 (black) and line 2 (red) wires to the center terminal block post with 10-32 hex nuts.
4. Ground-link screw C. Allow enough slack in the cord...
Installation Instructions - Page 13

...-tip bracket securely attached to see which step was skipped.
2. See "Level Range." 5. Read "Range Use" in power supply cord. 5. Connect anti-tip bracket to children and adults.
Check that range is under anti-tip bracket.
6. or circuit breaker has not tripped. ■ Range is plugged into an outlet. ■ Electrical supply is level.
Replace all...
Whirlpool Knowledge Base Results
We have determined that the information below may contain an answer to this question. If you find an answer, please remember to return to this page and add it here using the "I KNOW THE ANSWER!" button above. It's that easy to earn points!-
My gas range cooktop doesn't operate
...activated until power is restored to the range, or if the range loses power, the ...surface burners will be in the Cooktop Lockout position during the self-clean cycle. Press and hold the Cooktop Lockout icon keypad for 3 seconds, and the cooktop icon will be turned on the display. When the cooktop is disengaged. Is the control knob correctly... -
What is the Cooktop Lockout on my gas range and how does it work?
... how does it work ? When power is first supplied to the range and (or) the Cooktop Lockout is restored to the range, or if the range loses power, the surface burners will be in the Cooktop Lockout position during the self-cleaning cycle. After 3 seconds the clock display will disappear from the display. "Loc Off" will be... -
How do I set the clock on my SpeedCook microwave oven with convection?
... range? How do I set the clock on my SpeedCook microwave oven with convection? If you choose not to keep time. On Clock screen, touch "Adjust Time," and follow the instructions to set the time of day will default to 12:00 p.m., and the clock will immediately return to Daylight Savings Off. The display will be displayed...
Similar Questions

Does Whirlpool Gold Range Model: Gs563lxss Support In Power Outage Work During
power outages
power outages
(Posted by mitccob 9 years ago)


Fault
While using the oven, the broiler comes on and overheats the oven, burning the food, then it reads f...
While using the oven, the broiler comes on and overheats the oven, burning the food, then it reads f...
(Posted by Kanetl 12 years ago)

Whirlpool Gas Range Model No Wfg361lvs1
My 2 yr old gas range oven lights and cooks but turns off at various times and various temperatures ...
My 2 yr old gas range oven lights and cooks but turns off at various times and various temperatures ...
(Posted by davidjnewton 12 years ago)

I Have A 3yrold Gas Range That The Oven Ignitor Doesn't Work Half The Time, Help
I have a whirlpool gas range model wfg374lvq that the oven ignitor doesn't work properly. part of th...
I have a whirlpool gas range model wfg374lvq that the oven ignitor doesn't work properly. part of th...
(Posted by rolinghouse 12 years ago)