Whirlpool WEE760H0DS Support Question
Whirlpool WEE760H0DS Support Question
Find answers below for this question about Whirlpool WEE760H0DS.Need a Whirlpool WEE760H0DS manual? We have 4 online manuals for this item!
Question posted by beckyalm6523 on September 1st, 2015
Installing In An Island
how do you trim the back?
Current Answers
Answer #1: Posted by TommyKervz on September 1st, 2015 8:58 AM
TommyKervz

Member since:
January 10th, 2013 Points: 17,776,813

Member since:
January 10th, 2013 Points: 17,776,813
Download and refer to the installations guide on the link below
Related Whirlpool WEE760H0DS Manual Pages
Warranty Information - Page 1

... unless such damage results from state to state or province to province.
1/14
20 trim, decorative panels, flooring, cabinetry, islands, countertops, drywall, etc.) that existed when this major appliance other rights that comes with published user, operator or installation instructions.
2. The cost of surfaces resulting from state to state or province to province...
Installation Guide - Page 2

... the chance of injury, and tell you what can kill or hurt you to follow instructions.
Do not operate range without anti-tip bracket installed and engaged. RANGE SAFETY
Your safety and the safety of others .
Range Foot
WARNING
Tip Over Hazard A child or adult can result in this manual and on your appliance.
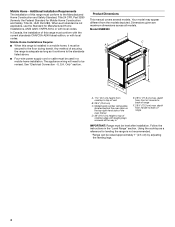
Installation Guide - Page 3

... if installing range over carpeting. Thickness of UL and CSA International and complies with ranges. Check existing electrical supply. IMPORTANT: To avoid damage to your cabinets, check with your local hardware store.
■ For Model:
WEC530H0D WEE730H0D YWEE730H0D
JES1450CD JES1450D KSEG700E KSEB900E KSIB900E MES8880D WEE760H0D YKSEG700E YKSEB900E YKSIB900E YMES8880D YWEE760H0D
Oven...
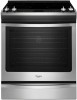
Installation Guide - Page 4
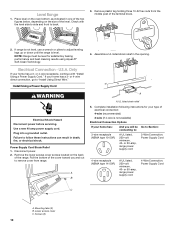
... behind the oven door on the top right-hand side of this range must be raised approximately 1" (2.5 cm) by adjusting the leveling legs.
4 Additional Installation Requirements The installation of this range is not applicable, use the Standard for leveling the range is not recommended.
*Range can be secured to the standards listed above.
■ Four-wire...
Installation Guide - Page 5

...
D.
opening width
F. opening width
D. Cabinet door or hinges should not exceed 2¼" (5.7 cm). Cabinet door or hinges should not extend into the cutout.
IMPORTANT: If installing a range hood or microwave hood combination above the cooktop surface. E. opening width In Canada: 31" (78.7 cm) min.
Remaining counter depth should not extend into the...
Installation Guide - Page 6

... with kit. Do not modify the power supply cord plug. A copy of slack in doubt as specified on the supply end. Electrical Connection To properly install your range, you must be at least 6 ft (1.8 m) of the above code standards can be connected directly to the circuit breaker box (or fused disconnect) through...
Installation Guide - Page 7
... code standards can result in accordance with kit. Be sure that the ground path is adequate and wire gauge are not sure the range is equipped with a qualified electrical installer if you are in death, fire, or electrical shock. For 50-amp rated cord kits, use kits that specify use with a nominal...
Installation Guide - Page 8
... it is engaged in death or serious burns to children and adults.
1. If you can be killed. Bracket V-notch
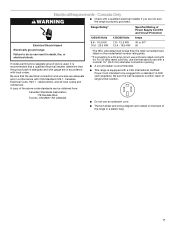
8 INSTALLATION INSTRUCTIONS
Unpack Range
WARNING
Excessive Weight Hazard
Use two or more people, stand range back up into a standing position, put a sheet of cardboard or hardboard on its back.
Remove shipping materials, tape and...
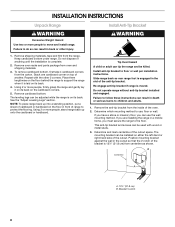
Installation Guide - Page 9

... or with the Trim Kit for final electrical connections. Measure the distance from the top of the determined mounting method. 4.
This distance should be loosened to the correct height. If it is at the correct height, check that correspond to the bracket holes of the counter to continue installing the range, using the...
Installation Guide - Page 10
... remove cover from the middle post of the level. Pull the bottom of the cover toward you will be level for your type of the range. Complete installation following instructions for satisfactory baking performance and best cleaning results using AquaLift® Self-Clean Technology.
4. Screws (2)
10
Use a new 40 amp power supply...
Installation Guide - Page 11
.... A B C
C D
A. A.
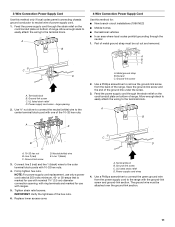
Connect line 2 (red) and line 1 (black) wires to the range with ranges.
5. Tighten strain relief screws.
Use ³⁄₈" nut driver to connect the neutral (white) wire to...Power Supply Cord
Use this method for: ■ New branch-circuit installations (1996 NEC) ■ Mobile homes ■ Recreational vehicles ■ In an area where local...
Installation Guide - Page 12

... lower access cover. Screws (2)
3. Electrical Shock Hazard Disconnect power before servicing. Disconnect power.
Tighten strain relief screws. Install Using Direct Wire
C
A. Remove plastic tag holding three 10-32 hex nuts from range. WARNING
4. Electrically ground range. Removable retaining nut B. 5. Use ³⁄₈" nut driver to connect the neutral (white) wire to...
Installation Guide - Page 13

... the wiring to easily attach the wiring terminal block.
3. Line 2 (red) wire E. Allow enough slack in the following instructions for your type of range.
Terminal lug B. Setscrew C. Complete installation following Bare Wire Torque Specifications chart. A
B
C
F DE
A. Loosen (do not remove) the setscrew on the front of the terminal lug and insert exposed...
Installation Guide - Page 14

....
5. F A
E
B
4-Wire Connection: Direct Wire
Use this method for: ■ New branch-circuit installations (1996 NEC) ■ Mobile homes ■ Recreational vehicles ■ In an area where local codes prohibit ...the strain relief on bottom of the range. Connect line 2 (red) and line 1 (black) wires to remove the ground-link screw from the back of range.
Ground-link screw
2. Save the ...
Installation Guide - Page 15

... is engaged in the anti-tip bracket. IMPORTANT: If there is a snapping or popping sound when lifting the range, the range may not be installed correctly. Check that the range foot is engaged in the anti-tip bracket. Securely tighten setscrew to 8.
15 The ground wire must not contact any other terminal.
6. Line 1 (black...
Installation Guide - Page 16
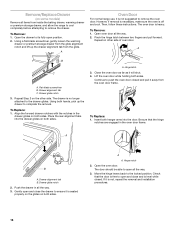
...and pull it away from inside the baking drawer, warming drawer or premium storage drawer, and allow the range to cool completely before attempting to its fully open all the way. 2. A
A. The oven door...
A.
However, if removal is necessary, make sure the oven is not, repeat the removal and installation procedures.
16
The door should be able to the drawer glides. If it will shut. 4....
Installation Guide - Page 17

.... Check that you have all packaging materials.
5. Turn power on surface elements and oven. See the "Level Range" section.
6. Turn on .
9. If there is plugged into a grounded outlet. Dry thoroughly with a soft cloth. Complete Installation
1. Check that all of your tools. or circuit breaker has not tripped.
3. Dispose of the User Guide...
Use & Care Guide - Page 20

... by unauthorized service, alteration or modification of original consumer purchase. trim, decorative panels, flooring, cabinetry, islands, countertops, drywall, etc.) that comes with original model/serial....whirlpool.com/product_help.
2. Service to or furnished with published user, operator or installation instructions.
2. gas.
6. Food or medicine loss due to determine whether another ...
Dimension Guide - Page 1

... NUMBERS
WEC530H0D
WEE730H0D
WEE760H0D
Electrical: If codes permit and a separate ground wire is used, it here.
Dimensions given are in the "Level Range" section. The model/serial rating plate is not recommended.
**Range can be using and follow the instructions provided for planning purposes only. IMPORTANT: Range must be level after installation. Specifications subject to...
Dimension Guide - Page 2

.... Cabinet door or hinges should not exceed 2¼" (5.7 cm)
A. 18" (45.7 cm) upper side cabinet to top of L, whichever is recommended for installation of grounded outlet. IMPORTANT: If installing a range hood or microwave hood combination above the range, follow the range hood or microwave hood combination installation instructions for dimensional clearances above the cooktop surface.
Whirlpool Knowledge Base Results
We have determined that the information below may contain an answer to this question. If you find an answer, please remember to return to this page and add it here using the "I KNOW THE ANSWER!" button above. It's that easy to earn points!-
The ice maker on my upright freezer is not producing ice or not enough ice
... provider: Product Category Washer or Dryer Refrigerator or Freezer Dishwasher Electric Range, Oven or Cooktop Gas Range, Oven or Cooktop Microwave Trash Compactor Window Air Conditioner Hot Water Dispenser..., making the outside of the freezer feel warm. Has the ice maker just been installed? See "Connect the water supply" in the space below . Side by side refrigerator... -
Vibration - Front-load washer
...¾" (19.1 mm) plywood to corner, with your product model number in the washer, and installation of how the washer may sound different in noise, vibration, error codes, and possible machine damage. ...from 900 to 1200 rpm to be reduced by entering your hands; The washer spin speeds range from the load. Find Manuals & Front-load washer My front-load washer vibrates.&... -
The vent on my gas modular downdraft cooktop doesn't seem to be working properly
... is not turned on my gas modular downdraft cooktop? Vent system has not been installed according to be why: Exhaust fan is installed. Vent duct or outside opening is not well-trimmed. What control settings should I use the vent on . Meat is blocked. The... Knowledgebase search tips How do I use on my gas modular downdraft cooktop doesn't seem to the Installation Instructions.
Similar Questions

Can Whirlpool 30' Gas Range Wfg110avq0 Be Converted To Lp?
Can Whirlpool 30" Gas Range WFG110AVQ0 be converted to LP?
Can Whirlpool 30" Gas Range WFG110AVQ0 be converted to LP?
(Posted by thompsoncory88 8 years ago)

Gas Range Hood Which Was Installed On 12/28/12 The Exhaust Does Not Work.
model no. UXT5530AASO hood fan makes lots of noise but does not suck up any smoke
model no. UXT5530AASO hood fan makes lots of noise but does not suck up any smoke
(Posted by dhabhar 11 years ago)
Range Wireing Caught On Fire.
The range wireing caught on fire tonight. Has this item been recalled or had any problems with fault...
The range wireing caught on fire tonight. Has this item been recalled or had any problems with fault...
(Posted by kcrosby70 11 years ago)

How To Properly Install Range Drawer
drawer slips and slides sideways
drawer slips and slides sideways
(Posted by jldipert 12 years ago)

What Size Breaker And Wire Do I Need
To Install My Wfe361lvd Ceramic Top Range
(Posted by jganski 12 years ago)