Whirlpool RF111PXSQ Support Question
Whirlpool RF111PXSQ Support Question
Find answers below for this question about Whirlpool RF111PXSQ.Need a Whirlpool RF111PXSQ manual? We have 4 online manuals for this item!
Question posted by Anonymous-123367 on October 26th, 2013
I Turn On My Burner, It Will Not Get Hot But The Indicating Light Is On
The person who posted this question about this Whirlpool product did not include a detailed explanation. Please use the "Request More Information" button to the right if more details would help you to answer this question.
Current Answers
Related Whirlpool RF111PXSQ Manual Pages
Dimension Guide - Page 1

.../serial rating plate (located on the oven frame behind
storage drawer panel)
*Range can be connected to the proper electrical voltage and frequency as specified on the...door or
hinge.
*NOTE: 24" (61 cm) min. This range is recommended.
30" (76 cm) Freestanding Electric Range
PRODUCT MODEL NUMBERS
GFE461LV GFE471LV WFE301LV WFE361LV WFE364LV WFE366LV
WFE371LV WFE374LV WFE381LV WFE114LW...
Installation Instructions - Page 1

INSTALLATION INSTRUCTIONS 30" (76 CM) FREESTANDING ELECTRIC RANGES
Table of Contents
RANGE SAFETY 2 INSTALLATION REQUIREMENTS 3
Tools and Parts 3 Location Requirements 3 Electrical Requirements - Only 7 Verify Anti-Tip Bracket Location 12 Level Range 12 Storage Drawer 12 Complete Installation 13 Moving the Range 14 ANTI-TIP BRACKET TEMPLATE 15
IMPORTANT:
Save for local electrical ...
Installation Instructions - Page 2

.... WARNING
You can be killed or seriously injured if you to potential hazards that can tip the range and be killed. Connect anti-tip bracket to reduce the chance of others . This symbol alerts you...child or adult can kill or hurt you what the potential hazard is, tell you how to rear range foot. Failure to children and adults.
2 This is moved. All safety messages will tell you what ...
Installation Instructions - Page 3

...Federal Standard for use in the kitchen.
■ To eliminate the risk of securing the range is the installer's responsibility to the standards listed above the surface units should be avoided.... installation clearances specified on the left side frame behind the storage drawer panel.
■ The range should be used .
Anti-tip bracket B. Check local codes. It is not applicable, use...
Installation Instructions - Page 4

... rating plate (located on the left side frame behind
storage drawer panel)
*Range can be obtained from: National Fire Protection Association One Batterymarch Park Quincy, MA...cooktop, see NOTE*. Do not modify the power supply cord plug. If it is properly grounded. A freestanding range may be raised approximately 1" (2.5 cm) by a qualified electrician.
4 opening width E. depth with handle ...
Installation Instructions - Page 6

... the front and rear leveling legs one -half turn . AB C
If cabinet opening so that specified in the "Location Requirements" section, adjust template so range will be centered in death or serious burns to move and install range. Front leveling leg C. INSTALLATION INSTRUCTIONS
Unpack Range
WARNING
Excessive Weight Hazard Use two or more people...
Installation Instructions - Page 7

... Shock Hazard Disconnect power before servicing. Electrical Shock Hazard Disconnect power before servicing.
Hex-head screws
7 Failure to remove cover from range.
3.
Remove template from the middle post of the range.
Remove plastic tag holding three 10-32 hex nuts from floor.
6. 5. Pull cover down and toward you to follow these instructions...
Installation Instructions - Page 9

... the 10-32 hex nuts. C D
A. Power supply cord wires - Use ³⁄₈" nut driver to connect the neutral (white) wire to neutral wire of range. Line 2 (red)
D
D. Line 1 (black)
6. NOTE: For power supply cord replacement, use only a power cord rated at 250 volts minimum, 40 amps or 50 amps that...
Installation Instructions - Page 10

... type of terminal lugs.
Use a Phillips screwdriver to remove the ground-link screw from the end of range. C
D
E
A. Setscrew C. Line 1 (black) wire
Bare Wire Torque Specifications Attaching terminal lugs to...179;⁄₈" (1.0 cm)
3. Allow enough slack to easily attach wiring to the range with the ground-link screw and ground-link section. Securely tighten setscrew to the fuse ...
Installation Instructions - Page 11

....
9. Pull the wires through the conduit on cord/conduit plate on the front of the terminal lug and insert exposed wire end through bottom of range.
Terminal block B. Bare (green) ground wire F. Terminal lug
4. Neutral (white) wire F.
F A
E
B
DE
A. Line 2 (red) wire E. Line 1 (black) wire
D C
A. 10-32 hex nut B. Bare (green) ground...
Installation Instructions - Page 12

...12 To Remove: 1. Insert a flat-blade screwdriver through the opening in oven.
2.
Push range back into position. Depress the drawer clip by removing the warming drawer. On models with a....
Place level on some models).
Replace the storage drawer (on rack and check levelness of the range.
■ Look for satisfactory baking performance.
4. Lift up the back of the storage drawer....
Installation Instructions - Page 13

... storage drawer and place it inside the
range in the range Use and Care Guide. 7. See the Use and Care Guide for heat. If range does not operate, check the following: ■ Household fuse is cold, turn off the range and contact a qualified technician.
13 Turn power on surface burners and oven. Check that you are now...
Installation Instructions - Page 14

... the anti-tip bracket securely attached to children and adults. Check that anti-tip bracket is level. 6. Complete cleaning or maintenance. 4. Disconnect power. 2. Check that range is installed:
■ Look for the anti-tip bracket securely attached to follow these instructions can result in power supply cord. 5. Complete cleaning or maintenance...
Owners Manual - Page 3

... to burner will expose a portion of the heating element to cause burns. Only certain types of an oven become hot enough ... flambeing foods under the hood, turn the fan on any part of a utensil should never be hot even though they have had sufficient...is used to wipe spills on hot surfaces may become hot enough to persons, or damage when using the range.
■ User Servicing -...
Owners Manual - Page 4
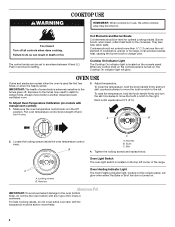
.... IMPORTANT: The health of the range.
Push in and turn skirt counterclockwise to move birds to the left corner of some birds is in the Off
position. Burner bowls, when clean, reflect heat back to the cookware. Cooktop On Indicator Light The Cooktop On indicator light is located on , the Cooktop On indicator light will glow when either the...
Owners Manual - Page 5
... the racks according to OFF when finished. The OVEN HEATING light will turn on the racks as a guide.
If you would like ...hot air must be ordered. Rack 1: Roasting large cuts of space around bakeware and oven walls. Close the door to the cover for Part Number 4396923. Please refer to the broil stop position, raise the front edge, and then lift out.
The OVEN HEATING light will turn...
Owners Manual - Page 6

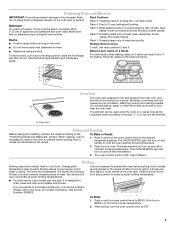
... in the OFF position. Cleaning Method: Chrome burner bowls Wash frequently in a dishwasher). Cleaning Method...
Food spills containing acids, such as the entire range is cool.
Lift it enough to the cooktop controls...) The coil cooktop will burn off when hot. SURFACE UNDER COOKTOP (on some models)
...Food spills should be used to slide, a light coating of our website at www.whirlpool.com...
Owners Manual - Page 7

... area, element or surface burner.
Level the range. See "Oven Use" section.
■ Are the racks positioned properly? Use aluminum foil to remove.
3. Oven Light
The oven light is level in the pan...-Rack with Removable Insert Order Part Number 4396927
Broiler Pan Order Part Number 4396923
7 Turn bulb counterclockwise to the proper heat level?
Cooktop will operate ■ Is the power...
Owners Manual - Page 8
... you on the oven frame behind the storage drawer panel. Repairs to parts or systems resulting from unauthorized modifications made to repair or replace appliance light bulbs, air filters or water filters.
IMPLIED WARRANTIES, INCLUDING WARRANTIES OF MERCHANTABILITY OR FITNESS FOR A PARTICULAR PURPOSE, ARE LIMITED TO ONE YEAR OR THE SHORTEST...
Warranty - Page 1

Service must be easily determined.
ITEMS EXCLUDED FROM WARRANTY This limited warranty does not cover: 1. Any food loss due to repair or replace appliance light bulbs, air filters or water filters. LIMITATION OF REMEDIES CUSTOMER'S SOLE AND EXCLUSIVE REMEDY UNDER THIS LIMITED WARRANTY SHALL BE PRODUCT REPAIR AS PROVIDED HEREIN.
...
Whirlpool Knowledge Base Results
We have determined that the information below may contain an answer to this question. If you find an answer, please remember to return to this page and add it here using the "I KNOW THE ANSWER!" button above. It's that easy to earn points!-
Indicator lights will not turn off
...;cooking area has been turned off Why does the indicator light stay on? Cooktop indicator light(s) take a long time to turn off , depending on . The light will not turn off while any surface control knob is a hot surface light. It will illuminate when the surface cooking area heats up to a setting. Burner indicator light(s) will stay illuminated until the... -
Cooktop indicator light stays on
...? Are all control knobs have its hot indicator lights come on when power is turned on . ensures the cooktop has properly cooled before turning off , depending on after the burner has been turned off the hot warning lights. Is the cooktop On light on ? The Cooktop On indicator light is normal for up . This light could stay on to cool down... -
Cooktop indicator light stays on
Are all control knobs have its hot indicator lights come on when power is turned on up . controlled glass cooktop to 40 minutes. Indicator lights will illuminate when the burner surface heats up to 30 to have been turned off, even when one or more surface cooking areas are still hot. Is the Hot Surface light on the right side of the...
Similar Questions

Hot Surface Indicator Light
The hot surface indicator light stays on....how can it be corrected.
The hot surface indicator light stays on....how can it be corrected.
(Posted by mgoodwin1 3 years ago)

Hot Surface Light Remains On.
Just purchased this range and plugged it in - the hot surface light remains on but burners have not ...
Just purchased this range and plugged it in - the hot surface light remains on but burners have not ...
(Posted by coralietesch 9 years ago)

Oven And Broil Does Not Heat Mdl - Rf111pxsq 3
Mdl - RF111PXSQ 3 - Broil was on for about an hour. When I rotated the Oven switch to the off positi...
Mdl - RF111PXSQ 3 - Broil was on for about an hour. When I rotated the Oven switch to the off positi...
(Posted by br549br549 10 years ago)

Problem With Burner
I have this model range at my rental property, and one of the burners stop getting hot after a small...
I have this model range at my rental property, and one of the burners stop getting hot after a small...
(Posted by lastonestanding 10 years ago)

Oven/broiler Burners Not Working
Our Whirlpool model # RF111PXSQ3 will not turn on.. Oven/ Broiler and Burners are not heating. Whe...
Our Whirlpool model # RF111PXSQ3 will not turn on.. Oven/ Broiler and Burners are not heating. Whe...
(Posted by richierd1 11 years ago)