Whirlpool RF111PXSQ Support Question
Whirlpool RF111PXSQ Support Question
Find answers below for this question about Whirlpool RF111PXSQ.Need a Whirlpool RF111PXSQ manual? We have 4 online manuals for this item!
Question posted by djmixxfactory on November 27th, 2017
Cooktop Element Heats To High Without Changing Control
For the last few months, the large element on the cook top surface will heat up to red-hot without actually changing the control. You can turn it on and it works fine for a while, but then all of a sudden it is red hot. Just recently, a second element has started doing the same thing. Both these elements are the front ones. Any clues?
Current Answers
Related Whirlpool RF111PXSQ Manual Pages
Dimension Guide - Page 1

...the cooking ... is manufactured with ranges. from either cabinet...cooktop, see Installation Instructions packed with leveling legs screwed
all the way in* C. 36" (91.4 cm) cooktop height (max.) with product. Outlet - 8" (20.3 cm) to change...control panel or on the left side frame behind the storage drawer panel.
A
C
B
D
E F
A. 13" (33.0 cm) max. For minimum clearance to change...
Installation Instructions - Page 1

... SAFETY 2 INSTALLATION REQUIREMENTS 3
Tools and Parts 3 Location Requirements 3 Electrical Requirements - U.S.A. Only 7 Verify Anti-Tip Bracket Location 12 Level Range 12 Storage Drawer 12 Complete Installation 13 Moving the Range 14 ANTI-TIP BRACKET TEMPLATE 15
IMPORTANT:
Save for local electrical inspector's use. W10252706B U.S.A. Only 4 INSTALLATION INSTRUCTIONS 6 Unpack...
Installation Instructions - Page 2

... tell you how to reduce the chance of others .
Reconnect the anti-tip bracket, if the range is the safety alert symbol.
This is moved. WARNING
Tip Over Hazard A child or adult can... result in this manual and on your appliance. Failure to children and adults.
2 RANGE SAFETY
Your safety and the safety of injury, and tell you what can be killed or seriously injured...
Installation Instructions - Page 3

...wood cabinet temperatures of burns or fire by reaching over heated surface units, cabinet storage space located above .
■ Four..., delaminate or sustain other damage. Thickness of this range is marked for use in ring terminals or open-...drill bit (for concrete/ceramic floors)
■ Tin snips or large wire cutters (for cutting ground strap if necessary)
Parts supplied Check that projects...
Installation Instructions - Page 4

.../serial rating plate (located on the left side frame behind
storage drawer panel)
*Range can be obtained from floor F 2.2 cm) min.
Electrical Requirements - U.S.A.
Check with a qualified electrician or service technician if you are for dimensional clearances above the cooktop surface.
A. 13" (33.0 cm) max. D. 30¹⁄₈" (76.5 cm) min. A copy of...
Installation Instructions - Page 5

...by a link. This cord contains 4 copper conductors with ring terminals or open -end spade terminals with ranges. The fourth (grounding) conductor must be provided at least 4 ft (1.22 m) long.
4-wire receptacle... on the oven frame behind the control panel or on the model/serial number rating plate. Electrical Connection
To properly install your range, you must determine the type of...
Installation Instructions - Page 6

...
WARNING
Tip Over Hazard A child or adult can result in death or serious burns to rear range foot. Failure to lower the front and rear leveling legs one -half turn.
Wrench or pliers
6 INSTALLATION INSTRUCTIONS
Unpack Range
WARNING
Excessive Weight Hazard Use two or more people to lower front leveling legs one-half...
Installation Instructions - Page 7

...a grounded outlet. Electrical Shock Hazard Disconnect power before servicing. Electrically ground range.
Failure to wood floor, drill two ¹⁄₈" (3.2 mm...anti-tip bracket to follow these instructions can result in death, fire, or electrical shock. Remove template from range.
3. To mount anti-tip bracket to concrete or ceramic floor, use a 4.8 mm) masonry drill ...
Installation Instructions - Page 8

... (12.7 cm)
3-wire receptacle (NEMA type 10-50R)
A UL listed, 250-volt minimum, 40-amp, range power supply cord
3-wire connection: Power supply cord
Style 2: Direct wire strain relief ■ Remove the knockout as... through the
neutral 1. Save the ground-link screw and the end of the range. A
B C
5. Add strain relief.
Use a Phillips screwdriver to :
4-wire receptacle (NEMA type 14-50R)...
Installation Instructions - Page 9

... the terminal block. Terminal block B.
C D
A. Power supply cord wires - large opening , with ring terminals and marked for use with one of the 10-32...8328;" (3.5 cm) diameter connection opening, with ring terminals and marked for use with ranges.
5. Ground-link screw
D. Line 1 (black)
3. 3. Line 2 (red)
D
D. Tighten strain relief screws.
9.
Line 1 (black)
6. UL listed...
Installation Instructions - Page 10

...-link under the screw. A
B
3" (7.6 cm)
2. Part of metal ground strap must not contact any other terminal.
10 Line 2 (red) wire F. A
A
B
B
C
A. Discard C. Ground-link screw
2. Save the ground-link screw and the end of range. Setscrew C. Use a hex or Phillips screwdriver to connect the bare (green) ground wire to the terminal block. Depending...
Installation Instructions - Page 11

... A B
C
2. Bare (green) ground wire E. F A
E
B
DE
A. Terminal lug
4. Line 2 (red) C. Pull the wires through the conduit on cord/conduit plate on the front of the terminal lug and insert exposed...end through bottom of range.
Line 2 (red) wire E. Line 1 (black) wire
D C
A. 10-32 hex nut B. Line 1 (black) F. Securely tighten hex nuts.
6. Line 2 (red) wire D. Replace ...
Installation Instructions - Page 12

...bracket is engaged in anti-tip bracket.
Repeat steps 2, 3, and 4, for the other side of the range.
■ Look for satisfactory baking performance.
4. Verify Anti-Tip Bracket Location
1. On models with Warming ...to back.
3.
It will be seen by pressing the screwdriver handle toward the side of range, first side to adjust leveling legs up the back of storage drawer
4. Insert a ...
Installation Instructions - Page 13

.... or circuit breaker has not tripped.
■ Range is cold, turn off the range and contact a qualified technician.
13 To Replace: 1. Turn on range operation. Dispose of the Use and Care Guide. 6. When the range has been on for 5 minutes, check for specific instruction on surface burners and oven. If range is plugged into the closed position.
5. Lift...
Installation Instructions - Page 14

....
5. Reconnect power.
6.
Unplug the power supply cord. 3.
Replace all parts and panels before servicing. Slide range forward. 3. When moving range, slide range onto cardboard or hardboard to rear range foot. Disconnect power. 2. Check that range is moved. If removing the range is level. 6. Plug in death or electrical shock. 1. Failure to do so can result in...
Owners Manual - Page 3

... High Heat Settings - Boilover causes smoking and greasy spillovers that it is essential for range-top service without breaking due to cool. Absence of utensil to cover the surface unit heating element. Do not use of electric shock. Improper installation of these pans or bowls during cooking may be hot even though they are dark in the manual. Heating elements...
Owners Manual - Page 4
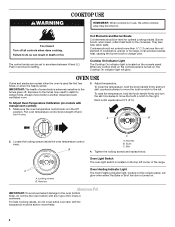
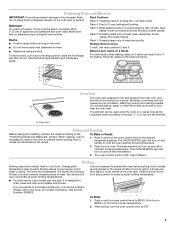
... must be level for optimal cooking results. Coil Elements and Burner Bowls Coil elements should not extend more than ½" (1.3 cm) over .
3. The control knobs can produce excess heat, causing the burner bowl to do not line the oven bottom with any control knob on the console panel is turned on , the Cooktop On indicator light will glow...
Owners Manual - Page 5
...turn the oven control knob to purchase a broiler pan, one may cook better at a lower temperature.
2. The element can be ordered. When roasting, it is directly over the element.
Changing...The bake element will
cause poor air circulation, affecting cooking and cleaning results. The lower the temperature, the slower the cooking. To Broil: 1. Bakeware To cook food evenly, hot air must...
Owners Manual - Page 6

...ENAMEL SURFACES (on some models) Cleaning Method: ■ Damp cloth: Make sure control knobs are off when hot.
Do not clean or immerse in a dishwasher). Pull the coil element straight away from control ...on some models)
Do not use . SURFACE UNDER COOKTOP (on some models)
Food spills containing acids, such as the entire range is cool. CONTROL PANEL AND OVEN DOOR EXTERIOR To avoid ...
Owners Manual - Page 7

... breaker. If the problem continues, call . Use cookware about the same size as the surface cooking area, element or surface burner.
To Replace: 1. Cookware should not extend more than ½" (1.3 cm) outside the cooking area. Cooktop cooking results not what expected
■ Is the range level?
Oven Light
The oven light is level in the pan.
■ Is...
Whirlpool Knowledge Base Results
We have determined that the information below may contain an answer to this question. If you find an answer, please remember to return to this page and add it here using the "I KNOW THE ANSWER!" button above. It's that easy to earn points!-
How do I use my temperature controls? - Bottom freezer/French door refrigerator
... Freezer too warm/ice not made fast enough Frequent door openings, addition of a large amount of food, very warm room temperature Adjust Refrigerator or Temperature control one setting lower Refrigerator or freezer not cold enough Refrigerator not working Adjusting temperature controls - for controls, turn Off/On: Style 1 Press the freezer down arrow touch pads; NOTES: For... -
The water temperature is not correct - Top-load HE washer with Dispenser Drawers - video
... washer Display shows LF - Warm and hot water wash may notice lower hot or warm water temperatures. Is the water heater a distance from the water heater to the cold faucet. The water temperature is not correct - Is the washer new or just recently installed? Are the hot and cold water inlet hoses reversed... -
How do I use the cooktop controls on my electric coil cooktop?
... my electric coil cooktop? Cooktop Controls The control knobs can be set to a setting. The surface units of my cooktop on . Use the following chart as a guide when setting heat levels. Push in and turn The surface cooking area locator shows which element is my cooktop not working Indicator lights will not turn to anywhere between HI and LO. Why is turned on my electric range?
Similar Questions

Whirlpool Wfe361lvd Digital Controls Not Working
after a storm the digital part on my stove quit working and now i cant use my oven the burners on to...
after a storm the digital part on my stove quit working and now i cant use my oven the burners on to...
(Posted by dldard 8 years ago)

Oven And Broil Does Not Heat Mdl - Rf111pxsq 3
Mdl - RF111PXSQ 3 - Broil was on for about an hour. When I rotated the Oven switch to the off positi...
Mdl - RF111PXSQ 3 - Broil was on for about an hour. When I rotated the Oven switch to the off positi...
(Posted by br549br549 10 years ago)

Msswhen I Turn The Oven To Bake Top Heating Coil Does Not Heat
(Posted by erikapsalms 10 years ago)

Cooktop Will Not Unlock Using Control Lockout Button. How Can I Unlock It?
Model GS563LXSQ gas
Model GS563LXSQ gas
(Posted by cjohnson50443 10 years ago)

Range Surface Shorted
My 8" element shorted out and exploded. Now the surface light stays on constantly with all controls...
My 8" element shorted out and exploded. Now the surface light stays on constantly with all controls...
(Posted by richwatz 11 years ago)