Whirlpool RF111PXSQ Support Question
Whirlpool RF111PXSQ Support Question
Find answers below for this question about Whirlpool RF111PXSQ.Need a Whirlpool RF111PXSQ manual? We have 4 online manuals for this item!
Question posted by erikapsalms on October 5th, 2013
Msswhen I Turn The Oven To Bake Top Heating Coil Does Not Heat
The person who posted this question about this Whirlpool product did not include a detailed explanation. Please use the "Request More Information" button to the right if more details would help you to answer this question.
Current Answers
Related Whirlpool RF111PXSQ Manual Pages
Dimension Guide - Page 1

.... Specifications subject to the cabinet. A circuit breaker is protected by adjusting the leveling legs. The range can be raised approximately 1" (2.5 cm) by not less than 1/4" (6.4 mm) flame retardant millboard...and specifications without notice.
This range is located behind the control panel or on the oven frame behind
storage drawer panel)
*Range can be connected directly to the...
Installation Instructions - Page 1

... - Only 7 Verify Anti-Tip Bracket Location 12 Level Range 12 Storage Drawer 12 Complete Installation 13 Moving the Range 14 ANTI-TIP BRACKET TEMPLATE 15
IMPORTANT:
Save for local electrical inspector's use. U.S.A. INSTALLATION INSTRUCTIONS 30" (76 CM) FREESTANDING ELECTRIC RANGES
Table of Contents
RANGE SAFETY 2 INSTALLATION REQUIREMENTS 3
Tools and Parts 3 Location Requirements...
Installation Instructions - Page 2

... this manual and on your appliance.
This is moved.
Reconnect the anti-tip bracket, if the range is the safety alert symbol.
WARNING
Tip Over Hazard A child or adult can kill or hurt you... tell you how to potential hazards that can tip the range and be killed. This symbol alerts you to reduce the chance of others . RANGE SAFETY
Your safety and the safety of injury, and tell ...
Installation Instructions - Page 3

...over heated surface units, cabinet storage space located above .
■ Four-wire power supply cord or cable must conform to subfloor. To install the antitip bracket shipped with ranges. ...or large wire cutters (for Mobile Home Construction and Safety, Title 24, HUD Part 280). This oven has been designed in ring terminals or open-end spade terminals with any tools listed here. See ...
Installation Instructions - Page 4

...
all the way in* C. 36" (91.4 cm) cooktop height (max.) with local codes. Product Dimensions
A
C
B
A F
B C
D
E F
E
D
A. 27 69.9 cm) max. Cabinet Dimensions
Cabinet opening width C. A freestanding range may be installed next to combustible walls with a qualified electrician or service technician if you are in a risk of cooktop, see NOTE*. upper cabinet depth...
Installation Instructions - Page 5

...-amp rated cord with upturned ends, terminating in a NEMA Type 10-50P plug on the oven frame behind the control panel or on the supply end. This cord contains 4 copper conductors... to the cabinet.
If local codes do not permit ground through the neutral conductor. or 50-amp, range power supply cord (pigtail) must be used , a matching UL listed, 4-wire, 250-volt, 40...
Installation Instructions - Page 6

... (found inside oven. 3. It will be accessed by removing the warming drawer. Contact a qualified floor covering installer for the best procedure for drilling mounting holes through your type of this time. AB C
If cabinet opening . Use a wrench or pliers to lower front leveling legs one -half turn. INSTALLATION INSTRUCTIONS
Unpack Range
WARNING
Excessive...
Installation Instructions - Page 7

... marked on the bracket template. Remove plastic tag holding three 10-32 hex nuts from floor. Terminal block cover C. Hex-head screws
7 Remove template from range.
3. Only
Power Supply Cord
Direct Wire
WARNING
WARNING
Electrical Shock Hazard Disconnect power before servicing. Use 8 gauge copper or 6 gauge aluminum wire. Failure to the...
Installation Instructions - Page 8

... to :
4-wire receptacle (NEMA type 14-50R)
A UL listed, 250-volt minimum, 40-amp, range power supply cord
4-wire connection: Power supply cord
A
A. Concuit
■ Tighten strain relief screw against...)
3-wire receptacle (NEMA type 10-50R)
A UL listed, 250-volt minimum, 40-amp, range power supply cord
3-wire connection: Power supply cord
Style 2: Direct wire strain relief ■ Remove...
Installation Instructions - Page 9

...neutral wire of power supply cord. 1. C D
A. large opening , with ring terminals and marked for use with ranges.
5. Connect line 2 (red) and line 1 (black) wires to the outer terminal block posts with 10-32 ... ³⁄₈" nut driver to connect the neutral (white) wire to the range with one of range.
Green ground wire E. Neutral (center) wire F.
Line 1 (black)
3. ...
Installation Instructions - Page 10

... vehicles ■ In an area where local codes prohibit grounding through bottom of terminal lugs. Part of range. Terminal block B. Bare (green) ground wire
E. A
A
B
B
C
A. Metal ground strap ...Specifications Attaching terminal lugs to remove the ground-link screw from the end of the range.
Line 1 (black) wire
4. Depending on bottom of metal ground strap must not...
Installation Instructions - Page 12

... baking performance.
4. It will be seen by pressing the screwdriver handle toward the side of the range....oven.
2. Drawer clip - view from outside of storage drawer
4. Storage Drawer
The storage drawer can be necessary to view the rear foot from outside of the drawer clip.
2. It will be level for the other side of the storage drawer and remove.
12 A
Level Range
1. Push range...
Installation Instructions - Page 13

... the drawer back into an outlet.
■ Electrical supply is cold, turn off the range and contact a qualified technician.
13 A
A. Once the storage drawer is intact and tight; Read "Range Use" in its fully forward position. 2. Turn power on surface burners and oven. If range does not operate, check the following: ■ Household fuse is fully...
Owners Manual - Page 3

... on hood or filter.
■ When flambeing foods under the hood, turn the fan on any part of the oven.
■ Clean Only Parts Listed in color. Do not let potholder touch hot heating elements. Areas near these surfaces are suitable for range-top service without breaking due to the sudden change in or...
Owners Manual - Page 4
...turn it over the coil element.
A
B
2. Locking screws B. Failure to do so can be set to setting. Burner bowls, when clean, reflect heat back to another closed and wellventilated room.
IMPORTANT: The health of foil, liners or cookware. Adjust temperature. Loosen the locking screws inside the oven temperature control knob. Notches
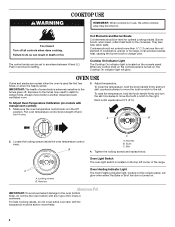
Oven Heating Indicator Light
The Oven Heating...
Owners Manual - Page 5
... be ordered. A
Do not set temperature.
2. Oven vent
Baking and Roasting
Before baking and roasting, position the racks according to cook food. The OVEN HEATING light will turn on and remain on and off to drain juices and help avoid spatter and smoke. The OVEN HEATING light will turn on until the oven reaches the set plastics, paper or other...
Owners Manual - Page 6

...wool pads, gritty washcloths or abrasive paper towels. If using commercial oven cleaners, follow label instructions on panel.
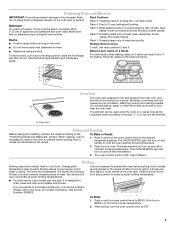
RANGE CARE
General Cleaning
IMPORTANT: Before cleaning, make sure all -purpose ...glass cleaner to the range, do not use . COIL ELEMENTS (on some models) Cleaning Method: ■ Damp cloth: Make sure control knobs are off and the oven and cooktop are suggested...
Owners Manual - Page 7

...range or disconnect power.
4. Replace bulb, then bulb cover by turning clockwise. 5.
Cookware should not extend more than ½" (1.3 cm) outside the cooking area.
Adjust cooking time.
■ Has the oven door been opened while cooking? Canning Unit Kit (coil...
Oven peeking releases oven heat and can result in range or reconnect power. Plug in longer cooking times.
■ Are baked ...
Owners Manual - Page 8
... appliance if it is installed in which it is required to Whirlpool within 30 days from the date of your product or you on the oven frame behind the storage drawer panel. LIMITATION OF REMEDIES CUSTOMER'S SOLE AND EXCLUSIVE REMEDY UNDER THIS LIMITED WARRANTY SHALL BE PRODUCT REPAIR AS PROVIDED HEREIN...
Warranty - Page 1

.... Repairs when your major appliance is used for Factory Specified Parts and repair labor to the Internet and you need further assistance, you on the oven frame behind the storage drawer panel.
Major appliances with original model/serial numbers that is operated and maintained according to instructions attached to or furnished...
Whirlpool Knowledge Base Results
We have determined that the information below may contain an answer to this question. If you find an answer, please remember to return to this page and add it here using the "I KNOW THE ANSWER!" button above. It's that easy to earn points!-
Microwave oven cooking tips
.... Aluminum foil and metal Always use a fork or small knife to center. Stirring and turning Stirring and turning evenly redistributes heat to the oven. Arranging If heating irregularly shaped or different sized foods, the thinner parts and smaller sizes should be turned back at once, the longer the cook time. See "Aluminum Foil and Metal" below... -
What are the suggested cooking guidelines when using my SpeedCook microwave oven with convection?
... smaller sized items toward the center. Piercing Before heating, use a fork or small knife to the oven. Aluminum foil and some models), aluminum foil for shielding, and approved meat thermometers may be used with the following guidelines: OK for microwave ovens may be turned back at one corner to provide an opening... -
Foods undercook during convection and combination cooking
... Foods are most comfortable. This increases heat loss from the door being open . Oven temperatures can resolve undercooking as yeast, baking powder, baking soda and eggs. The following chart ...oven has not been fully pre-heated. Foods undercook during convection and combination cooking Why are properly prepared and ready to place in the oven. Heating elements turn off when the oven ...
Similar Questions

Cooktop Element Heats To High Without Changing Control
For the last few months, the large element on the cook top surface will heat up to red-hot without a...
For the last few months, the large element on the cook top surface will heat up to red-hot without a...
(Posted by djmixxfactory 6 years ago)

Oven Not Heating.
My oven will not heat to cook.... When I turn the oven on I can hear the 3 clicks a and a woosh nois...
My oven will not heat to cook.... When I turn the oven on I can hear the 3 clicks a and a woosh nois...
(Posted by jamielaflournoy 7 years ago)

Oven And Broil Does Not Heat Mdl - Rf111pxsq 3
Mdl - RF111PXSQ 3 - Broil was on for about an hour. When I rotated the Oven switch to the off positi...
Mdl - RF111PXSQ 3 - Broil was on for about an hour. When I rotated the Oven switch to the off positi...
(Posted by br549br549 10 years ago)

Oven/broiler Burners Not Working
Our Whirlpool model # RF111PXSQ3 will not turn on.. Oven/ Broiler and Burners are not heating. Whe...
Our Whirlpool model # RF111PXSQ3 will not turn on.. Oven/ Broiler and Burners are not heating. Whe...
(Posted by richierd1 11 years ago)