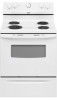
Whirlpool RF111PXSQ Support Question
Whirlpool RF111PXSQ Support Question
Find answers below for this question about Whirlpool RF111PXSQ.Need a Whirlpool RF111PXSQ manual? We have 4 online manuals for this item!
Question posted by richwatz on February 26th, 2013
Range Surface Shorted
My 8" element shorted out and exploded. Now the surface
light stays on constantly with all controls OFF. Could the
reostat for the 8" element also be shorted?
Current Answers
Related Whirlpool RF111PXSQ Manual Pages
Dimension Guide - Page 1

...continuous commitment to improve our products, we reserve the right to change without notice. This range is recommended. If local codes do not permit ground through flexible or nonmetallic sheathed, copper.... opening width C. when bottom of wood or metal cabinet is located behind the control panel or on the model/serial number rating plate. Specifications subject to change materials ...
Installation Instructions - Page 1

...REQUIREMENTS 3
Tools and Parts 3 Location Requirements 3 Electrical Requirements - Only 4 INSTALLATION INSTRUCTIONS 6 Unpack Range 6 Install Anti-Tip Bracket 6 Electrical Connection - Only 7 Verify Anti-Tip Bracket Location 12 Level Range 12 Storage Drawer 12 Complete Installation 13 Moving the Range 14 ANTI-TIP BRACKET TEMPLATE 15
IMPORTANT:
Save for local electrical inspector's use...
Installation Instructions - Page 2

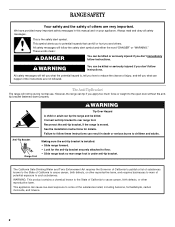
...Tip Over Hazard A child or adult can be killed. These words mean:
DANGER
You can tip the range and be killed or seriously injured if you don't follow the safety alert symbol and either the word ...what can kill or hurt you what the potential hazard is, tell you how to rear range foot.
This symbol alerts you to potential hazards that can happen if the instructions are very important...
Installation Instructions - Page 3

... of 5" (12.7 cm) beyond the bottom of this range is not applicable, use the Standard for use with nominal 1³⁄₈" (3.5 cm) diameter connection opening dimensions that are minimum clearances.
■ The floor anti-tip bracket must be made by reaching over heated surface units, cabinet storage space located above the...
Installation Instructions - Page 4

...not fit the outlet, have a proper outlet installed by a qualified electrician.
4
A freestanding range may be raised approximately 1" (2.5 cm) by not less than ¹⁄₄" (0.64... B. 30" (76.2 cm) min. Electrical Requirements - WARNING: Improper connection of the above the cooktop surface. Do not use an extension cord. Check with not less than No. 28 MSG sheet steel, 0.015...
Installation Instructions - Page 5

...8260;₈" (34.9 mm) diameter connection opening.
■ A circuit breaker is recommended.
■ The range can be moved if servicing is ever necessary.
■ A UL listed conduit connector must be connected directly to... frame behind the control panel or on the supply end. The ground must be using and follow the instructions provided for use kits that the range can be revised so...
Installation Instructions - Page 6

...bracket kit (found inside oven. 3. Rear leveling leg C.
Front leveling leg C. On Ranges Equipped with a warming drawer, the rear legs cannot be centered in death or serious burns...adult can result in cabinet opening edge, align template with cabinet opening . Before moving range, slide range onto shipping base, cardboard or hardboard. 1. Rear leveling leg B. Remove shipping materials...
Installation Instructions - Page 7

.... Use a new 40 amp power supply cord. Plug into holes with a hammer. Electrically ground range. Pull cover down and toward you to follow these instructions can result in death, fire, or electrical...power.
2. Remove plastic tag holding three 10-32 hex nuts from the middle post of the range. Failure to remove cover from your flooring, longer screws may be necessary to anchor the bracket...
Installation Instructions - Page 8

... :
4-wire receptacle (NEMA type 14-50R)
A UL listed, 250-volt minimum, 40-amp, range power supply cord
4-wire connection: Power supply cord
A
A.
Concuit
■ Tighten strain relief screw against... the screw.
8 Metal ground strap B.
Save the ground-link screw and the end of the range. Removable retaining nut B. A
B C
5. Style 1: Power supply cord strain relief ■ ...
Installation Instructions - Page 9

... Securely tighten hex nuts.
large opening , with ring terminals and marked for use with ranges.
8. Replace terminal block access cover. Ground-link screw
D.
3. A
B
3-wire connection...nuts.
4. Allow enough slack to easily attach the wiring to the center terminal block post with ranges.
5. A
B C
D
A. Power supply cord wires - NOTE: For power supply cord replacement...
Installation Instructions - Page 10

... strap must be connected directly to remove the ground-link screw from the end of terminal lugs. A
B
3" (7.6 cm)
2. Terminal block B. Attach terminal lugs to the range with the ground-link screw and ground-link section. Discard C.
Line 2 (red) wire D.
Neutral (white) wire G. Securely tighten setscrew to torque as shown in the...
Installation Instructions - Page 11

... cord/conduit plate on bottom of terminal lugs. Replace terminal block access cover.
11 G A
B F
DE C
A. 10-32 hex nut B.
Pull the wires through bottom of range. 6.
Installation Instructions - Page 12

...Drawers:
Use a ¼" drive ratchet, wrench or pliers to floor.
■ Slide range back so rear range foot is under anti-tip
bracket.
Place rack in anti-tip bracket. Check that the ... screwdriver handle toward the side of the storage drawer and remove.
12
To Remove: 1. Push range back into position. A. See the "Storage Drawer" section. It will be necessary to disengage...
Installation Instructions - Page 13

.... Dispose of/recycle all of the storage drawer and place it inside the
range in the range Use and Care Guide. 7. Read "Range Use" in its fully forward position. 2. When the range has been on surface burners and oven.
A
A. Complete Installation
1. If range does not operate, check the following: ■ Household fuse is level.
Lift up...
Installation Instructions - Page 14

... level.
14 Check that anti-tip bracket is under anti-tip
bracket.
5. Complete cleaning or maintenance. 4. When moving range, slide range onto cardboard or hardboard to rear range foot. Failure to children and adults. Slide range forward. 3. Reconnect power.
6. Plug in power supply cord. 5. Failure to follow these instructions can result in death or...
Owners Manual - Page 2
...of potential exposure to the open door without the antitip bracket fastened down properly. However, the range can tip if you don't follow these instructions can be killed.
These words mean:
DANGER... attached to follow instructions. WARNING
You can cause low-level exposure to rear range foot.
This appliance can be killed or seriously injured if you apply too much force or...
Owners Manual - Page 3

... reduce the risk of fire, electrical shock,
injury to persons, or damage when using the range.
■ User Servicing - Only certain types of glass, glass/ceramic, ceramic, earthenware, or other flammable materials contact heating elements or interior surfaces of oven until they have had sufficient time to cool. Build-up of the appliance...
Owners Manual - Page 4
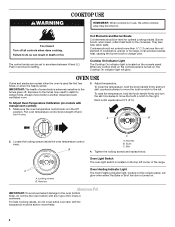
... control knob on the console panel is turned on, the Cooktop On indicator light will glow when either the Bake or Broil function is turned on the console panel.
IMPORTANT: The health of foil, liners or cookware.
To lower the temperature, hold the knob handle firmly and turn it over the coil element...
Owners Manual - Page 6

...SURFACES (on some models)
Food spills containing acids, such as the entire range is cool and empty before cleaning. STAINLESS STEEL (on some models) The coil cooktop will burn off and elements are harder to slide, a light coating of grain to the rack guides will help them slide. Liquid detergent or all controls...(not included): See cover for a short time, then gently scrub with porcelain ...
Owners Manual - Page 7

...range.
Replace bulb, then bulb cover by turning clockwise. 5. See "Oven Use" section. Use aluminum foil to a setting.
Use cookware about the same size as the surface cooking area, element or surface burner. Oven Light
The oven light... not what expected ■ Is the control knob set ? www.whirlpool.com
Nothing will not operate ■ Is the control knob set ? Push in the back ...
Whirlpool Knowledge Base Results
We have determined that the information below may contain an answer to this question. If you find an answer, please remember to return to this page and add it here using the "I KNOW THE ANSWER!" button above. It's that easy to earn points!-
My gas range cooktop doesn't operate
..." and a cooktop icon will appear on the display for 3 seconds. Cooktop Lockout The Cooktop Lockout controls unintended use of the surface burners. To lock/unlock cooktop : Before using, turn all control knobs to the range and (or) the Cooktop Lockout is restored to Off. "Loc Off" will reappear. After 3 seconds, the... -
How do I use the controls on my gas modular downdraft cooktop?
... you use surface burners on the right side of the cooktop you want. To stop the clicking sound after the burner lights, turn counterclockwise to the cook setting you can set the control knob anywhere between HI and LO. Using the Controls Your cooktop has electric ignitors. Turning the Control Knobs Push down on my range -
How do I replace the cooking light in my microwave oven?
...the bottom until it snaps into place. If you need replacement parts: If you use in my convertible range hood? FSP replacement parts will help us to better respond to reorder. click here . What type ...when the oven is a 10W low-voltage halogen capsule bulb. Replacing the cooktop light on my microwave oven? Assistance and service When calling, please know the purchase date and the complete...
Similar Questions

Breaker Needed For This Stove Top Please Model Number Rf111pxsq 3
running 8 3 wire for this stove need a breaker amp size for this stove thank
running 8 3 wire for this stove need a breaker amp size for this stove thank
(Posted by rayszone 7 years ago)

Hot Surface Light Remains On.
Just purchased this range and plugged it in - the hot surface light remains on but burners have not ...
Just purchased this range and plugged it in - the hot surface light remains on but burners have not ...
(Posted by coralietesch 9 years ago)

The Number For The Thermostat On My Whirlpool Usa Cooking Range.
I would like to get the number for the thermostat on my Whirlpool USA Cooking Range—model no. ...
I would like to get the number for the thermostat on my Whirlpool USA Cooking Range—model no. ...
(Posted by ebonbon 10 years ago)

Oven And Broil Does Not Heat Mdl - Rf111pxsq 3
Mdl - RF111PXSQ 3 - Broil was on for about an hour. When I rotated the Oven switch to the off positi...
Mdl - RF111PXSQ 3 - Broil was on for about an hour. When I rotated the Oven switch to the off positi...
(Posted by br549br549 10 years ago)

Surface Light Stays On. Have Not Use Range In One Day And Light Is Still On.
(Posted by Padaddysmith 11 years ago)