
Weider 3550 Support Question
Weider 3550 Support Question
Find answers below for this question about Weider 3550.Need a Weider 3550 manual? We have 1 online manual for this item!
Question posted by JVCAT on May 12th, 2013
I Had To Take My Weider 3550 Apart To Move,.having Trouble Putting Back Togeth
Im having trouble putting my weider 3550 back together,.,.
putting the frame together was not difficult.,.Im having
problems with the pulley system.,If someone has a photo
or picture diagram,.that would be a big help
thanks carlos [email protected]
Current Answers
Related Weider 3550 Manual Pages
User Manual - Page 1
...
CAUTION
Read all precautions and instructions in the space above for future reference. Patent Pending
Visit our website at www.weiderfitness.com
new products, prizes, fitness tips, and much more! WESY38320 Serial No.
TO AVOID DELAYS, PLEASE CALL DIRECT TO OUR TOLLFREE CUSTOMER HOT LINE.
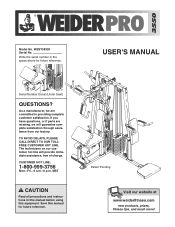
USER'S MANUAL
Serial Number Decal (Under...
User Manual - Page 2

... BEGIN 4 ASSEMBLY 5 ADJUSTMENTS 22 WEIGHT RESISTANCE CHART 24 TROUBLESHOOTING 25 CABLE DIAGRAMS 26 ORDERING REPLACEMENT PARTS Back Cover LIMITED WARRANTY Back Cover Note: A PART IDENTIFICATION CHART and a PART LIST/EXPLODED DRAWING are attached in the center of ICON Health & Fitness, Inc.
2
WEIDER is a registered trademark of this manual. Remove the PART IDENTIFICATION CHART...
User Manual - Page 3
... you are adequately informed of the pulleys.
15. The weight system is designed to tip.
12.
The weights will fall with pre-existing health problems.
Read all instructions before using.... Read all times.
7. The weight system is especially important for home use the weight system in any exercise program, consult your...
User Manual - Page 4
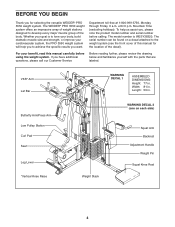
... versatile WEIDER® PRO 3550 weight system. Mountain Time (excluding holidays). For your cardiovascular system, the PRO 3550 weight system will help us...Pulley Station Curl Pad Seat Leg Lever *Vertical Knee Raise
WARNING DECAL 1
ASSEMBLED DIMENSIONS: Height: 77 in.
Department toll-free at 1-800-999-3756, Monday through Friday, 6 a.m. Whether your goal is WESY38320. To help...
User Manual - Page 5
...make the task enjoyable, assembly will attach the cables and pulleys that connect the weight stations to the weight stacks. Important...p.m.
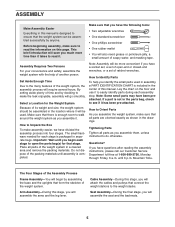
Questions? Mountain Time. The Four Stages of the Assembly Process
Frame Assembly-You will begin each stage to open -end or closed-... needed for each assembly step. How to Identify Parts
To help of ratchet wrenches. How to Orient Parts
As you identify ...
User Manual - Page 6
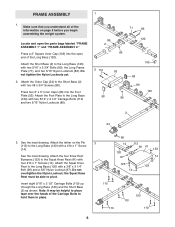
... the Long Base (120) with a 3/8" x 3 1/4" Bolt (96) and a 3/8" Nylon Locknut (87). the Squat Knee Rest must be helpful to place tape over the heads of the information on the Pin (112) to pivot. FRAME ASSEMBLY
1
1. Make sure that you begin assembling the weight system. Locate and open end of the Long Base...
User Manual - Page 7

... Bumper (77)
58
to the Seat Upright with two 5/16" x 3 3/4" Bolts (92), two 5/16" Washers (90), and two 5/16" Nylon Locknuts (86). Attach the Seat Frame (8) to the Butterfly Upright (3) with two 5/16" x 3 3/4" Bolts (92), two 5/16" Washers (90), and two 5/16" Nylon Locknuts (86). Slide the Seat Upright (9) onto the...
User Manual - Page 9
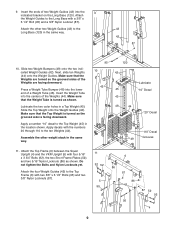
...grooved sides of two Weight Guides (42) into the
9
indicated bracket on the Long Base (120). Attach the Top Frame (6) between the Squat Upright (4) and the VKR Upright (5) with two 3/8" x 6 1/2" Bolts (95) and two... the Long Base with the numbers 20 through 110 to the Top Frame (6) with four 5/16" x 3 3/4" Bolts (92), the two Short Frame Plates (52), and two 5/16" Nylon Locknuts (86) as ...
User Manual - Page 10
...113
21
86 9
21 10
Tab 87
91
18-Lubricate
22
21
14
7
14. Attach the Butterfly Top Frame (7) to the Seat Upright (9) with soapy water. Attach the Eyebolt (22) as shown with grease. Do...98
60
100, Lubricate 70 113 21 29
25 28
27 Wet the Press Handle with grease. Attach the Butterfly Top Frame to the Right Butterfly Arm (26) with two 5/16" x 2 3/4" Bolts (85), two 5/16" Washers (90...
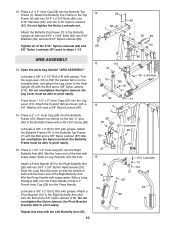
User Manual - Page 11
... and has an eyelet on one end and a threaded bolt on page 26 for help identifying the
19
cables. 16. Do not overtighten the Nylon Jamnut;
Slide 5"
Handgrips (36) onto both sides of the Plastic Washers are fitted over the welded bushing in the Butterfly Arm. Attach the eyelet end of the...
User Manual - Page 12
... one is shown]) from the Offset Double "U"-
20
bracket (61). Then, tighten the Nut against the 1/2" Washer (1).
5
74
118
43
1
23. Attach the Pulley inside of the Butterfly Top Frame with a 3/8" x 2 3/4" Bolt (101), two 3/8" Washers (91), two 1/2" Spacers (89), and a 3/8" Nylon Locknut (87).
23
78 87
91 89
88
12
7
91 101...
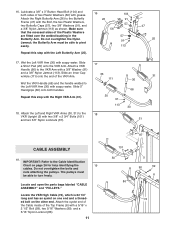
User Manual - Page 13
...Frame (6) with a
5/16" x 1" Shoulder Bolt (103) and a 5/16" Nylon
Locknut (86).
13
86 69
103 70
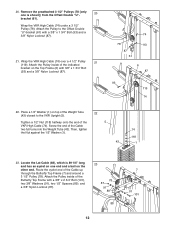
25 Remove the preassembled 3/8" Nylon Locknut (87)
25
and 3/8" x 2" Bolt (100) from the Pulley Plates (63). Wrap the Lat Cable (88) under a 3 1/2" Pulley... and a 3/8" Nylon
Locknut (87). Attach the Cable to hold the Cable in the Pulley Plates (63) with a 5/16" x 2 1/2" Bolt
(59), two 5/16" ...
User Manual - Page 14
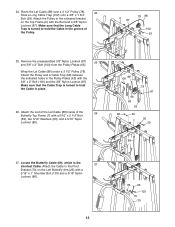
... (3) with a 3/8" x 1 3/4" Bolt (93) and a 3/8" Nylon Locknut (87).
69
78
30.
Attach the Pulley and a Long Cable Trap (102) to the Pivot Bracket
31
(70) on the Butterfly Upright (3)
with a 5/16"...Shoulder Bolt (103) and a 5/16" Nylon Locknut (86).
103 69
26 70
86
14 Attach the Pulley to
the indicated bracket on the Right Butterfly Arm (26) with a 3/8" x 2 1/2" Bolt (18) and ...
User Manual - Page 15
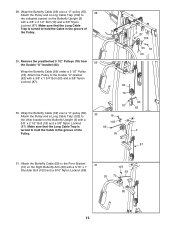
...), two 3/8" Washers (91), two 1/2" Spacers (89), and a 3/8" Nylon Locknut (87) as shown.
34. Wrap the Leg Lever Cable (75) over a 3 1/2" Pulley (78). Route the Leg Lever Cable (75) under a 4 1/2" Pulley (119). Attach the Pulley and a Large Cable Trap (121) to the indicated side of the Seat Upright (9) with a 3/8" x 3 3/4" Bolt (122), a 3/8" Washer (91), and...
User Manual - Page 16

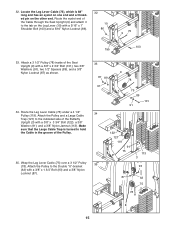
...on the Long Base (120) with a 1/4" Washer (97) and a 1/4" Nylon Locknut (34). Attach a 3 1/2" Pulley (78) to the "U"-bracket (64) with 3/8" x 1 3/4" Bolt (93) and a 3/8" Nylon Locknut (87).
93 120
38. Wrap ...the VKR Low Cable (72) under a 3 1/2"
38
Pulley (78).
36. Locate the VKR Low Cable (72), which is the only remaining cable that has an ...
User Manual - Page 17
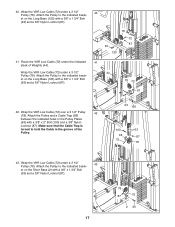
... sure that the Cable Trap is
turned to the indicated brack- Wrap the VKR Low Cable (72) under a 3 1/2"
40
Pulley (78). Wrap the VKR Low Cable (72) under a 3 1/2"
43
Pulley (78). Attach the Pulley to the indicated brack- et on the Long Base (120) with a 3/8" x 2" Bolt (100) and a 3/8" Nylon
Locknut (87). Wrap the...
User Manual - Page 18
... a 3/8" x 3 1/4" Bolt
(96) and a 3/8" Nylon Jamnut (113). Wrap the Squat Cable (73) over a 3 1/2" Pulley (78). 44. Attach the end of the VKR Low Cable (72) inside of
45
the Short Base (2) with a 5/16" x...2 90 59 46
90 59
73
86 90
120
47. Wrap the VKR Low Cable (72) over a 3 1/2" Pulley
47
(78). Attach the eyelet end of the Cable inside of the Long Base (120) with a 5/16" x ...
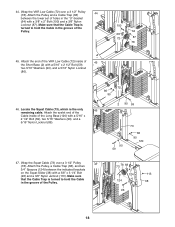
User Manual - Page 22
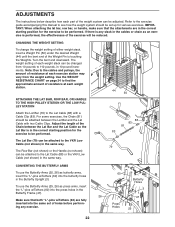
...the weight setting.
Use the WEIGHT RESISTANCE CHART on page 24 to 110 pounds, in the Butterfly Frame (47). Adjust the length of resistance at each weight station. Note: Due to be adjusted.... of holes before performing any slack in the correct starting position for the exercise to the cables and pulleys, the amount of the Chain between the Lat Bar and the Lat Cable with a ...
User Manual - Page 31

...Washer Short Base Butterfly Upright Squat Upright VKR Upright Top Frame Butterfly Top Frame Seat Frame Seat Upright Leg Lever Seat Bracket Curl Frame Backrest Bracket #10 x 1" Screw Butterfly Backrest Seat ...1/4" Square Inner Cap 1/2" Nut 4 1/2" Pulley Long Base Large Cable Trap 3/8" x 3 3/4" Bolt Knee Rest Bumper 3/4" Spacer User's Manual Exercise Guide
Note: "#" indicates a non-illustrated part...
User Manual - Page 33
...; The MODEL NUMBER of the product (WESY38320)
• The NAME of the product (WEIDER® PRO 3550 weight system)
• The SERIAL NUMBER of the product (see the front cover of this... for a period of this manual)
LIMITED WARRANTY
ICON Health & Fitness, Inc. (ICON), warrants this warranty is authorized by ICON.
To help us assist you . All repairs for commercial or rental purposes;
...
Similar Questions

I Had To Take My 8530 Unit Apart Can Figure Out How To Recable It An I Have The
Cant Figure Out How To Re Cable My 8530 Unit Had To Take Apart
Cant Figure Out How To Re Cable My 8530 Unit Had To Take Apart
(Posted by NOVA64YR 6 years ago)

What Did The Weider Pro 3550 Cost New?
I'm trying to sell one that I got in a trade. It is like new.
I'm trying to sell one that I got in a trade. It is like new.
(Posted by leewild 7 years ago)
Height
can someone please tell me how tall this unit is supposed to be when it is fully put together? I bou...
can someone please tell me how tall this unit is supposed to be when it is fully put together? I bou...
(Posted by Kimhiggins22 8 years ago)

What Do You Do When One Cable Is 18 In Too Short?
i bought a pro 4900 from a friend off craigs list. any ways when I got it put together the right wei...
i bought a pro 4900 from a friend off craigs list. any ways when I got it put together the right wei...
(Posted by rudemcnasty1960 9 years ago)

How Do We Put The Bar Together. It Is In 2 Parts?
(Posted by maur17 10 years ago)