Vivitar DVR 528 Support Question
Vivitar DVR 528 Support Question
Find answers below for this question about Vivitar DVR 528.Need a Vivitar DVR 528 manual? We have 2 online manuals for this item!
Question posted by je81581 on January 16th, 2022
How To Use The Zoom To Record
The person who posted this question about this Vivitar product did not include a detailed explanation. Please use the "Request More Information" button to the right if more details would help you to answer this question.
Current Answers
Answer #1: Posted by Kiwii on February 3rd, 2022 8:05 AM
Kiwii

Member since:
January 2nd, 2022 Points: 94,610

Member since:
January 2nd, 2022 Points: 94,610
You can check it out here : https://www.manualslib.com/manual/187454/Vivitar-Dvr-528.html?page=52
Hope it helps! Please don't forget to click "Accept this Answer" button if it was of some help. Thank you!
Related Vivitar DVR 528 Manual Pages
Camera Manual - Page 1

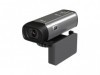
All rights reserved. Windows and the Windows logo are the property of Microsoft Corporation. All other trademarks are registered trademarks of their respective companies. DVR 528 Digital Video Camera
User Manual
© 2010 Sakar International, Inc.
Camera Manual - Page 2

... ...3 Computer System Requirements - Macintosh 4 A Quick Look at your Digital Camera ...5 Initial Camera Setup...6 Using Your Digital Camera ...8 Changing Camera Mode ...9 Navigating the Menus...10 Video Capture Mode ...10 Video Playback Mode...27 Photo Capture Mode ...31 Photo Playback Mode ...50 TV Out Function to Connect the Camera to a TV 55 Installing the Software ...56 Connecting the...
Camera Manual - Page 3

Please read this camera. Everything you for normal use. Note: Your camera needs an SD Memory card (up to 8GB) for purchasing this manual carefully first in order to get the most out of your camera. Introduction
Thank you need to be purchased separately.
What Your Camera Includes
Digital Video Camera Vivitar Experience Image Manager software...
Camera Manual - Page 4

Camera Technical Specifications
Image Sensor
Image Resolution
Video Resolution File Format External Memory LCD Display Lens Focus Range Zoom Exposure White Balance...), 320X240(QVGA) JPEG/AVI SD Card (up to 8GB) 1.5 Inch TFT
F3.0 Fixed Focus 150cm ~ infinity 4X Digital Zoom -3.0EV ~ +3.0EV Auto, Daylight, Cloudy, Incandescent , Fluorescent Auto / Scenery / Portrait / Night Scenery / Night Portrait ...
Camera Manual - Page 9

... set from the Auto Power Off settings menu.
8 Powering the camera ON
Press the Power button
to turn off completely.
The camera will automatically turn your digital camera.
Using Your Digital Camera
Make sure the batteries have been inserted properly into your camera ON. Note: your digital camera also has an Auto Power Off feature that your...
Camera Manual - Page 10

... corner of the LCD display
When in Playback Mode, this mode to capture photos with your camera. Changing Camera Mode
Your camera has three main modes: 1) Video Capture Mode - Use this mode to view the photos and videos you can begin to capture videos with your camera. 3) Playback Mode - Use this mode to capture and enjoy clear quality photos.
Camera Manual - Page 11

... display this icon when selected.
6) At any time you can be in Video Capture Mode by the camera, a selection icon will be remembered by default.
Navigating the Menus
Each camera mode has a set of menus specific to that are single-use functions that mode. Press the MENU button to open the menus for the...
Camera Manual - Page 12

... the top of the LCD indicating that the record is in your camera's Video Capture Mode:
11 1) While in Video Capture Mode use the LCD display on the back of the camera to direct the camera at the scene you would like to capture.
2) Click the Up/Zoom In and Down/Zoom Out buttons on the left of the...
Camera Manual - Page 24

...the right and left navigation buttons. 4) Scroll through the window with your camera in addition to the video record.
1) Press the UP or DOWN direction control buttons to scroll through the... by your previous screen
Audio Menu
The Audio menu allows you to control the camera's ability to record audio in the menu, use the up and down navigation buttons to set the time and date.
5) Press...
Camera Manual - Page 28

...
Video Playback Mode
When you first turn on your camera or to reset your camera settings to the factory default settings. 1) Select the "Default Setting". 2) Press the OK button. 3) You will be asked to confirm your camera until you manually change the setting or restore the camera's default factory settings.
Factory Settings Menu
Use this setting...
Camera Manual - Page 32

... Quick Function buttons:
Left Up Right Down
No Function Zoom In Self-Timer Zoom Out
31 Taking a Picture
1) While in Photo Capture mode, use the LCD display on the back of the camera to direct the camera at the scene you to capture pictures with your digital camera.
Photo Capture Mode
The Photo Capture mode allows...
Camera Manual - Page 51

... the DV/DSC button twice to review and edit photos and videos that the settings have been reset successfully. Factory Settings Menu
Use this menu to view the Firmware version on your camera or to reset your camera settings to the factory default settings.
1) The "Default Setting" is selected. 2) Press the OK button to...
Camera Manual - Page 52

Use the direction buttons to zoom in on a photo on your camera. Zooming In/Out on a Photo Press the Up / Zoom In button to navigate around the photo. Press the Down / Zoom Out button to scroll through the images on your camera's memory card.
Once in the Playback mode, press the LEFT or RIGHT direction buttons to zoom... out on a photo on your camera. Press the MENU...
Camera Manual - Page 53

Rotate Menu
Use this menu to rotate the pictures that you've taken with your camera can be protected or "locked" to prevent any deletion or alteration being made...Press the MENU button to exit the menu and return to your previous mode. Protect/Lock Menu
Pictures and Videos taken with your camera.
1) Press the UP or DOWN direction control buttons to scroll through the menu options. 2) Press the ...
Camera Manual - Page 54

...when viewing that image in the playback mode, you can delete pictures from your camera through the delete menu.
1) Use the LEFT or RIGHT buttons to select the image you would like to delete. ..., select "Delete This Photo" 6) To delete all the images (including all unlocked photos and videos) on your camera's memory card, select
"Delete All Images". 7) Press the OK button to select the desired option....
Camera Manual - Page 56
Use the camera as you would to use your previous mode.
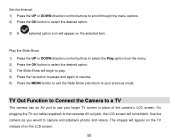
TV Out Function to Connect the Camera to a TV
The camera has an AV port to capture and playback photos and videos. Set the Interval: 1) Press the UP or DOWN direction control buttons ... The images will turns blank. On plugging the TV-out cable (supplied) to the cameras AV out jack, the LCD screen will appear on the TV instead of the...
Camera Manual - Page 57

... to "AV" mode. 3) You will need to set the TV format on the camera to suit the TV format of using and press the OK button. 6) When the camera is set to record mode, you can review all the photos and videos stored in the
SD memory card on the TV. The installation screen should...
Camera Manual - Page 62

..., MySpace, Picasa, Photobucket and YouTube Seamlessly transfer photos and videos from one social network to another Organize your use. If your camera is complete. 10) The photo and video files that you can select to download photos, videos or both. 4) Select your computer. Using the Vivitar Experience Image Manager, you selected are now downloaded...
Camera Manual - Page 63

... USB cable that you copy the images into the Pictures/My Pictures folder and the videos into your computer.
62 Transfer media from my camera to
your computer. Edit images using automatic and manual tools Use automatic "Geotagging" with a list of any files on the application`s Home page. Optionally, select the files...
Camera Manual - Page 64

... copy the images into the Pictures folder and the videos into your camera to heat sources. Then select a folder and choose Paste from my camera to my computer manually (Using Macintosh)
1) Use the USB cable that you camera in wet or moist conditions.
63 Camera Maintenance
The digital camera is a delicate device.
Optionally, select the files and choose...
Similar Questions

Is It Recording?
I just found a Vivitar Versa "spy" cam in my... space. It is plugged in the the cameras micro port a...
I just found a Vivitar Versa "spy" cam in my... space. It is plugged in the the cameras micro port a...
(Posted by melhowell187 1 year ago)

Vivitar 1080 Camera
I was given this camera and I downloaded the app but it is asking for a 6 dig
I was given this camera and I downloaded the app but it is asking for a 6 dig
(Posted by Janchvz64 1 year ago)

Camera Didn't Work.
It doesn't go over from the first screen.Full battery , and normal SD card though.What can I do?
It doesn't go over from the first screen.Full battery , and normal SD card though.What can I do?
(Posted by wnwjddms87 1 year ago)

Vivitar Dvr787-pnk-kit-wm Action Digital Video Recorder, Pink Video Camera With
Vivitar's DVR 787 HD comes on when plugged in and says it has full power but cuts off when you unplu...
Vivitar's DVR 787 HD comes on when plugged in and says it has full power but cuts off when you unplu...
(Posted by jjknott82 8 years ago)