
Toro 20334 Support Question
Toro 20334 Support Question
Find answers below for this question about Toro 20334 - Personal Pace Electric Start Walk Power Mower.Need a Toro 20334 manual? We have 2 online manuals for this item!
Question posted by bigal80 on June 22nd, 2014
How Long Does It Take To Charge A Battery On A 20334 Toro Mower
The person who posted this question about this Toro product did not include a detailed explanation. Please use the "Request More Information" button to the right if more details would help you to answer this question.
Current Answers
Answer #1: Posted by freginold on July 9th, 2014 2:59 AM
freginold

Member since:
December 20th, 2011 Points: 23,253,895

Member since:
December 20th, 2011 Points: 23,253,895
According to the owner's manual, you should let the battery charge for 24 hours.
Related Toro 20334 Manual Pages
Owner's Manual - Page 1
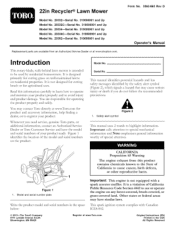
...if you need service, genuine Toro parts, or additional information, contact an Authorized Service Dealer or Toro Customer Service and have similar... Lawn Mower
Form No. 3363-863 Rev D
Model No. 20332mSerial No. 310000001 and Up Model No. 20332CmSerial No. 310000001 and Up Model No. 20334...walk-behind lawn mower is designed primarily for agricultural uses. It is intended to highlight information...
Owner's Manual - Page 2

...grass can amputate hands and feet and throw objects.
of bystanders before starting .
• Do not put hands or feet near drop-offs,...personal injury hazards.
Obey all times.
• Only allow responsible adults, who are a major factor related to observe the following safety instructions could be thrown by the blade.
walk;
never up and down and behind rotary lawn mowers...
Owner's Manual - Page 3
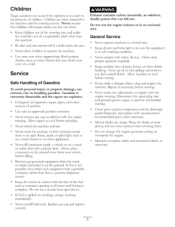
...recommended parts, when necessar):
Mower blades are often attracted to the presence of Gasoline
To avoid personal injury or property damage,...running . Use only an approved gasoline container. Remove gas-powered equipment from your view of grass, leaves, or other ...tamper with a plastic liner. Allow machine to prevent unintended starting .
Never remove gas cap or add fuel with the...
Owner's Manual - Page 4
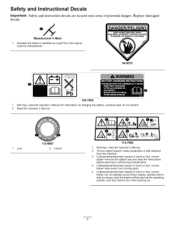
.... Safety and Instructional Decals
Important: decals. Safety and instruction decals are located near areas of hand or foot, mower blade--stay away from moving parts.
5. Lock
112-8867 2. operate side to side on charging the battery; Unlock
114-7982
1. stop the engine before servicing or performing maintenance.
4. Indicates the blade is identified as...
Owner's Manual - Page 5
... the crankcase, then do the following: 1. contact an Authorized
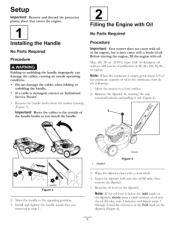
, Remove the handle _obs from the mower housing (Figure 3). Dipstick
Figure 4
, Wipe the dipstick clean with oil.
i
G009550
Figure 3
... when folding or unfolding the handle.
• If a cable is damaged, Service Dealer. Before starting the engine, fill the engine with a clean cloth. 4.
Note: When the crankcase is at ...
Owner's Manual - Page 6

...10 9
Figure 5
G009503
1. Side discharge chute
3. change it yearly thereafter. Side-discharge deflector
models only)
4. Battery charger (electric-start handle
7. Washout port (not shown) 13. Blade control bar 3. Ignition key (electric-start models only Refer to Charging the Battery in the Maintenance
section. Fuel tank cap
11. Important: Do not overfill the crankcase oil...
Owner's Manual - Page 7
...fire or explosion from igniting the gasoline, place the container and/or mower directly on an object.
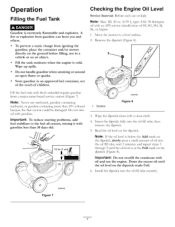
Checking the Engine Oil Level
Service Interval:..., or gasoline containing more than 30 days old. Important: To reduce starting problems, fuel stabilizer to a level surface.
2. Note: If the... sparks. To prevent a static charge from gasoline can burn you and others.
Install the dipstick into the...
Owner's Manual - Page 8
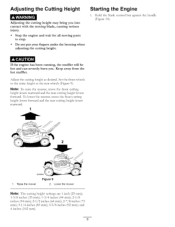
... may bring contact with the moving parts to the same height as desired.
Raise the mower
Figure 9 2. you .
If the engine has been running, the muffler will be ...Stop the engine and wait for all moving blade, causing injury. Keep away from the hot muffler. Starting the Engine
1. Lower the mower
Note: The cutting height settings are 1 inch (25 ram);
1-3/8 inches (35 ram); 1-3/4 ...
Owner's Manual - Page 9

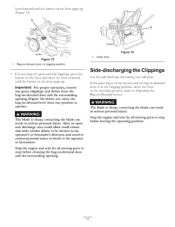
... inches (centimeters) forward to the metal handle and push the mower forward a couple of inches (centimeters). s/
Note: If the mower does not start after self-propelling, stop walking, hold your sides, and the mower will automatically keep pace with you (Figure 13).
1.
You can also try reaching just under the personal pace handle to disengage the wheel drive.
Owner's Manual - Page 10

... the Grass Bag
To remove the bag, reverse the steps above. Important: When you leave the mower (electric-start models only).
If the bag-on the handle (Figure 14).
3.
Bagging the Clippings
Use the ...mower and the bag-on -Demand Lever) before leaving the operating position. If the grass bag is in serious personal injury or death to recycle the grass and leaf clippings back into the lawn...
Owner's Manual - Page 11
...and wait for all moving parts to door
G009582
1.
If the grass bag is on the mower and the bag-on-demand lever is in the bagging position, move the lever rearward
until the...moving stop before cleaning the bag-on -demand another. contacting the blade can result in serious personal injury. Important: For proper operation, remove
any grass clippings and debris from one position to ...
Owner's Manual - Page 12
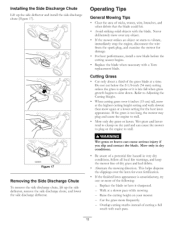
... blade at the highest cutting height setting and walk slower; Refer to clump on your mower. - Wet grass and leaves tend to Adjusting...striking solid objects with a Toro replacement blade. Replace the blade or have it is too long, the mower may plug and cause ... the mower strikes an object or starts to stall.
• Mow only dry grass or leaves. Never deliberately mow over the lawn for ...
Owner's Manual - Page 13
...If there are more than 5 inches (13 cm) of the lawn shows through the cut the leaves finely enough.
13 Cutting Leaves
• After cutting the lawn, ensure that half of leaves on the front wheels one notch lower... than the rear wheels. Set the cutting height on the lawn, set the front wheels at 2-1/8-inch (54 ram) and the rear wheels at 2-1/2 inches (64...
Owner's Manual - Page 14

... personal
the mower .... • Charge the battery for additional maintenance procedures. Disconnect the spark plug wire from under the mower.
• Replace the air filter; tip the mower prior to running... hours (electric-start models only).
• Empty the fuel tank before repairs as directed and before performing any additional yearly maintenance
procedures. Always tip the mower onto its...
Owner's Manual - Page 16

...: When the battery no longer holds a charge, recycle or dispose of California
to cause cancer and reproductive harm. Replacing the Fuse
Electric-start
models only
CALIFORNIA Proposition 65 Warning
Battery
accessories chemicals
posts,
contain known
terminals, and related
lead and lead compounds, to the State of the lead-acid battery according to the mower wire harness located...
Owner's Manual - Page 17
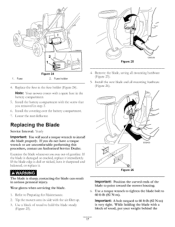
.... 3. If you run out of the blade to point toward the mower housing. , Use a torque wrench to tighten the blade bolt to install
the blade properly. Install the covering over the battery compartment• 7. Install the battery compartment you removed in serious personal injury. Refer to 60 ft-lb (82 N-m) is very tight. Fuse...
Owner's Manual - Page 19

... from the spark plug. 7. Connect the wire to run until you must charge the battery every 90 days (electric-start model only). 2.
contact an Authorized
1. Note: Old fuel in the fuel... area. Charge the battery for 24 hours (electric-start the engine, it in your automobile. Storage
Folding the Handle
Store the mower in a cool, clean, dry place•
Preparing the Mower for Storage...
Owner's Manual - Page 20

...Toro GTS Starting Guarantee
A 3-Year Full Warranty (Not Applicable for Commercial Use)
22 in Recycler ¢
20 in Mulcher/Bagger Walk Power Mowers
Conditions and Products Covered
Items and Conditions Not Covered
The Toro Company and its affiliate, Toro... or if it is used for any Authorized Toro Service Dealer to Start) Power Train**
Battery
Warranty Period 2 - This can no other rights...
Parts Catalog - Page 1

Form No. 3371-850 Rev B
22in Recycler® Lawn Mower
Model No. 20334-Serial No. 312000001 and Up
Parts Catalog
Register at www.Toro.com. Original Instructions (EN)
*3371-850* B
Parts Catalog - Page 10
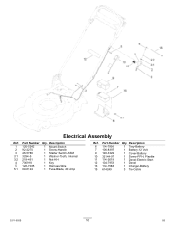
.... Description
6 114-7936
1 Tray-Battery
7 106-8397
1 Battery-12 Volt
9 120-3329
1 Cover-Battery
10 32144-97
1 Screw-PPH, Plastite
11 114-2619
1 Decal-Electric Start
12 104-7953
1 Decal
13 114-1588
1 Charger-Battery
15 614249
3 Tie-Cable
3371-850B
10
D5 Description
1 120-5242
1 Mount-Switch
2 92-2270
1 Screw-Handle
3 46-5780
1 Starter Switch...
Similar Questions

Blue Ignition Push Start Cap On Toro 20334 Electric Start Mower
My husband and I just purchased a Toro 20334 mower and when putting it together the blue ignition ca...
My husband and I just purchased a Toro 20334 mower and when putting it together the blue ignition ca...
(Posted by joders10 9 years ago)

Toro Personal Pace Electric Starter Does Not Engage
(Posted by tejsmigg 9 years ago)

Toro Lawn Mower 20334 Electric Start Won't Start
(Posted by brafran 10 years ago)

Toro 22 Recycler Personal Pace Wont Start
(Posted by chirielibir 10 years ago)

Blade For Model 20037 Personal Pace Lawn Mower
where can i buy a replacement 21 inch bladefor my 2003 Toro model 20037 personal Pace lawn mower???
where can i buy a replacement 21 inch bladefor my 2003 Toro model 20037 personal Pace lawn mower???
(Posted by lynnegrede 12 years ago)