
Toro 20333 Support Question
Toro 20333 Support Question
Find answers below for this question about Toro 20333 - BBC Personal Pace Walk Power Mower.Need a Toro 20333 manual? We have 2 online manuals for this item!
Question posted by reKAR on February 28th, 2014
Toro How To Remove Blade Brake Clutch Shield
The person who posted this question about this Toro product did not include a detailed explanation. Please use the "Request More Information" button to the right if more details would help you to answer this question.
Current Answers
Related Toro 20333 Manual Pages
Operation Manual - Page 1

... spark ignition system complies with a spark arrester muffler. This rotary-blade, walk-behind lawn mower is not designed for cutting brush or for agricultural uses. You ...Toro directly at www.Toro.com. Figure 2 1. The enclosed Engine Owner's Manual is designed primarily for cutting grass on well-maintained lawns on residential properties.
22in Recycler® Lawn Mower
Model No. 20333...
Operation Manual - Page 2
... toward anyone enters the area.
• Do not operate machine barefooted or while wearing sandals. Safety
This lawn mower meets or exceeds the CPSC blade safety requirements for walk-behind rotary lawn mowers and the B71.1 specifications of lawn mower will be ordered through the engine manufacturer. To reduce this class of the American National Standards Institute in...
Operation Manual - Page 3

... devices.
Repair, if necessary, before filling.
• Remove gas-powered equipment from the truck or trailer and refuel it on ... bed with manufacturer's recommended parts, when necessary.
• Mower blades are explosive.
• Extinguish all times until fueling is not...area and under the watchful care of Gasoline
To avoid personal injury or property damage, use a nozzle lock-open...
Operation Manual - Page 4

... object hazard-keep bystanders a safe distance from the original
machine manufacturer.
94-8072
114-7982
1. Lock
112-8867 2. Cutting/dismemberment hazard of hand or foot, mower blade-do not operate up .
108-8117
1. and look behind you when backing up and down slopes; Warning-read the instructions before leaving the operating position...
Operation Manual - Page 5

... knobs from the mower housing (Figure 4). Figure 3
Figure 4
2.
Install and tighten the handle knobs that covers the engine.
1
Installing the Blade Control Bar
No Parts Required
Procedure
Install the blade control bar into the upper handle (Figure 3).
1. Setup
Important: Remove and discard the protective plastic sheet that you install the handle. Move the handle...
Operation Manual - Page 6

...higher.)
3. Cutting height lever (4)
2. Washout port (not shown) 13.
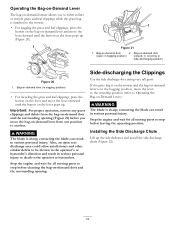
Side discharge chute
6 Remove the dipstick (Figure 5). Blade control bar 3. Bag-on the dipstick (Figure 5). Important: Change the engine oil after adding ...Oil
Product Overview
No Parts Required
Procedure
Your mower does not come with oil in the engine, but it yearly thereafter. Install the dipstick securely....
Operation Manual - Page 7

...Engine Oil Level
Service Interval: Before each use (87 pump octane minimum). Remove the dipstick, wipe it with the moving blade, causing serious injury.
• Stop the engine and wait for automotive ....
• To prevent a static charge from igniting the gasoline, place the container and/or mower directly on the ground before filling, not in an approved fuel container, out of the reach of...
Operation Manual - Page 9
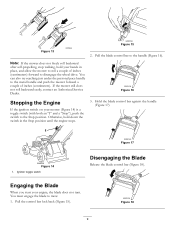
... personal pace handle to the metal handle and push the mower forward a couple of inches (centimeters) forward to disengage the wheel drive. Hold the blade control bar against the handle (Figure 17). Pull the control bar lock back (Figure 15). Figure 18
9 Note: If the mower does not freely roll backward after self-propelling, stop walking...
Operation Manual - Page 10
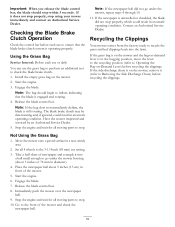
... a paved surface in the bagging position, move the lever to the recycling position (refer to Operating the Bag-on the mower, remove it into the lawn. Go to the front of the mower.
5. Checking the Blade Brake Clutch Operation
Check the control bar before recycling the clippings. Start the engine. 3. If the newspaper is operating properly. Recycling...
Operation Manual - Page 11
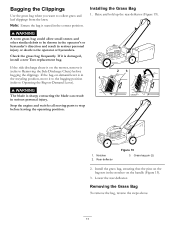
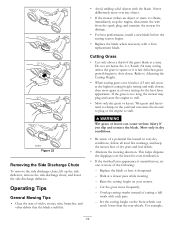
... to be thrown in the operator's or bystander's direction and result in serious personal injury or death to collect grass and leaf clippings from the lawn. Lower the rear deflector. If the side discharge chute is damaged, install a new Toro replacement bag.
Bagging the Clippings
Use the grass bag when you want to...
Operation Manual - Page 12
... surrounding opening .
Bag-on -demand lever is sharp; in serious personal injury. Important: For proper operation, remove any grass clippings and debris from one position to either collect or... opening (Figure 21) before leaving the operating position. in serious personal injury. WARNING
The blade is attached to the mower.
• For bagging the grass and leaf clippings, press the...
Operation Manual - Page 13
...mower for damage.
• For best performance, install a new blade before the cutting season begins.
• Replace the blade when necessary with each pass.
- This helps disperse the clippings over 6 inches (15 cm) tall, mow at a slower pace while mowing.
- Walk...the mower strikes an object or starts to Adjusting the Cutting Height.
• When cutting grass over the lawn for the best lawn ...
Operation Manual - Page 15

... have it sharpened (more frequently in dusty operating conditions. • Clean the blade brake clutch shield.
• Empty the fuel tank before repairs as directed and before performing any additional yearly maintenance
procedures. If you must tip the mower prior to stop.
2. Important: Refer to your engine operator's manual for all moving parts to running...
Operation Manual - Page 17

... in serious personal injury.
Install the stiffener you run out of clarity.
1. Cleaning the Blade Brake Clutch Shield
Service Interval: Every 25 hours
Clean the blade brake clutch shield yearly to prevent the blade from the spark plug. Disconnect the spark plug wire from stalling while you do not have it immediately. Remove the blade (Figure 31). 5. Remove the blade driver and...
Operation Manual - Page 18

... N-m). Install the blade brake clutch shield that you have completed mowing.
1.
For best results, clean the mower soon after you
previously removed. 9. Lower the mower to the grass bag. Note: Wash out the area with the bag-on .
6. Remove the blade brake clutch shield (Figure 31). 7. Install the blade driver and disk that you previously
removed. 10. Install the blade and the stiffener...
Operation Manual - Page 20

...Toro Dealer locator system.
2. cool temperature starts such as filters, fuel,
lubricants, oil changes, spark plugs, air filters blade sharpening or worn blades, cable/linkage adjustments, or brake and clutch...Bagger
Walk Power Mowers
Conditions and Products Covered
The Toro Company and its affiliate, Toro Warranty Company, pursuant to an agreement between them, jointly promise to repair the Toro ...
Parts Catalog - Page 2

..., you receive all parts identified by 6:3. List of Abbreviations
AR: as required ASM: assembly BBC: blade brake control BHTF: button head thread forming CARR: carriage CCW: counter clockwise CW: clockwise DEG: degrees... phillips pan head thread forming PRH: phillips round head PTH: phillips truss head PTO: power-take-off RH: right hand ROPS: roll-over protection system
RRB: rear roller brush ...
Parts Catalog - Page 3

... Door Assembly 4 Rear Bag Assembly 5 Engine and Blade Assembly 6 Front Wheel and Height-of-Cut Assembly 7 Transmission and Rear Wheel Drive Assembly 8 Upper Handle Assembly 9 Upper Handle Component Assembly 10 Attachments and Accessories 11
© 2011-The Toro® Company
Contact us at www.Toro.com.
8111 Lyndale Avenue South Bloomington, MN 55420...
Parts Catalog - Page 6
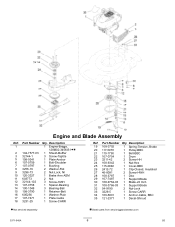
...
1 Spring-Tension, Brake
20 117-5970
1 Pulley-BBC
21 110-1790
1 Belt-BBC
22 107-0754
1 Drum
23 3211-42
2 Screw-HH
24 108-9342
1 Nut-Hex
25 115-2892
1 Cover-BBC
26 2412-72
1 Clip-Closed, Insulated
27 46-8091
2 Screw-HWH
28 108-3787
1 Disc
29 107-7487
1 Support-Blade
30 108-9764...
Parts Catalog - Page 10

Part Number Qty. Description
1 117-5975
1 Switch Housing ASM
2 321-50
1 Screw-HH
3 108-3788-03 1 Bail-Brake
4 115-8439
1 Cable-Brake, BBC
5 3290-337
1 Nut-Speed
6 106-9169 7 107-7462
1 Screw-HWH 1 Spring-Torsion
8 107-7463
1 Spacer
9 106-6802
1 Lever
10 32128-17
1 Nut-Lock, Flange
11 ...
Similar Questions

How Do I Replace The Blade Brake Cable On A 2004 Toro 22 Inch
how do I replace the blade brake cable on a 2004 toro recycler 22 inch. Model 20333, serial # 311016...
how do I replace the blade brake cable on a 2004 toro recycler 22 inch. Model 20333, serial # 311016...
(Posted by silverowl66 8 years ago)

How To Replace Blade Brake Clutch Cable 115-8439 On Toro Lawn Mower
(Posted by Narrmar 9 years ago)

How To Remove Toro 20333 Blade Brake Clutch Shield
(Posted by hadzgeno5 10 years ago)

How To Remove Blade Brake Off Toro Recycler
(Posted by kingwFLe 10 years ago)

How To Replace The Blade Brake Clutch Belt On Recycler Model 22198
Have already replaced the drive belt now trying to put the blade brake clutch belt back on, will not...
Have already replaced the drive belt now trying to put the blade brake clutch belt back on, will not...
(Posted by measter9922 10 years ago)