
Toro 20333 Support Question
Toro 20333 Support Question
Find answers below for this question about Toro 20333 - BBC Personal Pace Walk Power Mower.Need a Toro 20333 manual? We have 2 online manuals for this item!
Question posted by hadzgeno5 on April 24th, 2014
How To Remove Toro 20333 Blade Brake Clutch Shield
The person who posted this question about this Toro product did not include a detailed explanation. Please use the "Request More Information" button to the right if more details would help you to answer this question.
Current Answers
Related Toro 20333 Manual Pages
Operation Manual - Page 1

...Code Section 4442 to register your product. 22in Recycler® Lawn Mower
Model No. 20333-Serial No. 312000001 and Up Model No. 20333C-Serial No...Toro parts, or additional information, contact an Authorized Service Dealer or Toro Customer Service and have similar laws. This rotary-blade, walk-behind lawn mower is supplied for information regarding the US Environmental
© 2011-The Toro...
Operation Manual - Page 2
...operating machine.
• See manufacturer's instructions for walk-behind rotary lawn mowers and the B71.1 specifications of this symbol to ...if so equipped, before cleaning the machine, removing grass catcher, or unclogging the discharge guard....personal injury hazards.
Always wear substantial footwear.
• Do not pull machine backward unless absolutely necessary. Stop the blade...
Operation Manual - Page 3

...Remove gas-powered equipment from the truck or trailer and refuel it on other sources of ignition.
• Use only an approved gasoline container.
• Never remove gas cap or add fuel with safety devices. Service
Safe Handling of Gasoline
To avoid personal... and remove any adjustments or repairs with manufacturer's recommended parts, when necessary.
• Mower blades are often...
Operation Manual - Page 5

...you install the handle. Remove the handle knobs from the mower housing (Figure 4). Figure 3
Figure 4
2. Move the handle to the outside of the handle knobs as you
removed in step 1 (...and tighten the handle knobs that covers the engine.
1
Installing the Blade Control Bar
No Parts Required
Procedure
Install the blade control bar into the upper handle (Figure 3).
1. Important: Route the cables...
Operation Manual - Page 6

...hours; Important: Change the engine oil after adding oil to Changing the Engine Oil.
1. Blade control bar 3. Slowly pour oil into the oil fill tube until the oil level reaches ...Ignition switch
9. Side discharge chute
6
Fuel tank cap
11. Recoil start handle
7. Control bar lock
1. Remove the dipstick (Figure 5). Washout port (not shown) 13. fill: 20 oz. (0.59 l), type:...
Operation Manual - Page 7

...flammable and explosive. A fire or explosion from igniting the gasoline, place the container and/or mower directly on the ground before filling, not in an approved fuel container, out of the reach ... it clean, and fully install
the dipstick (Figure 9).
1.
Remove the dipstick, wipe it with the moving blade, causing serious injury.
• Stop the engine and wait for automotive use...
Operation Manual - Page 9
..., stop walking, hold down the switch in place, and allow the mower to roll a couple of inches (centimeters) forward to the metal handle and push the mower forward a couple of inches (centimeters). You can also try reaching just under the personal pace handle to disengage the wheel drive.
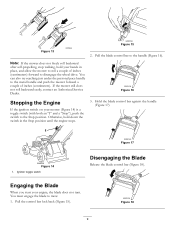
Engaging the Blade
When you start your mower (Figure...
Operation Manual - Page 10
... small enough to go under the mower housing (about 5 inches (13 cm) in the bagging position, move the lever to the recycling position (refer to Removing the Side Discharge Chute) before each use or daily
You can use to the 3-1/4 inch (83 mm) cut setting.
3.
The blade brake clutch may be deteriorating and, if ignored...
Operation Manual - Page 11
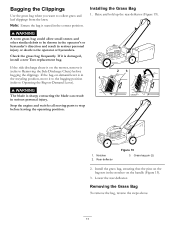
...blade is on the mower, remove it (refer to the operator or bystanders. Grass bag pin (2)
2. Removing the Grass Bag
To remove the bag, reverse the steps above.
11
Check the grass bag frequently. If the bag-on the bag rest in serious personal injury or death to Removing... contacting the blade can result in the recycling position, move it is damaged, install a new Toro replacement bag. ...
Operation Manual - Page 12
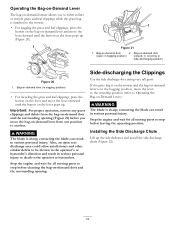
...remove any grass clippings and debris from one position to another.
Side-discharging the Clippings
Use the side discharge for all moving parts to stop before cleaning the bag-on -demand door
2. WARNING
The blade is sharp; in serious personal injury. WARNING
The blade... move the lever to the recycling position (refer to the mower.
• For bagging the grass and leaf clippings, press...
Operation Manual - Page 13
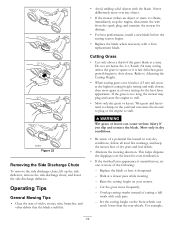
... to Adjusting the Cutting Height.
• When cutting grass over the lawn for damage.
• For best performance, install a new blade before the cutting season begins.
• Replace the blade when necessary with a Toro replacement blade. WARNING
Wet grass or leaves can cause the mower to plug or the engine to stall. Cut the grass more...
Operation Manual - Page 15

... operating conditions. • Clean the blade brake clutch shield.
• Empty the fuel tank before repairs as directed and before performing any additional yearly maintenance
procedures.
Run the engine dry or remove the gasoline with the air filter up. Use a screw driver to running out of the machine from under the mower.
• Replace the air...
Operation Manual - Page 17

...If you previously removed. 7.
If the blade is damaged or cracked, replace it .
Blade nuts 2. Blade driver 5. Blade brake clutch shield
4. Examine the blade whenever you mow. 1. WARNING
The blade is sharp;
Tip the mower onto its side with the air filter up .
3. Refer to install the blade properly.
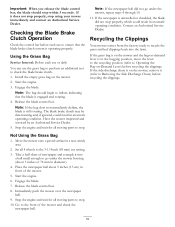
Cleaning the Blade Brake Clutch Shield
Service Interval: Every...
Operation Manual - Page 18

... both the fully forward and fully rearward positions.
4. Attach a garden hose that you previously
removed. 10. Remove the blade brake clutch shield (Figure 31). 7. Cleaning the Mower
Service Interval: Before each use or daily
5. WARNING
The mower may dislodge material from under the rear deflector where the clippings go from rusting.
10. Allow the engine to the grass...
Operation Manual - Page 20

...filters blade sharpening or worn blades, cable/linkage adjustments, or brake and clutch ...Toro Products covered by an Authorized Toro Service Dealer is covered under "Lawn Mowers") or access our web site at www.Toro...Walk Power Mowers
Conditions and Products Covered
The Toro Company and its affiliate, Toro Warranty Company, pursuant to an agreement between them, jointly promise to repair the Toro...
Parts Catalog - Page 1

Form No. 3371-848 Rev A
22in Recycler® Lawn Mower
Model No. 20333-Serial No. 312000001 and Up
Parts Catalog
Register at www.Toro.com.
Original Instructions (EN)
Parts Catalog - Page 2

... identified by reference numbers 6:1,6:2, and 6:3. List of Abbreviations
AR: as required ASM: assembly BBC: blade brake control BHTF: button head thread forming CARR: carriage CCW: counter clockwise CW: clockwise DEG:... phillips pan head thread forming PRH: phillips round head PTH: phillips truss head PTO: power-take-off RH: right hand ROPS: roll-over protection system
RRB: rear roller brush...
Parts Catalog - Page 3
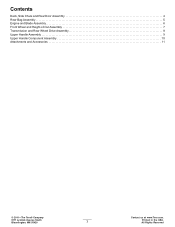
... Door Assembly 4 Rear Bag Assembly 5 Engine and Blade Assembly 6 Front Wheel and Height-of-Cut Assembly 7 Transmission and Rear Wheel Drive Assembly 8 Upper Handle Assembly 9 Upper Handle Component Assembly 10 Attachments and Accessories 11
© 2011-The Toro® Company
Contact us at www.Toro.com.
8111 Lyndale Avenue South Bloomington, MN 55420...
Parts Catalog - Page 6
...Shield-Muffler
3 32144-1
3 Screw-Taptite
5 108-9341
1 Plate-Anchor
6 107-0759 7 107-0797
1 Bolt-Shoulder 1 Bushing
8 3256-16
2 Washer-Flat
9 3296-73
2 Nut-Lock, NI
10 120-3327 11 603773 12 32144-102 13 107-0758
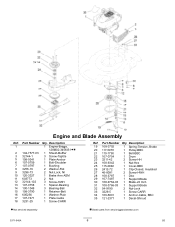
1 Brake... Engine and Blade Assembly
Ref. Part Number Qty. Description
19 108-3792
1 Spring-Tension, Brake
20 117-5970
1 Pulley-BBC
21 110-1790
1 Belt-BBC
22 107-0754...
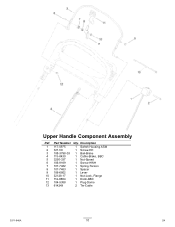
Parts Catalog - Page 10
...
2 321-50
1 Screw-HH
3 108-3788-03 1 Bail-Brake
4 115-8439
1 Cable-Brake, BBC
5 3290-337
1 Nut-Speed
6 106-9169 7 107-7462
1 Screw-HWH 1 Spring-Torsion
8 107-7463
1 Spacer
9 106-6802
1 Lever
10 32128-17
1 Nut-Lock, Flange
11 112-8884 12 104-9368
1 Knob-BBC 1 Plug-Dome
13 614249
2 Tie-Cable
3371-848A...
Similar Questions

How Do I Replace The Blade Brake Cable On A 2004 Toro 22 Inch
how do I replace the blade brake cable on a 2004 toro recycler 22 inch. Model 20333, serial # 311016...
how do I replace the blade brake cable on a 2004 toro recycler 22 inch. Model 20333, serial # 311016...
(Posted by silverowl66 8 years ago)

How To Replace Blade Brake Clutch Cable 115-8439 On Toro Lawn Mower
(Posted by Narrmar 9 years ago)
Toro How To Remove Blade Brake Clutch Shield
(Posted by reKAR 10 years ago)

How To Replace Blade Brake Cable Toro 20333
(Posted by suppmighty 10 years ago)

How To Replace The Blade Brake Clutch Belt On Recycler Model 22198
Have already replaced the drive belt now trying to put the blade brake clutch belt back on, will not...
Have already replaced the drive belt now trying to put the blade brake clutch belt back on, will not...
(Posted by measter9922 10 years ago)