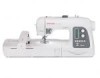
Singer XL-550 Futura Support Question
Singer XL-550 Futura Support Question
Find answers below for this question about Singer XL-550 Futura.Need a Singer XL-550 Futura manual? We have 1 online manual for this item!
Question posted by Coat661 on December 9th, 2021
What Does Error Code 13 Mean And How Do I Get Rid Of It
I'm new to the singer and it says error code 13 just trying to figure out how to get rid of it on my singer Futura XL 550
Current Answers
Answer #1: Posted by Technoprince123 on December 9th, 2021 1:25 AM
Technoprince123

Member since:
February 8th, 2021 Points: 1,205,190

Member since:
February 8th, 2021 Points: 1,205,190
Please response if this answer is acceptable and solw your problem thanks
Answer #2: Posted by SonuKumar on December 9th, 2021 7:44 AM
SonuKumar

Member since:
May 9th, 2021 Points: 16,621,300
Member since:
May 9th, 2021 Points: 16,621,300
https://www.manualslib.com/manual/739440/Singer-Futura-Xl-550.html?page=31
https://www.fixya.com/support/t27057165-singer_futura_xl_550_get_rid_error_code
Please respond to my effort to provide you with the best possible solution by using the "Acceptable Solution" and/or the "Helpful" buttons when the answer has proven to be helpful.
Regards,
Sonu
Your search handyman for all e-support needs!!
Related Singer XL-550 Futura Manual Pages
Instruction Manual - Page 3
...- 115 Helpful messages 116 - 117
For European version
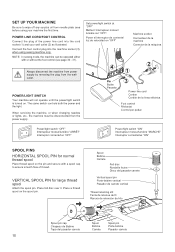
Sewing machine Dimensions: 567 mm × 240 mm × ...YOUR MACHINE Machine identification 6 - 7 Accessories 8 - 9 Set up your machine 10 - 11 Spool pins 10 - 11 Winding bobbin 12 - 13 Threading... stitch Sewing on a button 50 - 51 Buttonholes 52 - 59 Using buttonhole foot, Procedure, Corded buttonholes Buttonholing with FUTURA Multi ...
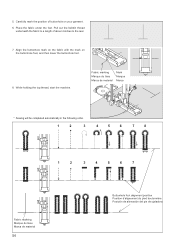
Instruction Manual - Page 6
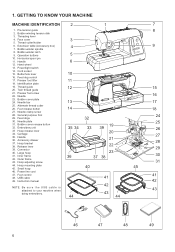
... YOUR MACHINE
MACHINE IDENTIFICATION
2
1
7
1. Face cover
3
5. Extension table (Accessory box)
4
9
7. Horizontal spool pin
11. Hand wheel
13. Presser foot lifter
11
18. Needle bar
13
17
25...: B e s u r e t h e U S B c a b l e i s
attached to your machine when doing embroidery.
43
43
44
44
46
47
48
49
6 Bobbin winder latch 9. Cord socket 15. Hoop mounting plate...
Instruction Manual - Page 8
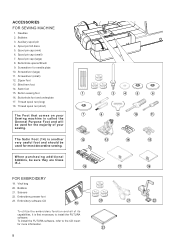
... and all of your
7
Sewing machine is first necessary to the CD insert for most decorative sewing. Bobbins
3. The Satin Foot (14) is another
12
very useful foot and should be
used for needle plate
10. Screwdriver (small)
12. Vinyl bag 20. To install the FUTURA software, refer to install the FUTURA software. Screwdriver (large...
Instruction Manual - Page 10
... before using sewing machine only. Place felt disc over it. Poner el Interruptor de corriente/ luz de velocidad en "OFF"
machine socket Connecteur de la machine Conector de la máquina
4
1
2
Pin Butée Pasador
3
Power line cord Cordon Cordón de la linea eléctrica
Foot control Rhéostat
XL-550-P04-1.Ceonptrsol...
Instruction Manual - Page 22
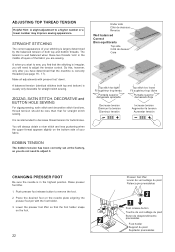
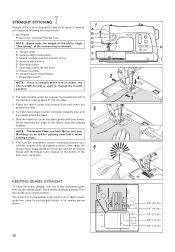
... so that the machine is usually only desirable for straight stitch sewing.
Do this, however, only after you do not need to sew, you find that for straight stitch sewing.
ADJUSTING TOP THREAD... Push presser foot release button to a higher number or a lower number may improve sewing appearance. It is largely determined by the balanced tension of your stitching is recommended to...
Instruction Manual - Page 24
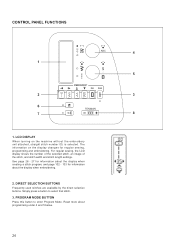
The information on the machine without the embroidery unit attached, straight stitch number 00, is selected. Simply press a button to enter Program Mode. For regular sewing, the LCD display shows the number of the selected stitch, an image of the stitch, and stitch width and stitch length settings. DIRECT SELECTION BUTTONS
...
Instruction Manual - Page 26
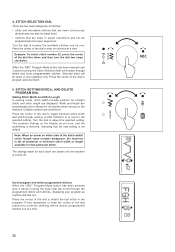
... the dial five times and then turn , and the underlining is removed, indicating that the new setting is turned off.
4. Example: To select stitch number 52, press the center of ...sewn continuously
(buttonholes are saved until the machine is not default. STITCH SETTING/SCROLL AND DELETE PROGRAM DIAL
Setting Stitch Width and Stitch Length In sewing mode, stitch width (needle position for each...
Instruction Manual - Page 28
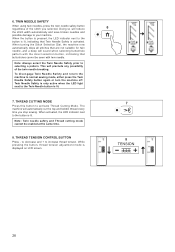
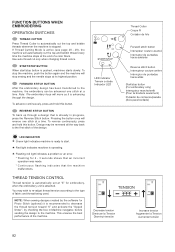
... Always select the Twin Needle Safety prior to normal sewing mode, either press the Twin Needle Safety button again or turn the machine off. Twin Needle Safety is only active when the ...width automatically and save broken needles and possible damage to the button is activated. The machine will sound when selecting buttonhole pattern with twin needle. THREAD TENSION CONTROL BUTTON
Press - ...
Instruction Manual - Page 30
...lamp lit.
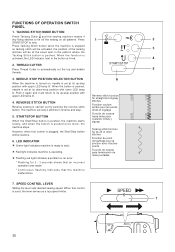
4. REVERSE STITCH BUTTON
Reverse sewing is lit red.
4
2. TACKING STITCH MODE BUTTON
Press Tacking Stitch and the sewing machine makes 4
tiny fixing stitches to the... machine is operating.
Flashing red light indicates a problem or an error. * Flashing for 2 - 3 seconds shows that an incorrect operation was made. * Continuous flashing indicates that the machine ...
Instruction Manual - Page 36
... button F. Presser foot lifter H. Start/stop the sewing machine. General Purpose Foot
NOTE: Based upon the weight of the fabric, slight "fine tuning" of sewing. Needle up/down position selector button D. Power/light...on the bobbin cover plate is used for piecing quilt blocks or for sewing narrow seams.
36
3/4" (19 mm) 5/8" (16 mm) 1/2" (13 mm) 3/8" ( 9 mm) 1/4" ( 6 mm) Draw the fabric...
Instruction Manual - Page 38
... thread tension toward 6 or higher until the foot control is designed to sew.
Press the foot control and the machine will sew 4 stitches in reverse and then 4 stitches in reverse and continue to right...stitch is released.
2. Press the reverse button and the machine will sew 4 stitches forward and then 4 stitches in forward and stop.
38
Thread bobbin with the Stitch...
Instruction Manual - Page 54
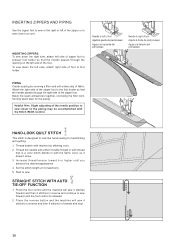
... fabric with the mark on your garment. 6. While holding the top thread, start the machine. Pull out the bobbin thread
underneath the fabric to the rear.
7.
Fabric marking Marque du tissu Marca de material
mark Marque Marca
* Sewing will be completed automatically in the following order.
1
2
3
4
5
6
7
8
1
2
3
4
5
6
7
Fabric marking Marque du tissu Marca...
Instruction Manual - Page 58
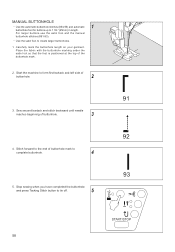
... with the buttonhole marking under the satin foot so that the foot is positioned at the top of buttonhole.
3
4. Start the machine to tie off.
5
91 92 93
58 Stop sewing when you have completed the buttonhole
and press Tacking Stitch button to form first bartack and left side of buttonhole mark...
Instruction Manual - Page 62

MORE SEWING EXAMPLES
See examples to the right for more examples on how to use the decorative stitches.
29
30 13 20 17 29 26 19
23
62
Instruction Manual - Page 80
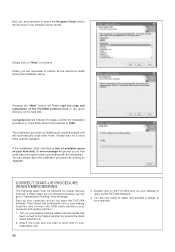
... been moved to the highest position by clicking on "Next" to your hard disk, an error message will automatically close after finish. Double click on the FUTURA Icon on your computer and sewing machine.
1. A progress bar will get a "Transmission Pending" error message. The installation procedure is .
Turn on your desktop to work with the installation...
Instruction Manual - Page 82
... when the embroidery unit is pushed, machines starts slowly.
Pressing the button once will move as it is operating.
Flashing red light indicates a problem or an error. * Flashing for 2 - 3 ...THREAD TENSION CONTROL
Thread tension is already in Machine navigator, before sending the design to the type of the design. NOTE: When sewing designs created by checking the box in progress...
Instruction Manual - Page 108
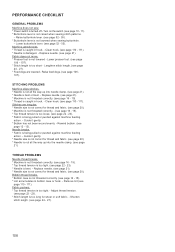
...case is damaged. - Fabric puckers. * Top thread tension is turned off.- PERFORMANCE CHECKLIST
GENERAL PROBLEMS Machine does not sew. * Power switch is too tight. - Turn on the switch. (see page 14 - 15). ... page 106 -
107). Lengthen stitch length. (see
page 12 - 13). Guide it gently. * Bobbin has not been wound evenly. - Machine jams/knocks. * Thread is not all the way up into needle ...
Instruction Manual - Page 110
... to its highest position and put
6
and slide the needle plate into position as illustrated for sewing machine lubrication.
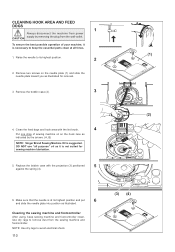
5. CLEANING HOOK AREA AND FEED DOGS
1
Always disconnect the machine from power CAUTION supply by the arrows. (A, B)
NOTE: Singer Brand Sewing Machine Oil is suggested. Raise the needle to avoid electrical shock.
110
(3) (4) Use dry rags to...
Instruction Manual - Page 112
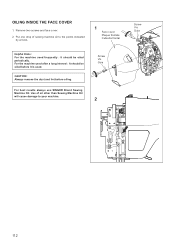
... dust and lint before it is used frequently : It should be oiled periodically.
For the machine used after a long interval : It should be oiled before oiling.
For best results always use SINGER Brand Sewing Machine Oil.
Use of sewing machine oil to your machine. Screw Vis Guia
2
Screw Vis Guia
112 Remove two screws and face cover. 2.
Instruction Manual - Page 120
...sewing machine only for use as threading needle, changing
needle, threading bobbin, or changing presser foot, etc." 18. "To disconnect, turn switch to avoid injury:
- To unplug, grasp the plug, not the cord." 13...been given supervision or instruction concerning use of The Singer Company Limited or its affiliates. ©2010 The Singer Company Limited or its intended use by persons (...
Similar Questions

The Usb Cable Hooked Up To The Sewing Machine From The Computer Keeps Saying The
(Posted by Loltmanmurphy 8 months ago)

How Do I Clear E7 Error Code On Singer Fashion Mate Model 7256 Sewing Machine
(Posted by cathyhowden1 2 years ago)


Error 6
Machine starts perfectly and all seems ok until I try to thread or sew. As soon as needle goes down ...
Machine starts perfectly and all seems ok until I try to thread or sew. As soon as needle goes down ...
(Posted by jodykey1 10 years ago)

What Dies E7 Mean Of Sewing Machine Model 7256
(Posted by smtopliffe 10 years ago)