Singer XL-550 Futura Support Question
Singer XL-550 Futura Support Question
Find answers below for this question about Singer XL-550 Futura.Need a Singer XL-550 Futura manual? We have 1 online manual for this item!
Question posted by twonycott on October 5th, 2014
Please Please Tell Me What E5 Is And How To Fix It. Machine Model In 5500.
thanks
Current Answers
Answer #1: Posted by TechSupport101 on October 5th, 2014 4:56 PM
TechSupport101

Member since:
May 24th, 2013 Points: 12,171,325

Member since:
May 24th, 2013 Points: 12,171,325
Hi. Download and reference to the machine's Instruction Manual here for the best account and approach for the E5 error code.
Related Singer XL-550 Futura Manual Pages
Instruction Manual - Page 3
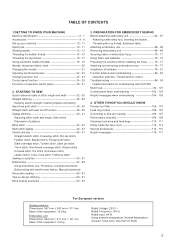
... Converting to -sew fabrics, Manual buttonhole Decorative sewing 60 - 61 Tips on a button 50 - 51 Buttonholes 52 - 59 Using buttonhole foot, Procedure, Corded buttonholes Buttonholing with FUTURA Multi hoop 94...cover 112 - 113 Special accessories 114 - 115 Helpful messages 116 - 117
For European version
Sewing machine Dimensions: 567 mm × 240 mm × 317 mm Mass of the equipment: ...
Instruction Manual - Page 8
... and all of your
7
Sewing machine is called the
General Purpose Foot and will
be used for the majority of its capabilities, it is another
12
very useful foot and should be sure they are Class I5 J.
16
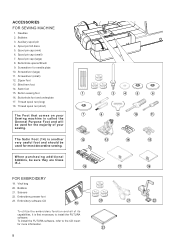
FOR EMBROIDERY
19. To install the FUTURA software, refer to install the FUTURA software. Needles
2. Bobbins...
Instruction Manual - Page 10
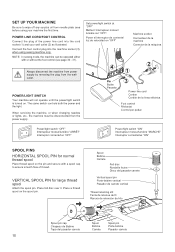
...machine socket Connecteur de la machine Conector de la máquina
4
1
2
Pin Butée Pasador
3
Power line cord Cordon Cordón de la linea eléctrica
Foot control Rhéostat
XL-550...the machine socket (3), when using your wall outlet (2) as illustrated. Always disconnect the machine from power supply by removing the plug from needle plate area before using sewing machine only...
Instruction Manual - Page 22
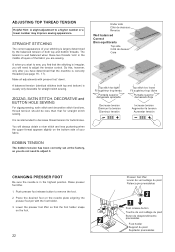
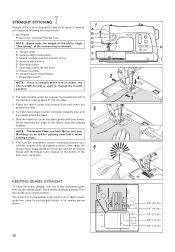
...number or a lower number may improve sewing appearance. Lower the presser foot lifter so that the machine is usually only desirable for straight stitch sewing. STRAIGHT STITCHING
The correct appearance of the... to adjust it. If, when you start to decrease thread tension for straight stitch sewing.
Under side Côté de dessous Reverso
Well balanced Correct Bien equilibrada
Top side...
Instruction Manual - Page 24
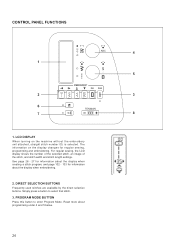
...machine without the embroidery unit attached, straight stitch number 00, is selected. Read more about the display when embroidering.
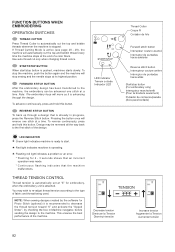
2. LCD DISPLAY
When turning on the display changes for information about programming under 4 and 5 below.
24 For regular sewing... program, and page 102 - 103 for regular sewing, programming and embroidering. DIRECT SELECTION BUTTONS
Frequently used...
Instruction Manual - Page 26
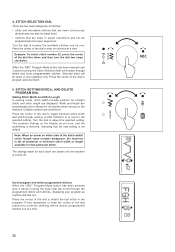
... are saved until the machine is set to default for that are displayed.
STITCH SETTING/SCROLL AND DELETE PROGRAM DIAL
Setting Stitch Width and Stitch Length In sewing mode, stitch width (needle... at maximum or minimum stitch width or length available for all stitches when turning on the machine. Default numbers are automatically set at a time.
26
Example: To select stitch number 52...
Instruction Manual - Page 28
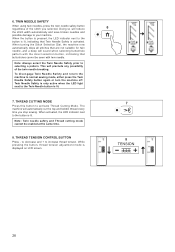
... to decrease and + to selecting a pattern. Twin Needle Safety is only active when the LED light next to your machine. Doing so will preclude any possibility of the stitch you stop sewing. When the button is pressed, the LED indicator next to the button is lit.
7. When activated, the LED indicator next...
Instruction Manual - Page 30
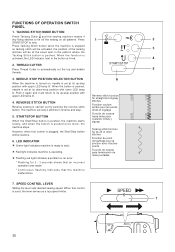
... be at its up -stop .
5.
SPEED CONTROL LEVER
Sliding the lever sets desired sewing speed. TACKING STITCH MODE BUTTON
Press Tacking Stitch and the sewing machine makes 4
tiny fixing stitches to the button is pushed once more, the machine stops. REVERSE STITCH BUTTON
Reverse sewing is used, the lever serves as a top speed limiter.
7
30 The...
Instruction Manual - Page 36
... line, used for guiding your hands. Feed dog control (at its highest position, then raise the presser foot. Thread tension control button I
4
2. Start/stop the sewing machine. Presser foot lifter H. Power/light switch
F G
2
NOTE: Since a straight stitch has no width, the stitch width control is in its center position. Pull both Metric...
Instruction Manual - Page 38
..., so it doesn't show.
3. Set the stitich length at 4 (maximum).
5. Thread bobbin with thread that is released.
2. Press the reverse button and the machine will sew 4 stitches forward and then 4 stitches in reverse and continue to sew forward until you achieve the desired appearance.
4. Helpful Hint: Slight adjusting of the needle position to...
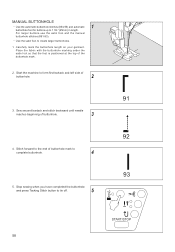
Instruction Manual - Page 54
...rear.
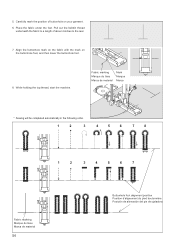
7. Align the buttonhole mark on the fabric with the mark on your garment. 6.
Fabric marking Marque du tissu Marca de material
mark Marque Marca
* Sewing will be completed automatically in the following order.
1
2
3
4
5
6
7
8
1
2
3
4
5
6
7
Fabric marking Marque du tissu Marca....
8. Place the fabric under the foot. While holding the top thread, start the machine.
Instruction Manual - Page 58
...foot is positioned at the top of buttonhole.
3
4. Carefully mark the buttonhole length on your garment. Sew second bartack and stitch backward until needle
reaches beginning of the buttonhole mark.
2. For larger buttons use ... left side of buttonhole mark to
complete buttonhole.
4
5. Start the machine to create larger buttonholes.
1. Stitch forward to the end of
buttonhole.
2
3.
Instruction Manual - Page 64
...drive lever is required for embroidering, so
be sure to turn off power to machine CAUTION before changing presser foot.
* Raise presser foot lifter.
Needle clamp Serre... (toward you ) until the needle is in its highest position.
1.
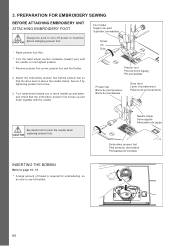
PREPARATION FOR EMBROIDERY SEWING
BEFORE ATTACHING EMBROIDERY UNIT ATTACHING EMBROIDERY FOOT
Foot holder Support du pied Sujetador prensatelas
Always be ...
Instruction Manual - Page 68
...CAUTION damage to open.
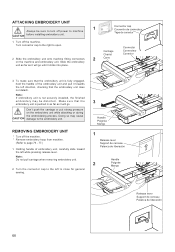
Don't push the carriage or put strong pressure on the machine and embroidery unit.
Turn the connector cap to the left while pressing release lever...during the embroidering process.
REMOVING EMBROIDERY UNIT
* Turn off the machine. * Remove embroidery hoop from machine.
(Refer to close for general sewing.
3
Handle Poignée Mango
1
Release lever Support de ...
Instruction Manual - Page 80
... be stored.
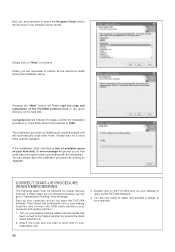
Turn on "Next" to the highest position by clicking on your desktop to open the FUTURA software. Now you are prompted to your sewing machine and connect the USB cable between your computer and sewing machine.
1. A progress bar will indicate the stage at which the installation procedure is finalizing all required actions and...
Instruction Manual - Page 82
.... REVERSE STITCH BUTTON To back up through the design. LED indicator Témoin a diode Indicador LED
LED INDICATOR Green light indicates machine is ready to start /stop sewing and the needle stops at a time. This ensures the best performance of fabric and thread being used.
FORWARD STITCH BUTTON After the embroidery...
Instruction Manual - Page 92
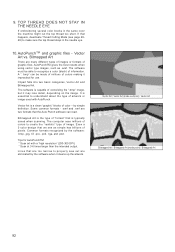
..." type of "format" that is the type of image.
If that we see page 2829) to properly sew out are too narrow to make sure the top thread stays in the same color the machine might cut the top thread too short. The software must be made of millions of colors making...
Instruction Manual - Page 94

...Hooping is a special feature in the FUTURA software that will allow embroidery data which is larger than a single embroidery hoop to be sent to the machine to stitch out, while making it easy... points (A, B, and C) are input, they inform the machine exactly as í lo requieren los datos de diseño. These lines will therefore sew the design to the accuracy of the final outcome of smaller...
Instruction Manual - Page 106
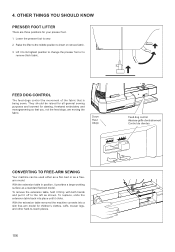
...-arm model for your presser foot. 1. Raise the lifter to the middle position to remove thick fabric. With the extension table removed the machine converts into place until it off to sew. ... d'entraînement Control de dientes
CONVERTING TO FREE-ARM SEWING
Your machine can be raised for all general sewing purposes and lowered for darning, freehand embroidery and monogramming so ...
Instruction Manual - Page 120
... blocked.
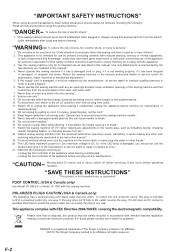
FOOT CONTROL (USA & Canada only)
Use Model YC-485 EC or Model JF-1000 with any opening." 8. To reduce the risk of the appliance before carrying out maintenance or
replacing lamps." 12. If it unattended: -
"Do not allow to break." 15. "Never operate the sewing machine with this plug is necessary when this...
Similar Questions

The Usb Cable Hooked Up To The Sewing Machine From The Computer Keeps Saying The
(Posted by Loltmanmurphy 7 months ago)

I Get E7 Error Message On My Singer Model 7258 Sewing Machine. There Is No Refe
Error message E7 is up on my Singer Stylist model 7258 sewing machine. It is not working at all. I t...
Error message E7 is up on my Singer Stylist model 7258 sewing machine. It is not working at all. I t...
(Posted by ebellamybellamy9 5 years ago)


What Is Er 10 Message
I have the futura 550xl keep receiving er10 message. Can only sew straight stitch on extremely slow ...
I have the futura 550xl keep receiving er10 message. Can only sew straight stitch on extremely slow ...
(Posted by cojovo59 9 years ago)

My Singer Xl-550 New Machine Misplaced The Cd Of The Manual.
Dont know what to do with cotton in the bobin when sewing.
Dont know what to do with cotton in the bobin when sewing.
(Posted by amedahh 9 years ago)