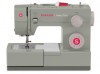
Singer 4452 I HEAVY DUTY Support Question
Singer 4452 I HEAVY DUTY Support Question
Find answers below for this question about Singer 4452 I HEAVY DUTY.Need a Singer 4452 I HEAVY DUTY manual? We have 1 online manual for this item!
Question posted by judithstark47 on October 3rd, 2016
I Have A Model 4452 Sewing Machine
How do I oil the machine
Current Answers
Answer #1: Posted by Odin on October 3rd, 2016 5:55 PM
Odin

Member since:
April 10th, 2010 Points: 41,236,690

Member since:
April 10th, 2010 Points: 41,236,690
Hope this is useful. Please don't forget to click the Accept This Answer button if you do accept it. My aim is to provide reliable helpful answers, not just a lot of them. See https://www.helpowl.com/profile/Odin.
Related Singer 4452 I HEAVY DUTY Manual Pages
Instruction Manual - Page 2

...unattended when plugged in order to avoid a hazard. 20. Switch the sewing machine off the machine or unplug when the machine is damaged, it has been dropped or damaged, or dropped into ...Read all instructions before cleaning. 3. Never place anything on cord. Always unplug this sewing machine. EN IMPORTANT SAFETY INSTRUCTIONS
When using an electrical appliance, basic safety should always ...
Instruction Manual - Page 6

... Step Presser Foot Lifter/ Adjusting Presser Foot Pressure...8 Accessories...10
Threading the Machine Winding the Bobbin...12 Inserting the Bobbin ...14 Threading the Upper Thread...16 Automatic Needle Threader ...18 Raising the Bobbin Thread ...20 Thread Tension ...22
Sewing How to Choose Your Pattern...24 Three Needle Position Dial ...26 Stitch Width...
Instruction Manual - Page 9

... storage
5
13
9. Bobbin stopper
11. Pattern selector dial
8
14. Presser foot pressure adjustment
1
9
3. Thread cutter
6. Stitch length dial
13. Thread take-up lever 2
10
4. Reverse sewing lever
11
3
5. Automatic threader 15. Thread tension dial
2. Three needle position dial
6
10. Stitch width dial
7
12. One step buttonhole lever
14
15
2 EN Principal...
Instruction Manual - Page 11

...
17
19. Bobbin thread guide
24. Main plug socket
23. Power cord
4
23 24 25 26 27
29 30
28 EN Principal Parts of the Machine
16. Horizontal spool pin
17. Upper thread guide
25. Buttonhole stitch balance adjustment slot
18
21.
Instruction Manual - Page 13

... not in any way. To reduce the risk of how to connect machine to power source.
Sewing light
Press main switch (A) to " l " for power and light.
1
...2902D (220-240V area)/ 4C-316Q (110-125V area). Polarized attachment plug b. EN Connecting Machine to Power Source
Connect the machine to a power source as illustrated. (1) This appliance is equipped with a polarized plug which must...
Instruction Manual - Page 15

...heavy weight).
It is suggested that you release it, the presser foot will drop back down to the intermediate position. As soon as you need to factory settings.
8
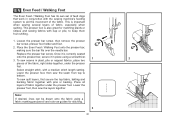
However, if you hold up the presser foot lifter. Adjusting Presser Foot Pressure
The presser foot pressure of the machine... Foot Lifter
When sewing several layers or thick fabrics, the presser foot can be raised to a ...
Instruction Manual - Page 17
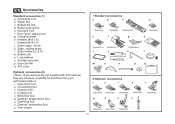
...m. Auxiliary spool pin p. Quilting / straight stitch foot x. Zipper foot c. Seam ripper / brush k. they are not supplied with this machine; L-screwdriver o. Overcasting foot t. Darning / embroidery foot z. Edge / quilting guide l. Needles (#16 x 5) i. Blind hem foot w....authorized retailer.) r. Gathering foot y. Non-stick foot f. Clearance plate h. Button sewing foot e.
Instruction Manual - Page 19

...then continue winding
until bobbin is in "bobbin winding" position, the machine will not sew and the handwheel turn. To start sewing, push the bobbin winder spindle to the left (10) and remove.... Thread bobbin as illustrated and place on to left 4 (sewing position).
3
5
6
7
8
9
10
12 Hold thread end securily. (7) 1
- Step on foot ...
Instruction Manual - Page 29
....
-
There is looping or birdnesting on the underside of your fabric.
- For all sewing will always obtain a nicer stitch
and less fabric puckering when the upper thread appears on ...(identical stitches both top and bottom) is an indication that the upper machine tension is important for straight stitch construction sewing. - 90% of fabric. If the thread is looping or birdnesting ...
Instruction Manual - Page 31

...the patterns indicated with the stitch width dial.
a.Reverse sewing lever b. Pattern selector dial
Model 4443
ABCDE FGH I JK
ABCDE FGH I JK
S1
ab
c d e
Model 4452
ABCDE FGH I JK
ABCDE FGH I JK
S1
...ABCDE FGH I JK
S2
24 Use the stitch width dial (c) to Choose Your Pattern
The diagram on this page display the stitch patterns available on the machine...
Instruction Manual - Page 37

EN Sewing Straight Stitch
To begin sewing, set the machine for straight stitch. (1)
Set the stitch length to start sewing. (3)
1
2
3
30 Place the fabric under the presser foot with the fabric edge lined up with the desired seam guide line on the needle plate. (2)
Lower the presser foot lifter, and then step on the foot controller to between 2 and 3.
Instruction Manual - Page 39

... the needle and presser 1
2
foot. (2)
Cutting the Thread
Pull the threads under and behind the presser foot. Sew a few reverse stitches. Pull threads down
the reverse sewing lever (A).
A
Release the lever and the machine will sew forward again. (1)
Removing the Work
Turn the handwheel toward you (counterclockwise) to bring
the thread take up lever...
Instruction Manual - Page 41

... " ". Ric rac stitch is suitable for firm fabrics like denim, corduroy, poplin, duck, etc. Adjust the stitch width dial to stretch and hardwearing seams. The machine sews two stitches forward and one stitch backwards. M
1 M
2 34 Used to add triple reinforcement to between "3" and "6". Ric Rac (2) Set the pattern selector dial to...
Instruction Manual - Page 43

...retailer. (See page 10 for the fabric. Blind hems, however, are appropriate for part number)
36 Sew a test first to the desired width and press.
M
Set the stitch length dial with a longer...weight fabrics, and a wider stitch is completed and press.
2 Note: To make sure the machine settings are normally sewn with the range shown on the diagram at a setting appropriate for heavier ...
Instruction Manual - Page 45

... sewing is strongly suggested to always make a test
M
buttonhole on a sample of your fabric before working on your
garment. Stop the machine when the buttonhole cycle has completed. Stabilizer should alsways be adjusted according to " ". Set stitch length dial to the project. Open the button plate and insert the button (B). 5. Hook the heavy...
Instruction Manual - Page 49

"6". Turn the handwheel to number "3" - For buttons with about 10 stitches. Set the machine for straight
a
2
ba b
stitch again, then sew a few securing stitches to "0". Set the machine for zig-zag stitch, then set the width to check that the needle goes cleanly into the left and right holes of the button. Raise ...
Instruction Manual - Page 53
... together under the presser
foot. Once it in place using a fabric marking pen/pencil and ruler as guides for matching plaids or stripes and sewing fabrics with the sewing machine's feeding system to bottom.
Note: If desired, lines can be drawn onto the fabric using a screwdriver.
1
2
3. This is correctly seated
onto the presser...
Instruction Manual - Page 55

Prepare the jeans hem and pin it sews on and off thick seams areas. Turn the hand wheel toward
the back of the machine.
- After you have sewn across
the seam.
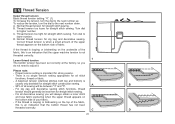
- EN Clearance Plate
The Clearance Plate is still on the machine. The Clearance Plate keeps the presser foot level when stitching over thick...
Instruction Manual - Page 61
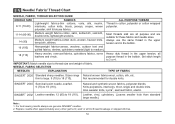
...® 2045 Semi-ball point needle, scarfed. 9 (70) to 18 (110).
For best sewing results always use the same thread in the upper tension and in the bobbin.
Always use genuine SINGER...; 2032 Leather needles. 12 (80) to medium).
18 (110)
Heavy woolen, overcoat fabrics, upholstery fabrics, some Heavy duty thread in cotton, polyester or cotton wrapped interlocks, cotton knits, tricots,...
Instruction Manual - Page 68
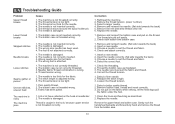
...is damaged. 2. Thread tension wrong.
1. Remove and reinsert the bobbin case and pull on the fabric while sewing, let the feed dogs pull
the fabric under the foot.
1. Insert a new needle. 2. Select a ...correctly threaded. 2. The wrong size needle has been used. 4. The machine is too thick for the needle. 4. Lint or oil have collected on the hook or needle bar. 2. Thread is caught in...
Similar Questions

I Have A Singer 4452 Heavy Duty. The Bulb Is Out. What Bulb Do I Use To Replace.
(Posted by ypeaslee 1 year ago)

How Do I Clear E7 Error Code On Singer Fashion Mate Model 7256 Sewing Machine
(Posted by cathyhowden1 2 years ago)

I Dismantled The Sewing Machine But Thin Blackplastic Washer Where It Goes
I dont remember where does the flat black plastic waser goes in my singer 4452
I dont remember where does the flat black plastic waser goes in my singer 4452
(Posted by frnrdrgz 4 years ago)

I Get E7 Error Message On My Singer Model 7258 Sewing Machine. There Is No Refe
Error message E7 is up on my Singer Stylist model 7258 sewing machine. It is not working at all. I t...
Error message E7 is up on my Singer Stylist model 7258 sewing machine. It is not working at all. I t...
(Posted by ebellamybellamy9 5 years ago)

Maintenance Manual
The manual that came with it doesn't show how to clean and oil. Is there a maintenance manual or doe...
The manual that came with it doesn't show how to clean and oil. Is there a maintenance manual or doe...
(Posted by bmayze 7 years ago)