Singer XL-550 Futura Support Question
Singer XL-550 Futura Support Question
Find answers below for this question about Singer XL-550 Futura.Need a Singer XL-550 Futura manual? We have 1 online manual for this item!
Question posted by sherrypage24 on January 3rd, 2017
06 Error
my singer has a 06 error can't seem to fix it
Current Answers
Answer #1: Posted by Odin on January 3rd, 2017 9:33 AM
Odin

Member since:
April 10th, 2010 Points: 41,236,690

Member since:
April 10th, 2010 Points: 41,236,690
See the two answers (which provided alternative causes) at http://www.fixya.com/support/t23729807-singer_error_codes_6.
Hope this is useful. Please don't forget to click the Accept This Answer button if you do accept it. My aim is to provide reliable helpful answers, not just a lot of them. See https://www.helpowl.com/profile/Odin.
Answer #2: Posted by BusterDoogen on January 3rd, 2017 10:01 AM
BusterDoogen

Member since:
October 30th, 2011 Points: 28,565,447
Member since:
October 30th, 2011 Points: 28,565,447
Go here to make sure you have the latest firmware. Clean the feed dogs found on page 110.
I hope this is helpful to you!
Please respond to my effort to provide you with the best possible solution by using the "Acceptable Solution" and/or the "Helpful" buttons when the answer has proven to be helpful. Please feel free to submit further info for your question, if a solution was not provided. I appreciate the opportunity to serve you!
Related Singer XL-550 Futura Manual Pages
Instruction Manual - Page 3
...cover 112 - 113 Special accessories 114 - 115 Helpful messages 116 - 117
For European version
Sewing machine Dimensions: 567 mm × 240 mm × 317 mm Mass of the equipment: ... Converting to -sew fabrics, Manual buttonhole Decorative sewing 60 - 61 Tips on a button 50 - 51 Buttonholes 52 - 59 Using buttonhole foot, Procedure, Corded buttonholes Buttonholing with FUTURA Multi hoop 94...
Instruction Manual - Page 8
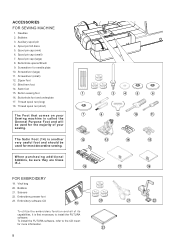
...Vinyl bag 20. Embroidery software CD
19
To utilize the embroidery function and all of your
7
Sewing machine is first necessary to the CD insert for needle plate
10. Screwdriver for more information.
8
... are Class I5 J.
16
FOR EMBROIDERY
19. To install the FUTURA software, refer to install the FUTURA software. Spool pin cap (small)
7. Auxiliary spool pin
4. Screwdriver...
Instruction Manual - Page 10
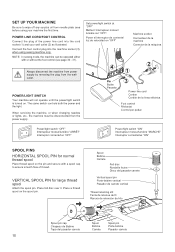
...cap to wipe off any surplus oil from needle plate area before using sewing machine only.
Always disconnect the machine from power supply by removing the plug from the power supply. Set ...
machine socket Connecteur de la machine Conector de la máquina
4
1
2
Pin Butée Pasador
3
Power line cord Cordon Cordón de la linea eléctrica
Foot control Rhéostat
XL-550-P04...
Instruction Manual - Page 22
... side of your fabric.
Lower the presser foot lifter so that for straight stitch sewing.
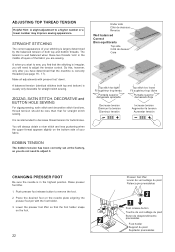
STRAIGHT STITCHING
The correct appearance of your stitching is usually only desirable for buttonholes. If, when you start to sew, you find that the machine is irregular, you do not need to adjust the tension control. ADJUSTING TOP...
Instruction Manual - Page 24
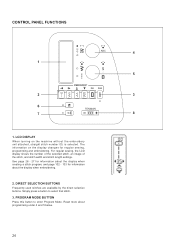
... display changes for information about the display when embroidering.
2. The information on the machine without the embroidery unit attached, straight stitch number 00, is selected. See page ...the display when creating a stitch program, and page 102 - 103 for regular sewing, programming and embroidering. For regular sewing, the LCD display shows the number of the selected stitch, an image of ...
Instruction Manual - Page 26
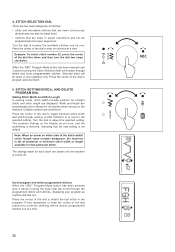
... DELETE PROGRAM DIAL
Setting Stitch Width and Stitch Length In sewing mode, stitch width (needle position for each stitch are saved until the machine is not default. The settings made for straight stitch) ...in the program. Press the center of the stitch width/ stitch length value number disappear, the machine is lit next to delete the last stitch in one . 4. STITCH SELECTION DIAL
There are...
Instruction Manual - Page 28
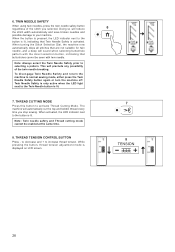
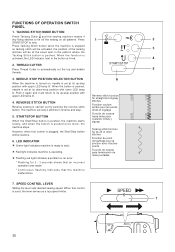
... that Twin Needle Safety is lit.
7. Note: Always select the Twin Needle Safety prior to activate Thread Cutting Mode. The machine will preclude any possibility of the stitch you stop sewing. When activated, the LED indicator next to the button is lit, indicating that buttonholes cannot be enabled at the same time...
Instruction Manual - Page 30
...;n de costura hacia atrás para costuras rectas y zigzag
Tacking stitch function for tie-off the sewing on , needle is turned on all patterns. TACKING STITCH MODE BUTTON
Press Tacking Stitch and the sewing machine makes 4
tiny fixing stitches to the button is plugged, the Start/Stop button will be inactive.
6. When the button...
Instruction Manual - Page 36
....
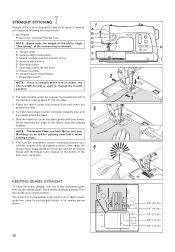
The guide line on the needle plate. STRAIGHT STITCHING 00
Straight stitch is most frequently used for sewing narrow seams.
36
3/4" (19 mm) 5/8" (16 mm) 1/2" (13 mm) 3/8" ( 9 mm) 1/4" ( 6 mm) Start/stop the sewing machine.
Let's begin by following the steps below.
1. Thread tension control button I
4
2.
Reverse stitch button E. SETTINGS Presser foot - Place...
Instruction Manual - Page 38
... 6 or higher until the foot control is released.
2. Needle to left side, attach right side of the zipper foot. Press the foot control and the machine will sew 4 stitches in reverse and then 4 stitches in forward and stop.
38 Thread the needle with either invisible thread or with the fabric color, so...
Instruction Manual - Page 42

...06
SETTINGS :Presser foot - Turn the handwheel counter
3
clockwise (toward you) by turning it under the foot. It should just pierce the fold of the guide.
4. NOTE: It takes practice to the left. Then turn the hem up the required depth, press and pin in place.
2. Sew...Blind Hem Foot
-
Always make a sewing test first.
4
Top side Cara Endroit
MULTI-STITCH ZIGZAG 07 ...
Instruction Manual - Page 54
Fabric marking Marque du tissu Marca de material
mark Marque Marca
* Sewing will be completed automatically in the following order.
1
2
3
4
5
6
7
8
1
2
3
4
5
6
... out the bobbin thread
underneath the fabric to the rear.
7. While holding the top thread, start the machine.
Align the buttonhole mark on the fabric with the mark on your garment. 6. Carefully mark the position ...
Instruction Manual - Page 58
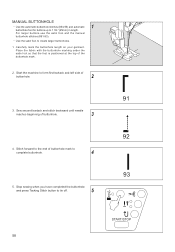
... first bartack and left side of buttonhole mark to create larger buttonholes.
1. Start the machine to tie off.
5
91 92 93
58 For larger buttons use the satin foot... and the manual
buttonhole stitches (#91-93).
* Use the satin foot to
complete buttonhole.
4
5. Sew second bartack and stitch backward until needle
reaches beginning of the buttonhole mark.
2. Stitch forward to the...
Instruction Manual - Page 80
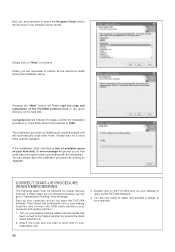
Simply click on your hard disk, an error message will prompt you to continue. A progress bar will automatically close after finish.
If the installation utility identifies a lack of the FUTURA software files to your sewing machine and connect the USB cable between your computer and sewing machine.
1. Turn on the hard disk.
Please wait for proper start...
Instruction Manual - Page 82
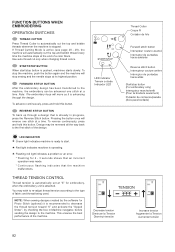
... couture arrière interruptor de puntadas hacia atrás Start/stop sewing and the needle stops at its highest position. START/STOP BUTTON When start .
Red light indicates machine is operating.
Flashing red light indicates a problem or an error. * Flashing for Photo Stitch (optional) it is automatically set at a time...
Instruction Manual - Page 94

... les exigences du dessin de broderie. Multi-Hoop
Multi-Hooping is a special feature in the FUTURA software that will allow embroidery data which is too large for the hoop or a combination of...stitch out, while making it and sew accordingly. Mark a line horizontally across the center of the fabric.
2. The vertical and horizontal lines must be sent to the machine to stitch out the design.
1....
Instruction Manual - Page 102
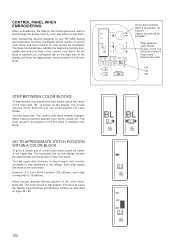
... approximate current position in the color block, press OK. The hoop moves to step backward in the design. After transferring desired design(s) to your FUTURA sewing and embroidery machine, the display shows number of current color block and total number of the display will show the approximate current position in selected color block...
Instruction Manual - Page 110
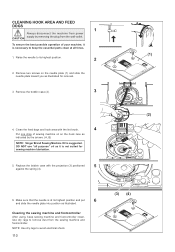
...-outlet. DO NOT use "all times.
(1)
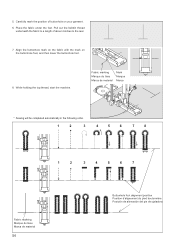
1. CLEANING HOOK AREA AND FEED DOGS
1
Always disconnect the machine from power CAUTION supply by the arrows. (A, B)
NOTE: Singer Brand Sewing Machine Oil is suggested.
To ensure the best possible operation of sewing machine oil on the needle plate (1) and slide the needle plate toward you as it is not...
Instruction Manual - Page 112
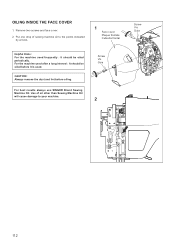
... will cause damage to the points indicated
by arrows.
1 Face cover Plaque frontale Cubierta frontal
Helpful Hints : For the machine used after a long interval : It should be oiled before oiling.
For best results always use SINGER Brand Sewing Machine Oil.
Screw Vis Guia
2
Screw Vis Guia
112 OILING INSIDE THE FACE COVER
1. For the...
Instruction Manual - Page 120
... injury to avoid a hazard." 6. To reduce the risk of The Singer Company Limited or its affiliates. ©2010 The Singer Company Limited or its affiliates.
SINGER is not intended for their safety.
"WARNING- "T his appliance is a registered trademark of electric shock, this sewing machine. Use only attachments recommended by the manufacturer, its intended use of...
Similar Questions

The Usb Cable Hooked Up To The Sewing Machine From The Computer Keeps Saying The
(Posted by Loltmanmurphy 8 months ago)

I Get E7 Error Message On My Singer Model 7258 Sewing Machine. There Is No Refe
Error message E7 is up on my Singer Stylist model 7258 sewing machine. It is not working at all. I t...
Error message E7 is up on my Singer Stylist model 7258 sewing machine. It is not working at all. I t...
(Posted by ebellamybellamy9 5 years ago)

Beeping From Singer Sewing Machine Stylist Ii 5625
My sewing machine will beep and stop sewing after three inches of sewing. I have taken it to be repa...
My sewing machine will beep and stop sewing after three inches of sewing. I have taken it to be repa...
(Posted by arusheria 9 years ago)

My Singer Xl-550 New Machine Misplaced The Cd Of The Manual.
Dont know what to do with cotton in the bobin when sewing.
Dont know what to do with cotton in the bobin when sewing.
(Posted by amedahh 9 years ago)
