Singer SES2000 FUTURA Support Question
Singer SES2000 FUTURA Support Question
Find answers below for this question about Singer SES2000 FUTURA.Need a Singer SES2000 FUTURA manual? We have 1 online manual for this item!
Question posted by barbara9894 on January 13th, 2021
Singer Futura Ses2000
Will the Singer Futura ses2000 stitch a 5x7 embroidery design?
Current Answers


Related Singer SES2000 FUTURA Manual Pages
Instruction Manual - Page 3
... version
Sewing machine Dimensions: 428 mm × 307 mm × 294 mm Mass of the equipment: 10 kg
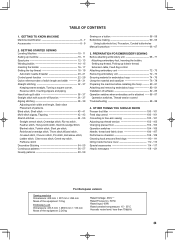
Embroidery unit Dimensions: 433.5 mm × 269.5 mm × 133 mm Mass of patterns Blind stitch, Shell stitch 40 - 41 Multi-stitch zigzag, Fagoting 42 - 43 Stretch stitches 44 - 53 Straight stretch stitch, Overedge stitch, Ric-rac stitch, Feather stitch, Honeycomb stitch, Slant Overedge Stitch...
Instruction Manual - Page 6
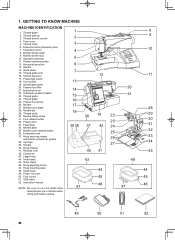
...control 4. Operation switches 11. Presser foot lifter 21. Needle 27. Embroidery unit 37. Carriage 39. Inner frame 45. Thread take-up 3.... 18. Needle bar 29. Foot release button 32. GETTING TO KNOW MACHINE
MACHINE IDENTIFICATION
1. Thread guide 2. Thread guide 25. Hoop securing screws
with your machine when doing embroidery sewing.
1 2 3 4 5 6 7 13 14 15 16 17 ...
Instruction Manual - Page 8
...
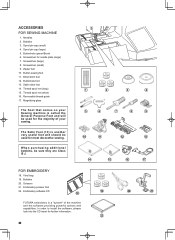
18. Buttonhole opener/Brush 6. Zipper foot 10. Satin stitch foot 14. Removable thread guide 17. Spool pin cap (small) 4. Screwdriver (small) 9. Embroidery software CD
19
20
18
FUTURA embroidery is called the General Purpose Foot and will be used for most decorative sewing. ACCESSORIES FOR SEWING MACHINE
1. Bobbins 3. Button sewing foot 11. Thread spool net (long) 15. Scissors...
Instruction Manual - Page 10
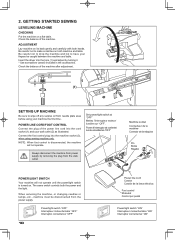
... not operate. Connect the foot control plug into the hole (1) and adjust by removing the plug from needle plate area before using sewing machine only. 2.
Power/light switch "OFF" Interrupteur moteur/lumière "OFF" Interruptor corriente/luz "OFF"
10
Power line cord Cordon Cordón de la linea ...
Instruction Manual - Page 24
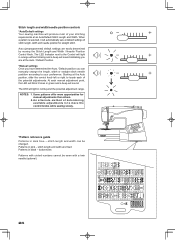
... o f d e t e r m i n i n g available adjustments is selected, it will automatically sew at an Auto/Default Stitch Length and Width. Starting at the Auto / Default Position. *Manual settings Once you have determined the Auto / ... each of the potential adjustments. Stitch length and width/needle position controls
*Auto/Default settings Your sewing machine will produce most of your preference...
Instruction Manual - Page 26
..., and a beep will reduce the stitch width automatically and save broken needles and possible damage to your machine.
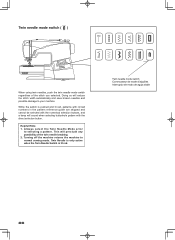
This will preclude any possibility of the stitch you selected. Twin needle mode switch Commutateur... lit red. Turning off the machine returns the machine to selecting a pattern.
A l w a y s s e l e c t t h e Tw i n N e e d l e M o d e p r i o r
to normal sewing mode.
Instruction Manual - Page 32
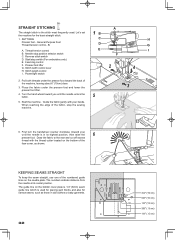
...machine, leaving about 6" (15cm) clear. 3. KEEPING SEAMS STRAIGHT
To keep the seam straight, use one of the numbered guide lines on the bottom of the fabric, stop switch (For embroidery...
face cover, as those in its center position. Thread tension control B. Start/stop the sewing machine.
6. First turn the handwheel counter clockwise (toward you ) until the needle enters the fabric....
Instruction Manual - Page 40

... Reverso Envers
1
Under side Reverso Envers
2
Fine fabric Material fino Tissus fins
Under side Reverso Envers
Under side Reverso Envers
B
3. Sew slowly, guiding the fabric carefully along the edge of the stitch sews just over the folded edge, pulling the fabric in place.
2. Zigzag foot :Thread tension control - E
Turn under the foot. If...
Instruction Manual - Page 84
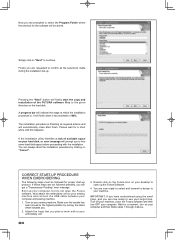
... select and transmit a design to use your large hoop.
Please wait for a short while until this happens. Double click on the Futura Icon on the hard disk. It will finish when it has reached to your sewing machine and connect the USB cable between your computer and sewing machine.
1. Next attach the embroidery unit to 100%. Now...
Instruction Manual - Page 92
...
2. Restart the embroidery machine and continue embroidering. Place the bobbin on the bobbin winder shaft and push the shaft towards the right.
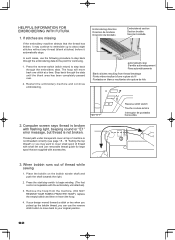
2. HELPFUL INFORMATION FOR EMBROIDERING WITH FUTURA
1. In such cases, use the following procedure to step back through the embroidering data to cover small spool of thread while sewing
1.
If stitches are supplied with...
Instruction Manual - Page 94

...
The Futura software will recalculate the stitch of an imported design when ...stitches correctly.
5. Some common formats - .wmf and .emf are two formats that are too narrow to create the "realistic" type of re-sizing up the artwork.
The software is not dense enough. The computer sees millions of colors to properly sew out are many different formats. 4. When resizing a design...
Instruction Manual - Page 96
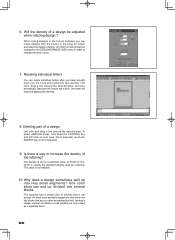
...' into the hoop and exited the text window. The machine has a certain limit of stitches that are built-in order to increase the density of a design be only a few) as a separate block.
96 Resizing individual letters
You can resize designs from the Library in the Futura software you can resize individual letters after exceeding the...
Instruction Manual - Page 104

...stop switch (For embroidery only)
LED indicator Témoin a diode Indicador LED
Interrupteur marche/arrêt (Pour la broderie seulement)
Pulsador de comienzo/parada (Sólo para bordado)
REVERSE STITCH BUTTON
* Reverse stitch function for tie-off of other stitches ( ) The sewing machine makes 4 tiny tacking stitches to start. Red light indicates machine is ready to tie...
Instruction Manual - Page 106

..., synthetic, rayon, blends.
Push the needle up as far as it before a new sewing project. Always refer to its highest position by turning it downward.
4.
Bonded Wovens Heavy Canvas
... band
* Do not use on stretch fabrics. * For best sewing results, always use a Singer Branded Needle. Always disconnect the machine from power supply by pulling it toward the back
Côté...
Instruction Manual - Page 110
... removal.
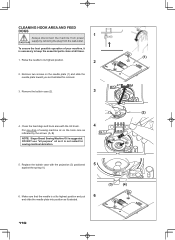
3. Make sure that the needle is at all purpose" oil as illustrated for sewing machine lubrication.
(2)
(A) (B)
5. Remove two screws on the hook race as illustrated.
(3)
...the projection (3) positioned
5
against the spring (4).
6. To ensure the best possible operation of sewing machine oil on the needle plate (1) and slide the needle plate toward you as it is necessary...
Instruction Manual - Page 112
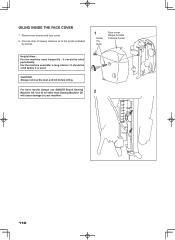
OILING INSIDE THE FACE COVER
1. Remove two screws and face cover. 2. Use of sewing machine oil to your machine.
112 For the machine used after a long interval : It should be oiled before oiling.
For best results always use SINGER Brand Sewing Machine Oil.
CAUTION: Always remove the dust and lint before it is used frequently : It should be...
Instruction Manual - Page 114
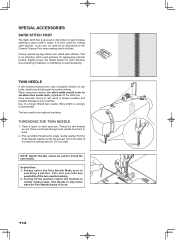
... any possibility of parallel stitches for sewing satin stitches. Draw one . Use a backing of the machine, leaving about 6" (15 cm) clear. This will result in broken needles and possible damage to the back of stabilizer or interfacing to back.
2. NOTE: Needle threader cannot be set above twin needle mark, regardless of a Singer Brand twin needle...
Instruction Manual - Page 116
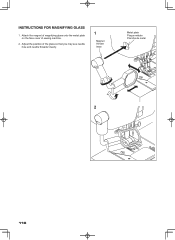
INSTRUCTIONS FOR MAGNIFYING GLASS
1. Adjust the position of sewing machine.
2. Attach the magnet of magnifying glass onto the metal plate on the face cover of the glass so that you may see needle hole and needle threader clearly.
1
Magnet Aimant Iman
Metal plate Plaque métale Plancha de metal
2
116
Instruction Manual - Page 118
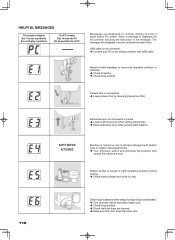
... PC to the sewing machine with bobbin case or rotation interrupted forcibly. Turn off power switch and attach large hoop. Check hoop position. Check that
caused the machine to stop. USB cable is not lowered or raised. Lower buttonhole lever when sewing buttonholes. Raise buttonhole lever when sewing stitch patterns. Presser...
Instruction Manual - Page 124
...Please note that on cord. All rights reserved. "WARNING- "Always unplug sewing machine from outlet." 9. F-2
SINGER is for its affiliates.
Use only attachments recommended by pulling on disposal, this plug is required around the sewing machine needle." 11. Keep ventilation openings of the sewing machine and foot control free from all instructions before using and before...
Similar Questions

The Usb Cable Hooked Up To The Sewing Machine From The Computer Keeps Saying The
(Posted by Loltmanmurphy 8 months ago)

Singer Futura Quartet Seqs 6700 Sewing Machine
how to set my singer futura quartet seqs 6700 sewing machine to sew. A distance more than one inch a...
how to set my singer futura quartet seqs 6700 sewing machine to sew. A distance more than one inch a...
(Posted by johour2194 3 years ago)

I Get E7 Error Message On My Singer Model 7258 Sewing Machine. There Is No Refe
Error message E7 is up on my Singer Stylist model 7258 sewing machine. It is not working at all. I t...
Error message E7 is up on my Singer Stylist model 7258 sewing machine. It is not working at all. I t...
(Posted by ebellamybellamy9 5 years ago)


Beeping From Singer Sewing Machine Stylist Ii 5625
My sewing machine will beep and stop sewing after three inches of sewing. I have taken it to be repa...
My sewing machine will beep and stop sewing after three inches of sewing. I have taken it to be repa...
(Posted by arusheria 9 years ago)