
Singer H74 Support Question
Singer H74 Support Question
Find answers below for this question about Singer H74.Need a Singer H74 manual? We have 2 online manuals for this item!
Question posted by paseste on October 29th, 2014
Bottom Thread
Removed plate, cleaned bobbin area...can not bring up bobbin thread, Was sewing OK when bobbin thread jammed.
Current Answers
Related Singer H74 Manual Pages
Instruction Manual 2 - Page 3

.... SAVE THESE INSTRUCTIONS
This sewing machine is being used as
threading needle, changing needle, threading bobbin, changing presser foot or ...remove plug from the electrical outlet when removing covers, lubricating, or when making any opening. 12. Use only the attachments recommended by or near children.
2. Do not use the proper needle plate, as described in the needle area...
Instruction Manual 2 - Page 4
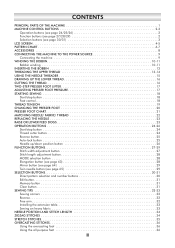
... THE POWER SOURCE 9 Connecting the machine 9 WINDING THE BOBBIN 10-11 Bobbin winding 10-11 INSERTING THE BOBBIN 12 THREADING THE UPPER THREAD 13-14 USING THE NEEDLE THREADER 15 DRAWING UP THE LOWER THREAD 16 CUTTING THE THREAD 16 TWO-STEP PRESSER FOOT LIFTER 17 ADJUSTING PRESSER FOOT PRESSURE 17 STARTING SEWING 18 Start/stop button 18 Foot...
Instruction Manual 2 - Page 5
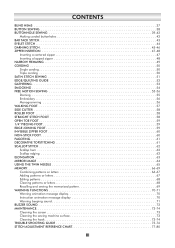
... 68 Clearing patterns or letters 68 Recalling and sewing the memorized pattern 69 WARNING FUNCTIONS 70-71 Warning animation message display 70 Instruction animation message display 70 Warning beeping sound 71 BUZZER SOUND 72 MAINTENANCE 73-74 Cleaning the screen 73 Cleaning the sewing machine surface 73 Cleaning the hook 73-74 TROUBLE SHOOTING GUIDE 75...
Instruction Manual 2 - Page 6
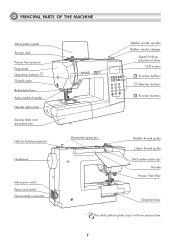
PRINCIPAL PARTS OF THE MACHINE
Stitch pattern plate Tension dial Presser foot pressure Face plate Operation buttons A Thread cutter Buttonhole lever Auto needle threader Needle plate cover
Sewing table and accessory box
Hole for Auxiliary spool pin
Handwheel
Main power switch Power cord socket Foot controller connector
Bobbin winder spindle Bobbin winder stopper
Speed limiting adjustment lever
...
Instruction Manual 2 - Page 7
... button to adjust the width of the current patterns and automatically stop the machine.
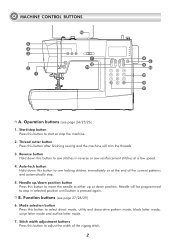
2. MACHINE CONTROL BUTTONS
5 4 3
2 1
16
67 12 123
1
2
3
4
5
6
7
8
9
0
8 6
9 14
15
10 11
A. Needle will trim the threads.
3. Start/stop button Press this button to stop in reverse or sew reinforcement stitches at the end of the zigzag stitch.
2 Auto-lock button...
Instruction Manual 2 - Page 14
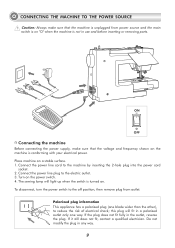
Connect the power line cord to the electric outlet. 3. The sewing lamp will fit in use and before inserting or removing parts. this plug will light up when the switch is turned .... To disconnect, turn the power switch to the off position, then remove plug from power source and the main switch is on "O" when the machine is not in a polarized outlet only one blade wider than the other...
Instruction Manual 2 - Page 16
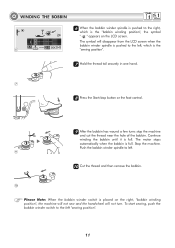
... the LCD screen. WINDING THE BOBBIN
6 When the bobbin winder spindle is pushed to the left "sewing position".
11
Push the bobbin winder spindle to left.
9
10 Cut the thread and then remove the bobbin.
10
Please Note: When the bobbin winder switch is placed on the right, "bobbin winding position", the machine will not sew and the handwheel will disappear...
Instruction Manual 2 - Page 17
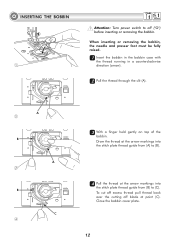
... the arrow markings into the stitch plate thread guide from (A) to (B).
44 Pull the thread at point (C). Close the bobbin cover plate.
12 A
2
B
A
3
B
C
4
33 With a finger held gently on top of the
bobbin. To cut off excess thread pull thread back over the cutting off ("O") before inserting or removing the bobbin.
When inserting or removing the bobbin, the needle and presser foot...
Instruction Manual 2 - Page 21
....
1
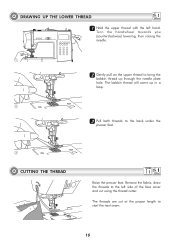
22 Gently pull on the upper thread to bring the
bobbin thread up in a loop.
2
33 Pull both threads to the back under the
presser foot.
3
CUTTING THE THREAD
Raise the presser foot. The bobbin thread will come up through the needle plate hole. DRAWING UP THE LOWER THREAD 11 Hold the upper thread with the left side of the face...
Instruction Manual 2 - Page 29
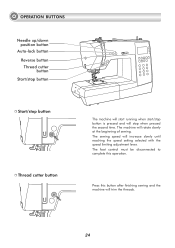
... complete this button after finishing sewing and the machine will rotate slowly at the beginning of sewing. The sewing speed will stop when pressed the second time. OPERATION BUTTONS
Needle up/down position button
Auto-lock button Reverse button Thread cutter button
Start/stop button
Start/stop button Thread cutter button
The machine will start running when...
Instruction Manual 2 - Page 34
... again for single needle sewing.
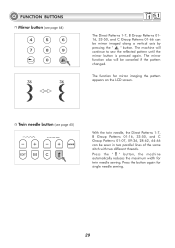
29 Twin needle button (see page 64)
The Direct Patterns 1-7, B Group Patterns 0116, 33-50, and C Group Patterns 01-66 can be canceled if the pattern changed. The machine will be sewn in two parallel lines of the same stitch with two different threads. FUNCTION BUTTONS Mirror button...
Instruction Manual 2 - Page 36
... button to remove an added pattern when sewing combinations of characters... or decorative stitches. Pressing the " " button will allow manual setting of the stitch width, stitch length, mirror, elongation and the auto-lock function.
Use the stitch width " + " or " – " button to memory mode. (See pages 66-69 for more information on programming the machine...
Instruction Manual 2 - Page 37
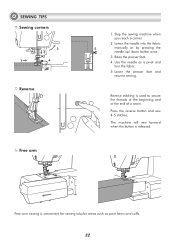
... and sew 4-5 stitches. Free-arm sewing is convenient for sewing tubular areas such as a pivot and turn the fabric.
5. Stop the sewing machine when you reach a corner.
2. Reverse stitching is released. Raise the presser foot.
4.
Use the needle as pant hems and cuffs.
32
The machine will sew forward when the button is used to secure the threads at...
Instruction Manual 2 - Page 58
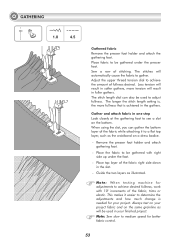
Adjust the upper thread tension dial to achieve the amount of stitching.
Remove the presser foot holder and attach gathering foot.
- Note: Sew slow to medium speed for adjustments ... achieve desired fullness, work with right side up under the presser foot. Note: When testing machine for better fabric control.
53
This makes it to determine the adjustments and how much change is...
Instruction Manual 2 - Page 60
... of the fabric is filled, turn the work and cover the area with your index finger and tighten the screw (c). First sew around the edges of stitching.
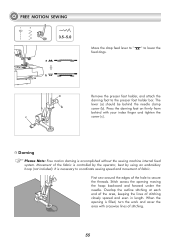
55 FREE MOTION SEWING
1
5
3.5~5.0
a b ba
a b
c
Move the drop feed lever to secure the threads. " to lower the
Remove the presser foot holder, and attach the darning foot to...
Instruction Manual 2 - Page 62
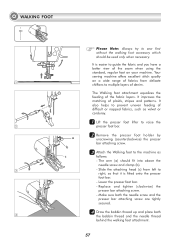
... from left to raise the
2
presser foot bar. Your
sewing machine offers excellent stitch quality
1
on your machine. Make sure both the needle screw and the presser bar attaching screw are tightly secured.
44 Draw the bobbin thread up and place both
4
the bobbin thread and the needle thread
behind the walking foot attachment.
57
The arm (a) should...
Instruction Manual 2 - Page 78
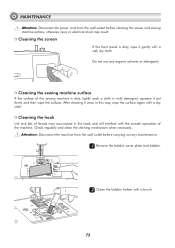
... with a soft, dry cloth. Check regularly and clean the stitching mechanism when necessary. Cleaning the sewing machine surface
If the surface of thread may result. Do not use any maintenance.
11 Remove the bobbin cover plate and bobbin.
1
22 Clean the bobbin holder with a dry cloth. Cleaning the hook
Lint and bits of the sewing machine is dirty, wipe it out firmly and then...
Instruction Manual 2 - Page 79
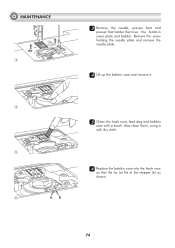
... needle plate and remove the needle plate.
44 Lift up the bobbin case and remove it.
55 Clean the hook race, feed dog and bobbin
case with a brush. Also clean them, using a soft, dry cloth.
66 Replace the bobbin case into the hook race
so that the tip (a) fits to the stopper (b) as shown.
74 Remove the bobbin cover plate and bobbin. MAINTENANCE...
Instruction Manual 2 - Page 80
....singer.com
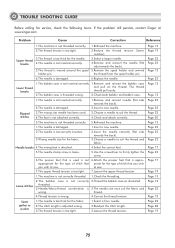
Problem
Cause
Correction
Reference
1.The machine is not threaded correctly. 1.Rethread the machine. The thread should pull easily.
2.The bobbin case is not inserted correctly. 1.Remove and reinsert the bobbin case and pull on the thread.
appropriate for the type of stitch that is used . 3.Choose a needle to sew.
7.The upper thread tension is too tight. 7.Loosen the...
Instruction Manual 2 - Page 81
...
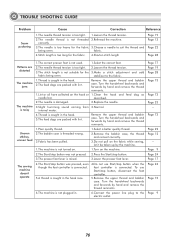
The machine jams
The machine is noisy
Uneven stitches, uneven feed
The sewing machine doesn't operate
1.The correct presser foot is not used.
1.Select the correct foot.
2.The needle thread tension is too tight. 2.Loosen the thread tension.
3.The stitch length is too long for the 3.Make a stitch adjustment and add
fabric being sewn.
Remove the upper thread and bobbin...
Similar Questions

Singer Talent 3323 Timing Is Off. How Do You Remove The Black Bobbin Holder To
Singer Talent 3323 timing is off. How do you remove the black bobbin holder to access underneath
Singer Talent 3323 timing is off. How do you remove the black bobbin holder to access underneath
(Posted by fmodin 2 years ago)


Will Singer H74 Sewing Machine Go Into Sewing Machine Table
(Posted by vogelgeos 10 years ago)

Singer C500 Singer Sewing Machine Needle Hitting Needle Plate? New To Me Have
(Posted by Anonymous-134344 10 years ago)
