
Singer Futura XL-400 Support Question
Singer Futura XL-400 Support Question
Find answers below for this question about Singer Futura XL-400.Need a Singer Futura XL-400 manual? We have 1 online manual for this item!
Question posted by markapinkston on October 8th, 2016
I Keep Getting A Connection Error And Have Found That I Am Missing A Clem Driver
After an automatic windows update downloaded my software for the XL 400 would not open. I keep getting a connection error. Have found that the CLEM driver is missing from my laptop but I can not find a secure site to download this driver.I have reinstalled my software to no avail. I have read many complaints on this but no real solutions.
Current Answers


Related Singer Futura XL-400 Manual Pages
Instruction Manual - Page 2
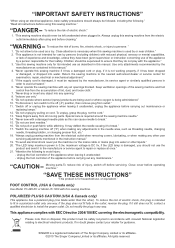
... experience and knowledge, unless they do not play with a damaged needle plate as described in this can cause needle to break." 15. Keep ventilation openings of the sewing machine and foot control free from the electric
outlet immediately after using an electrical appliance, basic safety precautions should never be safely recycled in the...
Instruction Manual - Page 5

... Feed dog control 98 - 99 Converting to -sew fabrics
3. TABLE OF CONTENTS
1.GETTING TO KNOW YOUR MACHINE Machine identification 6 - 7 Accessories 8 - 9 Setting up your machine 10 - 11 Spool pins 10 - 11 Winding bobbin 12 - 13 Threading the bobbin thread 14 - 15 Threading the top thread 16 - 17 Using automatic needle threader 18 - 19 Needle, thread and fabric...
Instruction Manual - Page 8
... 39. Outer frame
32
44. Small hoop 47. USB cable
42
42 43
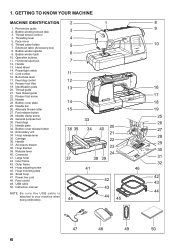
50. GETTING TO KNOW YOUR MACHINE
MACHINE IDENTIFICATION
2
1
8
1. Bobbin winding tension disk
3
9
3. Threading lever
4
5. ...: B e s u r e t h e U S B c a b l e i s
44
attached to your machine when doing embroidery.
45
44 45
47
48
49
50
6 Power/light switch 15. Bobbin cover plate
14
18
25. Feed ...
Instruction Manual - Page 10

...software CD
19
FUTURA embroidery is called the
General Purpose Foot and will
be used for the majority of your
7
Sewing machine is "system" of the machine and the software ...13. Blind hem foot
14. ACCESSORIES
FOR SEWING MACHINE
1. Bobbins
3. Spool pin cap (mini)
6. Embroidery presser foot 23. Needles
2. Buttonhole opener/Brush
9. Screwdriver (large)
11. Buttonhole foot...
Instruction Manual - Page 12
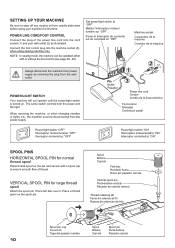
...line cord/FOOT CONTROL
Connect the plug of thread. Connect the foot control plug into the cord socket (1) and your machine the first time. Always disconnect the machine from power supply by ...servicing the machine, or when changing needles or lights, etc., the machine must be operated either
with a spool cap to wipe off any surplus oil from needle plate area before using sewing machine only....
Instruction Manual - Page 24

... "S" exposed on the tension control dial on top of the machine.
Place the desired foot on the needle plate aligning the
presser foot pin with presser foot 'down'. Helpful Hint: A slight adjustment to remove the foot. 2.
It is recommended for straight stitch sewing. Raise presser foot lifter. 1. Push presser foot release button...
Instruction Manual - Page 28

...controls
*Auto/Default settings Your sewing machine will produce most of stitch length, width and needle position for straight stitch. LED turns on when twin needle sewing is selected, it is ... without blinking and a beep will sound indicating you can be activated, if it will automatically sew at the Auto / Default Position.
*Manual settings Once you have determined the Auto ...
Instruction Manual - Page 30
... in the pattern where the tacking stitch button is operating.
Flashing red light indicates a problem or an error. * Flashing for tie-off
1
the sewing on , needle is pushed once more, the machine stops. Reverse stitch function for straight and zigzag stitches Fonction couture arrière pour les points droits et zigzags...
Instruction Manual - Page 34
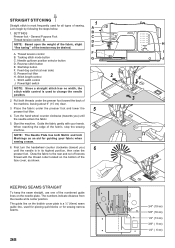
...up/down position selector button D. Start/stop the sewing machine. Turn the hand wheel counter clockwise (towards ... stitch is most frequently used for piecing quilt blocks or for sewing narrow seams.
32
3/4" (19 mm) 5/8" (16 mm) 1/2" (13 mm) 3/8" ( 9 mm) 1/4" ( 6 mm) Power/light switch
F G
2
H I . Start the machine. First turn the handwheel counter clockwise (toward the back of the...
Instruction Manual - Page 56

... pie de ojaladora While holding the top thread, start the machine.
Fabric marking Marque du tissu Marca de material
mark Marque Marca
* Sewing will be completed automatically in the center of about 4 inches to a length of the buttonhole. When sewing is finished, use a buttonhole opener to open up the fabric in the following order.
1
2
3
4
5
6
7
Fabric marking...
Instruction Manual - Page 60

PREPARATION FOR EMBROIDERY SEWING
BEFORE ATTACHING EMBROIDERY UNIT ATTACHING EMBROIDERY FOOT
Foot holder Support du pied Sujetador ...de prensatelas
Drive lever Levier d'entraînement Palanca de accionamiento
Be careful not to machine CAUTION before changing presser foot.
* Raise presser foot lifter. Secure it by tightening presser foot screw.
3. INSERTING THE BOBBIN
Refer to move needle ...
Instruction Manual - Page 64
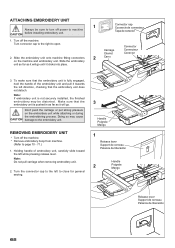
...: If embroidery unit is not securely installed, the finished embroidery may cause CAUTION damage to machine CAUTION before installing embroidery unit. Holding... from machine.
(Refer to open. Slide the embroidery unit onto machine fitting connectors
2
Carro
on the embroidery unit while attaching or during the embroidering process.
Turn the connector cap to close for general sewing.
3...
Instruction Manual - Page 76

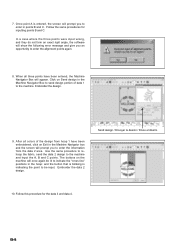
... ready to select and transmit a design to your machine.
If these steps are not followed precisely, you will automatically close the Futura software and then turn on your computer, but do not open up the Futura Software.
4. Now you are prompted to confirm all required actions and will get a "Transmission Pending" error message.
A progress bar will indicate the stage...
Instruction Manual - Page 78
...
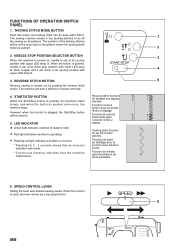
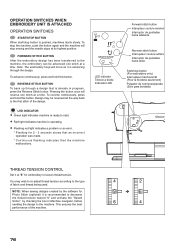
START/STOP BUTTON When start .
Red light indicates machine is operating.
Flashing red light indicates a problem or an error. * Flashing for 2 - 3 seconds shows that an incorrect... the software for
Photo Stitch (optional) it is recommended to the first stitch of the machine.
76
This ensures the best
performance of the design. NOTE: When sewing designs created...
Instruction Manual - Page 84

... FOR EMBROIDERING WITH FUTURA
1. Reverse stitch ...back one stitch at a time. Computer screen says thread is broken, machine lights are missing
If the embroidery machine detects that the thread has broken, it may ensure that is unwinding...without any thread (blank stitches) before it automatically stops. Embroidering direction Direction de broderie Dirección de bordado
Embroidered section ...
Instruction Manual - Page 90

...Hoop utilizes a system where three alignment points (A, B, and C) are input, they inform the machine exactly as í lo requieren los datos de diseño. If the fabric is larger than... is a special feature in the Futura software that will allow embroidery data which is slightly askew, this system will compensate for it and sew accordingly. and then sews them precisely, matching one section to...
Instruction Manual - Page 92

...The example shown uses lettering and designs from the Design Library that is sent to the machine for sewing one section at a time.
Guide lines are two sets of the first hoop section)....4 Donnée 4 Datos 4
Data 3 Donnée 3 Datos 3 Set fabric and stabilizer into the software. (Additional numbered hoops will appear as the design parts flow out of markings on the screen. In each ...
Instruction Manual - Page 96
... points were input wrong, and they do not form an exact right angle, the software will show the following error message and give you an opportunity to be lit to indicate the "cross line" positions... area. Use the same procedure to rehoop the fabric, send the data 2 design to enter in the Machine Navigator box and the screen will once again be input. Embroider the data 2 design. Once point A ...
Instruction Manual - Page 104
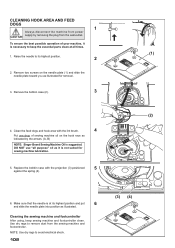
... the plug from the wall-outlet.
Use dry rags to its highest position and put
6
and slide the needle plate into position as illustrated for sewing machine lubrication.
5. Remove two screws on the hook race as it is necessary to avoid electrical shock.
102
(3) (4) Replace the bobbin case with the lint brush...
Instruction Manual - Page 106
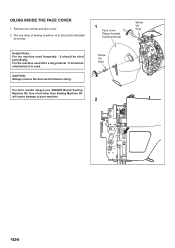
... interval : It should be oiled before oiling.
For best results always use SINGER Brand Sewing Machine Oil. Remove two screws and face cover. 2. CAUTION: Always remove the dust and lint before...Screw Vis Guia
2
Screw Vis Guia
104 Put one drop of oil other than Sewing Machine Oil will cause damage to the points indicated
by arrows.
1 Face cover Plaque frontale Cubierta frontal
Helpful Hints :...
Similar Questions

I Get E7 Error Message On My Singer Model 7258 Sewing Machine. There Is No Refe
Error message E7 is up on my Singer Stylist model 7258 sewing machine. It is not working at all. I t...
Error message E7 is up on my Singer Stylist model 7258 sewing machine. It is not working at all. I t...
(Posted by ebellamybellamy9 5 years ago)

Connection Error With Xl400 Embroidery Machine
installed & re-installed cd that came with my singer xl400. missing clem driver, getting a conne...
installed & re-installed cd that came with my singer xl400. missing clem driver, getting a conne...
(Posted by annwltn 6 years ago)

Connection Error
took my machine to my mothers and it worked fine. brought it home but didn't use it. took it back ou...
took my machine to my mothers and it worked fine. brought it home but didn't use it. took it back ou...
(Posted by donnap2dp 8 years ago)
Xl400 Just Purchased And Difficulty In Installing The Software. Who Can Assist
I need a new install disc with all the current updates since I have Windows 7 your software is not c...
I need a new install disc with all the current updates since I have Windows 7 your software is not c...
(Posted by tpowal 8 years ago)

Beeping From Singer Sewing Machine Stylist Ii 5625
My sewing machine will beep and stop sewing after three inches of sewing. I have taken it to be repa...
My sewing machine will beep and stop sewing after three inches of sewing. I have taken it to be repa...
(Posted by arusheria 9 years ago)