Singer 9970 Support Question
Singer 9970 Support Question
Find answers below for this question about Singer 9970.Need a Singer 9970 manual? We have 1 online manual for this item!
Question posted by valerodz on September 13th, 2015
What Is The Meaning Of Message On Lcd, Release The Foot Controller Pedal.
singer 9970
Current Answers
Answer #1: Posted by TechSupport101 on September 13th, 2015 8:36 AM
TechSupport101

Member since:
May 24th, 2013 Points: 12,171,275

Member since:
May 24th, 2013 Points: 12,171,275
This means that the switch the foot controller pedal engages and disengages is stuck at an engaged position or it is defect.
Related Singer 9970 Manual Pages
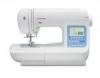
Instruction Manual - Page 2
.... 2. To unplug, grasp the plug, not the cord. 10. Keep fingers away from the accumulation of The Singer Company Limited S.à.r.l. SINGER is required around the sewing machine needle. 11. Keep ventilation openings of the sewing machine and foot controller free from all instructions before using and before cleaning. It may deflect the needle causing it on cord...
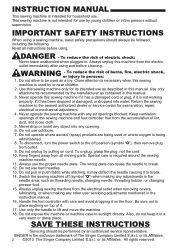
Instruction Manual - Page 3
... PATTERNS 53 H. CONTENTS
IMPORTANT SAFETY INSTRUCTIONS 2 MODEL 9970 4 FOR EUROPEAN AND SIMILAR TERRITORIES: ...... 4 MAIN PARTS 5 ACCESSORIES 6 DUST COVER 6 REMOVABLE EXTENSION TABLE 7
A. REMOVING THE PRESSER FOOT HOLDER 7
INSERTING THE NEEDLE 8 FABRIC, THREAD AND NEEDLE TABLE .......... 8 CONNECTING THE MACHINE 9 FOOT CONTROLLER 9 FUNCTION OF EACH PART 10
A. START/STOP BUTTON...
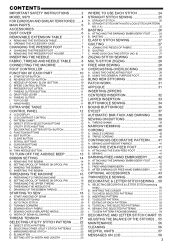
Instruction Manual - Page 5
...Hand Wheel 10. Control Panel 11. Needle Threader 15. Needle Plate 22. Spool Pin 31. Felt Washer 34. LCD Contrast Control 35. Straight Stitch Button 45. Presser Foot Lifter 49. Foot Controller 52. Controller Jack
1
8
...Button 47. Presser Foot Release Lever 17. Needle Thread Guide 24. Spool Cap 32. MAIN PARTS
1. Face Plate 3. Stitch Balance Adjusting Screw
(underneath machine)
12. Bobbin ...
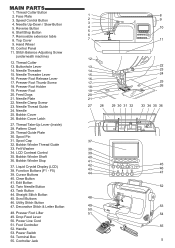
Instruction Manual - Page 6
Screw Driver
1
2
34 5 6
9
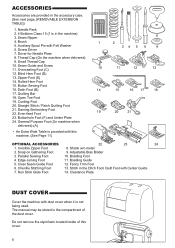
7. Driver for Needle Plate
8. Thread Cap (On the machine when delivered)
9. Overcasting Foot (C)
10
11
12
13
12. Zipper Foot (E)
14. Even-feed Foot
19
20
21
23. Invisible Zipper Foot
8. Parallel Sewing Foot
10. Braiding Guide
5. Chenille Stitching Foot
13. Stitch in the accessory case.
(See next page, [REMOVABLE EXTENSION
7
TABLE])
1. Non ...
Instruction Manual - Page 9
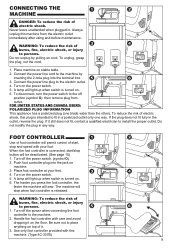
... a qualified electrician to the off
position (symbol O), then remove plug from the electric outlet immediately after using and before maintenance. Place machine on . 6. A lamp will sew. Place foot controller at your foot. Always unplug this machine from outlet.
To reduce the risk of it. 3. Turn off the power switch. (symbol O) 2. Be sure not to fit in...
Instruction Manual - Page 10
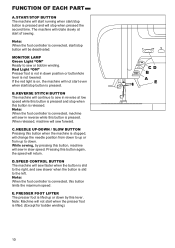
... is pressed. If the red light is on, the machine will sew in down . When released, machine will return.
Note: When the foot controller is connected, machine will not start even when start when the presser foot is connected, this button is pressed. Note: Machine will be deactivated. The machine will rotate slowly at low speed while this button is...
Instruction Manual - Page 14
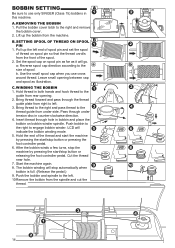
... or releasing the foot controller pedal. The bobbin winding will indicate the bobbin winding mode. 5. BOBBIN SETTING
Be sure to the
thread guide from under tension disc in this machine. Pull the bobbin cover latch to the
guide from right to the size of the spool.
2. Use the small spool cap when you use only SINGER...
Instruction Manual - Page 18
... upper thread only at the next starting of seam, press the start /stop sewing or release the foot controller pedal. 5. When you cut the threads. Hold back both threads and press the start / stop button to draw up the bobbin thread)
18
CAUTION 1. STARTING TO SEW
The machine will be set to page 7 for changing the presser...
Instruction Manual - Page 19
...Release the reverse button and press the start to forward sewing. 4. Start to sew these stitches. When you reach the end of seam, press and hold the reverse button. Sew 4-5 reverse stitch. 3. Machine will disappear.
19 This function can be made and lower the presser foot... will sew tacking stitches and stop button (or press the pedal).
Press and hold reverse button and sew 4-5 ...
Instruction Manual - Page 20
... needle positon. a. Stop the machine when you reach a corner. Use the needle as follows. 1. In such case, set as a pivot and turn fabric. 4. Raise the presser foot. 2.
F. Lower the presser foot and resume sewing. To keep the width of
general purpose foot and lower the foot. 3. TURNING CORNERS 1.
SEWING HEAVY FABRIC When sewing heavy fabrics, the toe end...
Instruction Manual - Page 25
... No. 4. Left needle Position No. 3. Position the fabric under the presser foot and lower it . 2. Hold the upper thread and bobbin thread
loosely and start sewing. B.
Place hand lightly on the fabric while sewing.
3. Machine will sew 4-5 stitches forward and sew 4-5 stitches backward and continue sewing forward.
3. No. 1. When you reach the end of fabric being sewn...
Instruction Manual - Page 26
... the needle clamp screw.
4. Place the fabric under the presser foot and then
lower the presser foot lifter. 2. Machine will be reduced automatically. 1. Pull the bobbin thread to the left to the rear and sew one stitch only. 3.
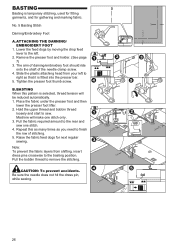
No. 5 Basting Stitch
Darning/Embroidery Foot
A. Lower the feed dogs by moving the drop feed lever to...
Instruction Manual - Page 32
... fabric
2. Baste the zipper tape.
3. Stitch across the lower end and right side of the zipper from bottom to the seam line. Zipper foot should be used for sewing center needle position straight stitch No. 1 only. Baste the zipper opening c: Basting d: Wrong side of the zipper.
4. Press open zipper face down on...
Instruction Manual - Page 33
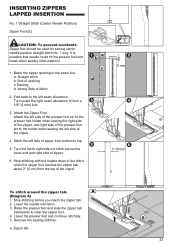
... left seam allowance. Attach the left side of the presser foot pin to the presser foot holder when sewing the right side of the zipper, and right side of the presser foot pin to the seam line. Zipper tab
33 Zipper foot should be used for sewing center needle position straight stitch No. 1 only. Remove the...
Instruction Manual - Page 39
... hole of presser foot and lower foot to form a firm shank. Raise the foot and cut the threads remaining about 4" (10 cm) long.
7.
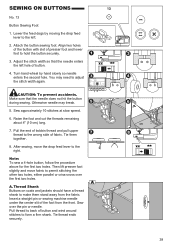
SEWING ON BUTTONS
No. 13
Button Sewing Foot
1. Thread Shank ...Note: To sew a 4-hole button, follow the procedure above for the first two holes. Sew approximately 10 stitches at slow speed.
6. A. Insert a straight pin or sewing machine needle under the...
Instruction Manual - Page 40

...stitch width so that the stitches are just cover the cord. B. Lower the foot and sew slowly, guiding the cord. Fold edge of cording foot.
40
3 mm 5 cm TRIPLE CORDING Set the stitch pattern to No.... HEMMING
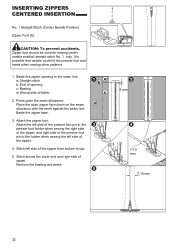
No. 1 Straight Stitch (Center Needle Position) Rolled Hem Foot
1. Sew several stitches and raise the presser foot. CORDING
No. 9 Zigzag Stitch for Single Cording No. 12 Multi Zigzag for about 2" ...
Instruction Manual - Page 41

... layers of fabric and improves the matching of very difficult fabrics. No. 1, 2, or 9
Even-feed Foot
A. Slide the attaching head from your left to feed freely under foot. CONTINUOUS DECORATIVE PATTERN
Use the Satin Foot for sewing quilts. This foot has a full indentation on the underside to easily allow closely spaced zigzag stitches and fabric...
Instruction Manual - Page 46
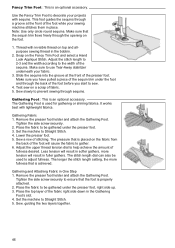
... securely to decorate your projects with lightweight fabrics. Set the machine to the width of the foot before you start to use Tear-Away stabilizer underneath your sewing machine stitches them in fuller gathers. Make sure that the foot is used to be gathered under the foot and through sequins. Adjust the stitch length to 2-3 and...
Instruction Manual - Page 54
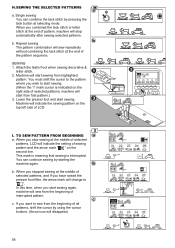
... 2. I " mark cursor is interrupted. c. Repeat sewing The pattern combination will indicate the sewing pattern on the top left side of the pattern sequence. SEWING 1. Machine will sew repeatedly without combining the tack stitch at the end of LCD. TO SEW PATTERN FROM BEGINNING a.
b. Lower the presser foot and start sewing from the beginning of sewing pattern and the arrow mark...
Instruction Manual - Page 58
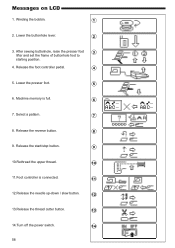
... Winding the bobbin.
1
2. After sewing buttonhole, raise the presser foot
3
lifter and set the frame of buttonhole foot to
starting position.
4. Release the foot controller pedal.
4
5. Release the start/stop button.
9
10.Rethread the upper thread.
10
11.Foot controller is full.
6
7. Lower the presser foot.
5
6. Lower the buttonhole lever.
2
3. Messages on LCD
1.
Similar Questions

Classes On How To Use Singer 9970 Sewing Machine
I bought the sewing machine during the pandemic and would like to learn how to use it- functions, st...
I bought the sewing machine during the pandemic and would like to learn how to use it- functions, st...
(Posted by Connienm 1 year ago)

Foot Control Pedal Not Working, Any Suggestions
any suggestions for getting foot pedal to work?
any suggestions for getting foot pedal to work?
(Posted by Hemlignow 1 year ago)

'release The Foot Controller Pedal'. Error
When I connect the pedal cord to the machine, then turn the machine on, I keep getting an error mess...
When I connect the pedal cord to the machine, then turn the machine on, I keep getting an error mess...
(Posted by btaylor5 7 years ago)

Why Won't My Machine Sew, Checked Bobbin And Retreaded. Has Power Just Will Not
the machine has power and threade correctly and bobbin is in right. It did freeze on me when sewing....
the machine has power and threade correctly and bobbin is in right. It did freeze on me when sewing....
(Posted by alewis41 7 years ago)

I Can't Seem To Get A Bobbin To Fill
When I press down on control foot I get "release the foot controller pedal or release the start/stop...
When I press down on control foot I get "release the foot controller pedal or release the start/stop...
(Posted by randiru 10 years ago)