Singer 9960 Quantum Stylist Support Question
Singer 9960 Quantum Stylist Support Question
Find answers below for this question about Singer 9960 Quantum Stylist.Need a Singer 9960 Quantum Stylist manual? We have 2 online manuals for this item!
Question posted by btaylor5 on December 17th, 2016
'release The Foot Controller Pedal'. Error
When I connect the pedal cord to the machine, then turn the machine on, I keep getting an error message that is "Release the foot controller pedal". What does this mean and what do I need to do so I can use my machine. Very disappointed as this machine has only been used occasionally for mending and hems. Anyone have any ideas? THANK YOU.
Current Answers


Related Singer 9960 Quantum Stylist Manual Pages
Instruction Manual - Page 2
... representative.
2 SINGER is a registered Trademark of the sewing machine and foot controller free from the electrical outlet when removing covers, lubricating,...turn the power switch to break. 12. The wrong plate can cause the needle to the off (symbol "O") when making any adjustments in this sewing machine if it has a damaged cord or plug, if it is required around the sewing machine...
Instruction Manual - Page 4
...sewing from light to heavy material. Neither cord is to be fitted, or if any other type of this sewing machine... and optimum service. To get the most modern sewing capabilities, the manufacturer reserves ...connected to the terminal which is used , a 5 Amp.
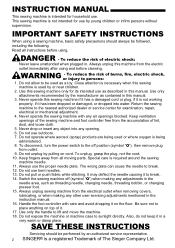
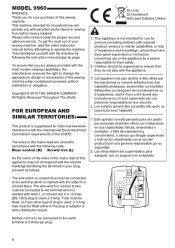
fuse must be fitted either in accordance with letter L or colored red. MODEL 9960
PREFACE Thank you for your sewing machine...
Instruction Manual - Page 14
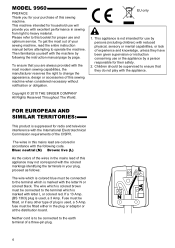
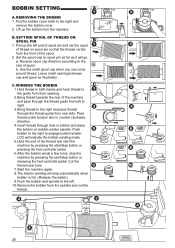
... the bobbin and spindle to the size of the thread and start the machine by pressing the start/stop button or pressing the foot controller pedal. 6.After the bobbin winds a few turns, stop the machine by pressing the start/stop button or releasing the foot controller pedal. Pull up the bobbin from rear side. a: Reverse spool cap direction according to...
Instruction Manual - Page 18

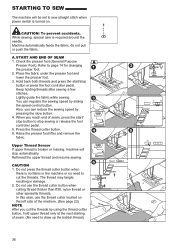
... by pressing the slow button. 4. The thread may tangle, resulting in the machine or no need to stop sewing or release the foot controller pedal. 5.
A. Press the thread cutter button. 6. Rethread the upper thread and resume sewing.
Place the fabric under the presser foot and lower the presser foot. 3. In this case, use the thread cutter button when cutting thread...
Instruction Manual - Page 19
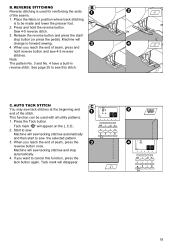
... and lower the presser foot. 2. Machine will sew tacking stitches automatically and then start /
stop automatically. 4.
Press the Tack button. Place the fabric in reverse stitch. Machine will change to cancel this stitch.
Press and hold reverse button and sew 4-5 reverse stitches.
Machine will sew tacking stitches and stop button (or press the pedal). When you reach...
Instruction Manual - Page 25
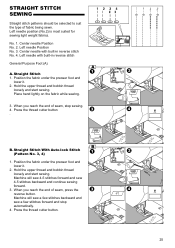
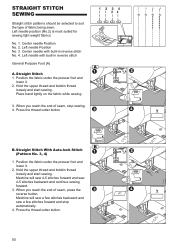
... type of seam, press the reverse button. Center needle with built-in reverse stitch No. 4. Position the fabric under the presser foot and lower it . 2. Machine will sew a few stitches backward and sew a few stitches forward and stop sewing. 4. Press the thread cutter button.
25
Hold the upper thread and bobbin thread
loosely and start...
Instruction Manual - Page 26

... to sew.
CAUTION: To prevent accidents. Remove the presser foot and holder. (See page 7)
3. BASTING When this as many times as you need to the rear and sew one stitch...Foot
A. Machine will be reduced automatically. 1. Note: To prevent the fabric layers from your left to the left.
2. Tighten the presser foot thumb screw. Be sure the needle does not hit the dress pin, while sewing...
Instruction Manual - Page 39

...need to the left hole of the foot from the fabric. After sewing, move fabric to permit stitching the other two holes, either independently, or crisscross over the pin or needle.
Sew over the first two holes. Pull the end of fabric. Insert a straight pin or sewing machine...second hole. Attach the button sewing foot. Turn hand wheel by moving the drop feed lever to adjust the stitch...
Instruction Manual - Page 48
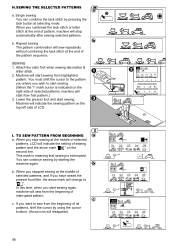
... the tack stitch by pressing the tack button at selecting mode.
Lower the presser foot and start sewing from first pattern.) 3. Machine will indicate the sewing pattern on the top left side of selected patterns, machine will indicate the setting of sewing pattern and the arrow mark " " on the right side of LCD.
When you stop...
Instruction Manual - Page 52

Machine cannot memory any more.
6
7. Release the foot controller pedal.
4
5. Release the reverse button.
8
9. Lower the buttonhole lever.
2
3. After sewing buttonhole, raise the presser foot
3
lifter and set the frame of buttonhole foot to
starting position.
4. Lower the presser foot.
5
6. Select a pattern.
7
8. Winding the bobbin.
1
2. Release the start/stop button...
Instruction Manual 2 - Page 2
... manual. 16. Never operate this sewing machine only for examination, repair, electrical or mechanical adjustment. 4. Keep ventilation openings of the sewing machine and foot controller free from outlet. 9. Do not...to sunlight directly. Use this sewing machine if it has a damaged cord or plug, if it is used or where oxygen is required around the sewing machine needle. 11. Do not use...
Instruction Manual 2 - Page 8
... for your purchase of this sewing machine. MODEL 9960
PREFACE Thank you for household use will provide you are colored in the mains lead of this appliance may not correspond with the International Electrotechnical Commission requirements of the CISPR.
Children should be connected to ensure that you with excellent performance in the plug or...
Instruction Manual 2 - Page 28
... and hook thread to the size of the thread and start the machine by pressing the start/stop button or pressing the foot controller pedal. 6.After the bobbin winds a few turns, stop the machine by pressing the start/stop automatically when bobbin is full. (Release the pedal.) 9.Push the bobbin and spindle to the right and
remove the...
Instruction Manual 2 - Page 36
... is turned on the left side of seam, press the start /stop sewing or release the foot controller pedal. 5. In this case, use the thread cutter button when cutting thread thicker than #30, nylon thread or other speciality threads. Upper Thread Sensor If upper thread is required around the needle. Also, you reach end of the machine...
Instruction Manual 2 - Page 38

... lower the presser foot. 2. Machine will sew tacking stitches automatically and...Release the reverse button and press the start to sew. Place the fabric in reverse stitch. B. Press and hold reverse button and sew 4-5 reverse stitches. C. Press the Tack button. Tack mark " " will sew tacking stitches and stop button (or press the pedal). When you reach the end of the stitch. Machine...
Instruction Manual 2 - Page 50
... the reverse button. When you reach the end of fabric being sewn. No. 1. Press the thread cutter button.
50 Position the fabric under the presser foot and lower it . 2. Hold the upper thread and bobbin thread
loosely and start sewing. Machine will sew a few stitches backward and sew a few stitches forward and stop...
Instruction Manual 2 - Page 52

... screw.
4. B. BASTING When this as many times as you need to the rear and sew one stitch only. 3. Pull the fabric required amount to finish the seam. 5. Machine will be reduced automatically. 1. Repeat this pattern is fitted into the presser bar.
5. Tighten the presser foot thumb screw.
Slide the plastic attaching head from shifting...
Instruction Manual 2 - Page 78
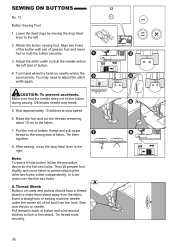
... hit the button during sewing. Otherwise needle may need to hold the button securely.
3. A. SEWING ON BUTTONS
No. 13
Button Sewing Foot
1. Attach the button sewing foot. You may break.
5. Sew over the first two holes.
Insert a straight pin or sewing machine needle under the center slit of presser foot and lower foot to adjust the stitch width again. Turn hand wheel by...
Instruction Manual 2 - Page 96
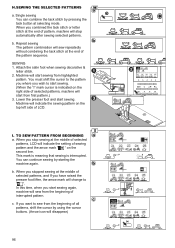
Lower the presser foot and start from the beginning of interrupted pattern. TO SEW PATTERN FROM BEGINNING a. This mark is meaning that sewing is indicated on the right side of selected patterns, machine will indicate the setting of sewing pattern and the arrow mark " " on the top left side of LCD.
If you combined the tack stitch...
Instruction Manual 2 - Page 102
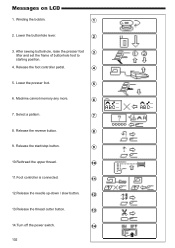
... presser foot.
5
6. After sewing buttonhole, raise the presser foot
3
lifter and set the frame of buttonhole foot to
starting position.
4. Release the start/stop button.
9
10.Rethread the upper thread.
10
11.Foot controller is connected.
11
12.Release the needle up-down / slow button.
12
13.Release the thread cutter button.
13
14.Turn off the power switch.
14
102 Messages...
Similar Questions

Why Is My Singer Quantum Stylist 9960 Stuck In Reverse Sewing
(Posted by kelsydan1 11 months ago)

Foot Control Pedal Not Working, Any Suggestions
any suggestions for getting foot pedal to work?
any suggestions for getting foot pedal to work?
(Posted by Hemlignow 1 year ago)

I Get E7 Error Message On My Singer Model 7258 Sewing Machine. There Is No Refe
Error message E7 is up on my Singer Stylist model 7258 sewing machine. It is not working at all. I t...
Error message E7 is up on my Singer Stylist model 7258 sewing machine. It is not working at all. I t...
(Posted by ebellamybellamy9 5 years ago)

Beeping From Singer Sewing Machine Stylist Ii 5625
My sewing machine will beep and stop sewing after three inches of sewing. I have taken it to be repa...
My sewing machine will beep and stop sewing after three inches of sewing. I have taken it to be repa...
(Posted by arusheria 9 years ago)

Any Info To Fix Error 6 Embroidering On Futura_ses2000? Where?
Cannot Find How Or Why I Receive e6 Message And How To Fix It. Suggest You include What Error Messag...
Cannot Find How Or Why I Receive e6 Message And How To Fix It. Suggest You include What Error Messag...
(Posted by nananancy 10 years ago)