Singer 9960 Quantum Stylist Support Question
Singer 9960 Quantum Stylist Support Question
Find answers below for this question about Singer 9960 Quantum Stylist.Need a Singer 9960 Quantum Stylist manual? We have 2 online manuals for this item!
Question posted by nananancy on November 3rd, 2013
Any Info To Fix Error 6 Embroidering On Futura_ses2000? Where?
Cannot Find How Or Why I Receive e6 Message And How To Fix It. Suggest You include What Error Message Means And Ways To Troubleshoot It In The Manual, On Line Support Areas. There Is no Support At Futura-support.com Nor An Area To Assist Anyone In This Area. Please Respond.
Current Answers
Answer #1: Posted by Odin on November 3rd, 2013 5:31 PM
Odin

Member since:
April 10th, 2010 Points: 41,236,690

Member since:
April 10th, 2010 Points: 41,236,690
E6 means that the thread is tangled. You'll find several possible solutions at http://www.justanswer.com/1avr-sewing-machine-repair/5kr1i-futura-singer-ce-250-ce-350-keep-getting-e6-error-change.html.
Hope this is useful. Please don't forget to click the Accept This Answer button if you do accept it. My aim is to provide reliable helpful answers, not just a lot of them. See https://www.helpowl.com/profile/Odin.
Related Singer 9960 Quantum Stylist Manual Pages
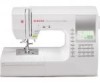
Instruction Manual - Page 2
... a sewing machine, basic safety precautions should be followed, including the following. Do not pull or push fabric while stitching. Always unplug sewing machine from outlet. 9. Also, do not keep it on the floor. IMPORTANT SAFETY INSTRUCTIONS
When using . Read all moving parts.
Use this manual. 3. Return the sewing machine to be used as a toy. Never operate the sewing machine with...
Instruction Manual - Page 3

...Messages on LCD 52
3 DIRECT STITCH SELECTION BUTTONS 12 E. TWIN NEEDLE BUTTON 13
TO TURN OFF THE AUDIBLE BEEP 13 BOBBIN SETTING 14
A. INSERTING THE BOBBIN 15
THREADING THE MACHINE...WIDTH AND LENGTH 23
WHERE TO USE EACH STITCH 24 STRAIGHT STITCH SEWING 25
A. CONTENTS
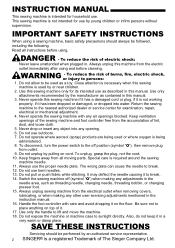
IMPORTANT SAFETY INSTRUCTIONS 2 MODEL 9960 4 FOR EUROPEAN AND SIMILAR TERRITORIES: ...... 4 MAIN PARTS 5 ...
Instruction Manual - Page 4
... by persons (including children) with reduced physical, sensory or mental capabilities, or lack of plug is marked with letter L or colored red. Please refer to this sewing machine when considered necessary...supervised to ensure that you are colored in accordance with the following the instruction manual page by following code.
To ensure that they have been given supervision or ...
Instruction Manual - Page 6

Small Thread Cap
10. Button Sewing Foot
16. Cording Foot
20. Even-feed Foot
19
20
21
23. Clearance Plate 30. a. Driver for ... next page, [EXTENSION TABLE])
7
1. Fancy Trim Foot 32. Shank w/o metal
22
23
24
DUST COVER
Cover the machine with dust cover when it is in the compartment
of this machine. (See Page 11)
OPTIONAL ACCESSORIES 25. The manual may be used.
Instruction Manual - Page 7

... the thumb screw.
7 EXTENSION TABLE
a.
b.
Removing the presser foot holder When attaching the special presser foot or cleaning the machine, you . REMOVING THE EXTENSION TABLE Hook your finger to the stitch you sew, or work you until the
needle is at its pin directly under the
slot in presser foot holder. 5. CHANGING...
Instruction Manual - Page 9
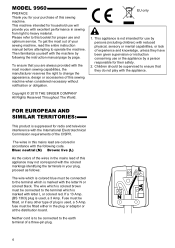
...machine. 3. Connect the power line plug to the off
position (symbol O), then remove plug from the electric outlet immediately after using and before maintenance. FOR UNITED STATES AND CANADA USERS: POLARIZED PLUG INFORMATION This appliance has a polarized plug (one way... shock, or injury to place anything on cord. The machine will sew. Be sure not to persons. 1. To unplug, grasp...
Instruction Manual - Page 10
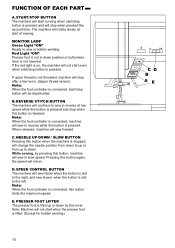
...: When the foot controller is connected, start /stop button is pressed and will not start of sewing. REVERSE STITCH BUTTON The machine will rotate slowly at low speed while this lever. When released, machine will return.
B. C. While sewing, by this button is lifted. (Except for bobbin winding)
10 Note: When the foot controller is...
Instruction Manual - Page 11

... thread thicker than #30, nylon thread or other speciality threads. Their function is no fabric
in the machine or no need wide sewing space, attach the extra wide table as below the presser foot. For ordinary sewing, move the fabric being sewn. This raises feed dogs to front. 3. J. EXTRA WIDE TABLE
If you...
Instruction Manual - Page 19
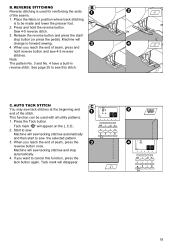
... end of the stitch. This function can be made and lower the presser foot. 2. When you want to forward sewing. 4. Machine will change to cancel this stitch. Place the fabric in reverse stitch. B. See page 25 to sew.
Tack mark " " will disappear.
19
Press the Tack button. REVERSE STITCHING Reverse stitching is to...
Instruction Manual - Page 25
... with built-in reverse stitch
General Purpose Foot (A)
A. Place hand lightly on the fabric while sewing.
3. When you reach the end of seam, press the reverse button. B. Machine will sew a few stitches backward and sew a few stitches forward and stop sewing. 4. Left needle Position No. 3. Straight Stitch 1. Press the thread cutter button . Press the thread...
Instruction Manual - Page 26

... plastic attaching head from shifting, insert dress pins crosswise to finish the seam. 5.
Machine will be reduced automatically. 1. Repeat this pattern is fitted into the presser bar.
5.
Be sure the needle does not hit the dress pin, while sewing.
26 Tighten the presser foot thumb screw. CAUTION: To prevent accidents. No. 5 Basting...
Instruction Manual - Page 39

... securely.
3. CAUTION: To prevent accidents. Make sure that the needle enters the left .
2. After sewing, move fabric to make them together.
8.
Thread Shank Buttons on coats and jackets should have a thread... of presser foot and lower foot to form a firm shank. Insert a straight pin or sewing machine needle under the center slit of bobbin thread and pull upper thread to the fabric.
7. ...
Instruction Manual - Page 48
... buttons. (Arrow icon will stop sewing at the end of sewing pattern and the arrow mark " " on the right side of LCD. When you combined the tack stitch or letter stitch at the end of pattern, machine will disappear)
48 This mark is meaning that sewing is indicated on the second line. I " mark cursor is interrupted...
Instruction Manual 2 - Page 2
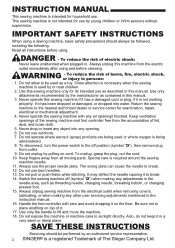
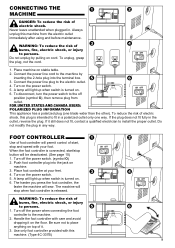
... to place anything on top of lint, dust, and loose cloth. 5. DANGER - Return the sewing machine to be followed, including the following. Keep ventilation openings of the sewing machine and foot controller free from the accumulation of it in the instruction manual. 16. The wrong plate can cause the needle to sunlight directly. SAVE THESE INSTRUCTIONS...
Instruction Manual 2 - Page 8
... with the machine by persons (including children) with...sewing machine.
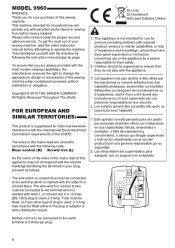
If a 13 Amp. (BS 1363) plug is colored brown must be connected to operate the machine.
Les enfants doivent être surveillés afin qu'ils ne jouent pas avec l'appareil.
1. MODEL 9960... with excellent performance in your sewing machine, read the entire instruction manual before attempting to the terminal ...
Instruction Manual 2 - Page 38

...: The pattern No. 3 and No. 4 have a built-in position where back stitching
is used with all utility patterns. 1. Start to forward sewing. 4. See page 50 to sew the selected pattern. 3.
Machine will sew tacking stitches and stop button (or press the pedal). B. REVERSE STITCHING Reverse stitching is to cancel this stitch. When you reach...
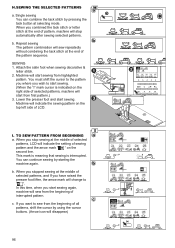
Instruction Manual 2 - Page 50
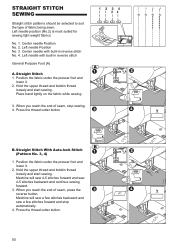
... (Pattern No. 3, 4)
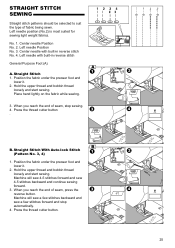
1. Position the fabric under the presser foot and
lower it .
2. Machine will sew 4-5 stitches forward and sew 4-5 stitches backward and continue sewing forward.
3. Left needle with built-in reverse stitch
General Purpose Foot (A)
A. Place hand lightly on the fabric while sewing.
3. Press the thread cutter button. Press the thread cutter button.
50 Center...
Instruction Manual 2 - Page 52

...one stitch. 4. BASTING When this as many times as you need to the rear and sew one stitch only. 3. Machine will be reduced automatically. 1. Repeat this pattern is fitted into the presser bar.
5....fabric layers from your left .
2. Be sure the needle does not hit the dress pin, while sewing.
52 The arm of darning/embroidery foot should ride onto the shaft of the needle clamp screw.
...
Instruction Manual 2 - Page 78
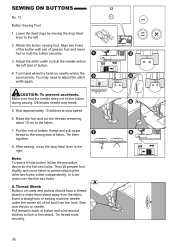
...the threads remaining about 10 cm to the left hole of fabric.
Insert a straight pin or sewing machine needle under the center slit of the foot from the fabric. Adjust the stitch width so that ...the needle does not hit the button during sewing. Then lift presser foot slightly and move the drop feed lever to the right. Otherwise needle...
Instruction Manual 2 - Page 96
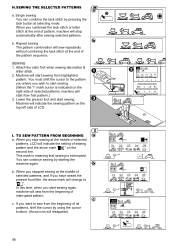
... stitch or letter stitch at the end of pattern, machine will disappear)
96 Repeat sewing The pattern combination will indicate the sewing pattern on the second line. This mark is meaning that sewing is indicated on the right side of selected patterns, machine will sew from highlighted
pattern.
b. Machine will sew repeatedly without combining the tack stitch at the end...
Similar Questions

Why Is My Singer Quantum Stylist 9960 Stuck In Reverse Sewing
(Posted by kelsydan1 11 months ago)

Quantum 9960, Thread Balls Up
thread balls up under plate. Have to tear fabric to get it out. Also the bar that goes across the bo...
thread balls up under plate. Have to tear fabric to get it out. Also the bar that goes across the bo...
(Posted by Sisbankssb 3 years ago)

I Get E7 Error Message On My Singer Model 7258 Sewing Machine. There Is No Refe
Error message E7 is up on my Singer Stylist model 7258 sewing machine. It is not working at all. I t...
Error message E7 is up on my Singer Stylist model 7258 sewing machine. It is not working at all. I t...
(Posted by ebellamybellamy9 5 years ago)

Bobbin Case On Singer 9960 Quantum Stylist Noisey
when I sew I hear a clicking sound and some rattling of the bobbin occurs. more so when I sew on the...
when I sew I hear a clicking sound and some rattling of the bobbin occurs. more so when I sew on the...
(Posted by sdshowen 8 years ago)

I Need An Extnesion Table For My Sewing Machine Singer 7258 Stylist
(Posted by loucksd 10 years ago)