Singer 9970 Support Question
Singer 9970 Support Question
Find answers below for this question about Singer 9970.Need a Singer 9970 manual? We have 1 online manual for this item!
Question posted by virginiamackenna on August 9th, 2021
Hola Cómo Hago Para Que Avance La Tela
cómo hago para que avance la tela
Current Answers
Answer #1: Posted by SonuKumar on August 9th, 2021 8:19 AM
SonuKumar

Member since:
May 9th, 2021 Points: 16,604,800

Member since:
May 9th, 2021 Points: 16,604,800
Please respond to my effort to provide you with the best possible solution by using the "Acceptable Solution" and/or the "Helpful" buttons when the answer has proven to be helpful.
Regards,
Sonu
Your search handyman for all e-support needs!!
Related Singer 9970 Manual Pages
Instruction Manual - Page 1
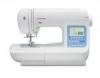
INSTRUCTION MANUAL 9970
Instruction Manual - Page 2
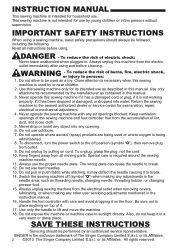
... - All rights reserved. Use only attachments recommended by an authorized service representative. Read all moving parts. Do not use outdoors. 7. Keep ventilation openings of the sewing machine and foot controller free from the electrical outlet when removing covers, lubricating, or when making any adjustments in . Handle the foot controller with any other...
Instruction Manual - Page 3
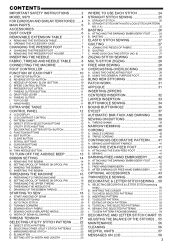
... 51 F. SELECTING OTHER UTILITY STITCH PATTERNS 22 C. PREPARING TO THREAD MACHINE 16 B. TO SEW PATTERN FROM BEGINNING 54
DECORATIVE AND LETTER STITCH CHART 55 ADJUSTING THE ...LCD CONTRAST CONTROL 12 C. CONTENTS
IMPORTANT SAFETY INSTRUCTIONS 2 MODEL 9970 4 FOR EUROPEAN AND SIMILAR TERRITORIES: ...... 4 MAIN PARTS 5 ACCESSORIES 6 DUST COVER 6 REMOVABLE EXTENSION TABLE 7
A. ...
Instruction Manual - Page 4
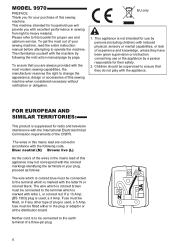
... be fitted, or if any other type of plug is to be connected to this sewing machine. EU only
1. Neither cord is used , a 3 Amp. MODEL 9970
PREFACE Thank you with excellent performance in sewing from light to heavy material. This machine intended for your purchase of a three-pin plug.
4 To ensure that they have been...
Instruction Manual - Page 5
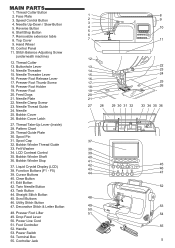
.... Cursor Buttons 40. Twin Needle Button 43. Utility Stitch Button 47. Power Line Cord 51. Needle Up-Down / Slow Button 5. Stitch Balance Adjusting Screw
(underneath machine)
12. Thread Cutter 13. Needle Threader 15. Presser Foot Release Lever 17. Presser Foot Holder 19. Presser Foot 20. Feed Dogs 21. Needle Plate 22...
Instruction Manual - Page 6
...Pin with this cover.
6 Quilting Bar
18. Darning Embroidery Foot 22. Invisible Zipper Foot
8. Parallel Sewing Foot
10. Non Stick Glide Foot
14. Needle Pack
2. 4 Bobbins Class 15 (1 is not... Seam Ripper
8
4. Driver for Needle Plate
8. General Purpose Foot (On machine when
delivered) (A)
• An Extra Wide Table is provided with Felt Washer 6. Braiding Foot
4. Clearance ...
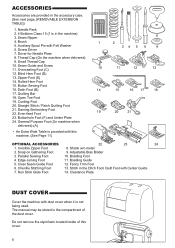
Instruction Manual - Page 7
...attach, insert to the left bottom side of presser bar. 4. B. OPENING THE ACCESSORY CASE Hook your finger to the stitch you sew, or work you . 4. CHANGING THE PRESSER FOOT
The presser foot must be changed according to the left side of accessory case... THE PRESSER FOOT HOLDER
When attaching presser feet that have their own shank, or when cleaning the machine, you change the presser foot.
Instruction Manual - Page 8
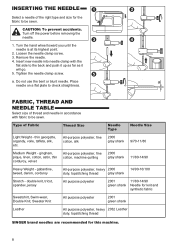
... prevent accidents. Do not use the bent or blunt needle. FABRIC, THREAD AND NEEDLE TABLE
Select size of the right type and size for this machine.
8 Type of Fabric
Thread Size
Needle Type
Needle Size
Light Weight - gingham, pique, linen, cotton, satin, thin corduroy, velvet
All-purpose polyester, fine cotton...
Instruction Manual - Page 9
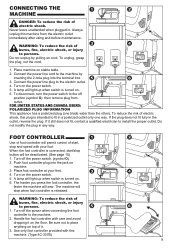
...machine by pulling on cord. FOR UNITED STATES AND CANADA USERS: POLARIZED PLUG INFORMATION This appliance has a polarized plug (one way. FOOT CONTROLLER
Use of foot controller will permit control of electric shock, this machine... from outlet. Use only foot controller provided with your feet. 4. CONNECTING THE MACHINE... the machine will ...machine. 2. If it on
machine...machine...
Instruction Manual - Page 10
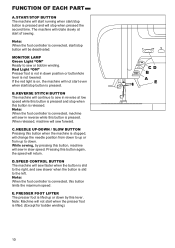
...or down by pressing this lever. REVERSE STITCH BUTTON The machine will not start even when start/stop button is lifed up to sew in slow speed. Note: When the foot controller is released...pressed and will start running when start of sewing. Note: When the foot controller is connected, machine will sew in down . START/STOP BUTTON The machine will stop button is pressed. Red Light...
Instruction Manual - Page 11
..., move the fabric being sewn. Raise the presser foot and bring fabric and
threads backward after sewing to the
right.
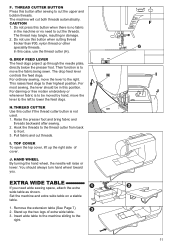
11 This raises feed dogs to cut both threads automatically. Insert wide table to the machine sliding to cut threads. THREAD CUTTER BUTTON Press this cutter if the thread cutter button is...
Instruction Manual - Page 12
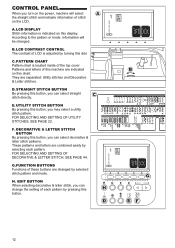
Patterns and letters of this machine are combined easily by selected stitch pattern and mode. E.
These patterns and letters are indicated on this button, you can change ... SETTING OF UTILITY STITCHES, SEE PAGE 22.
LCD CONTRAST CONTROL The contrast of LCD is located inside of stitch on the power, machine will be changed by selecting each pattern by turning this dial.
Instruction Manual - Page 13
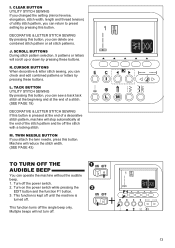
... stitch width. (SEE PAGE 43)
TO TURN OFF THE AUDIBLE BEEP
You can operate the machine without the audible beep. 1. TWIN NEEDLE BUTTON If you attach the twin needle, press this button. CLEAR BUTTON UTILITY STITCH SEWING If you changed the setting (mirror/reverse, elongation, stitch width, length and thread tension) of...
Instruction Manual - Page 14
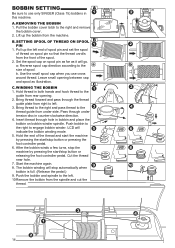
... from the front of thread on spool pin so that the thread unrolls from the machine. Bring thread forward and pass through the thread
guide plate from the spindle and cut... 1. b. SETTING SPOOL OF THREAD ON SPOOL PIN
1. After the bobbin winds a few turns, stop the machine by pressing the start /stop automatically when bobbin is full. (Release the pedal.) 9.
WINDING THE BOBBIN ...
Instruction Manual - Page 15

... holder with the thread
unwinding counter clockwise.
2. Pull thread out about 10 cm (4 inches). Pull thread toward the left tab into the hole in this machine.
15 D. INSERTING THE BOBBIN 1. Place bobbin into notch (a) while holding the bobbin.
3.
Instruction Manual - Page 16

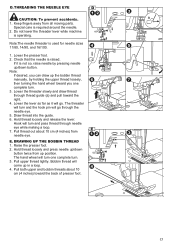
PREPARING TO THREAD MACHINE 1. Press the needle up/down button and set the spool of spool pin and set the
needle in both hands and pass thread to the .... To thread the take-up lever, draw thread up thread. 5. C. Pull up and bring thread back down toward you use needle threader.
16 THREADING THE MACHINE
A. Pull thread downward along the slit. 6.
Instruction Manual - Page 17
D. THREADING THE NEEDLE EYE
CAUTION: To prevent accidents. Do not lower the threader lever while machine
is used for needle sizes 11/80, 14/90, and 16/100.
1. Note:The needle threader is operating. Note: If desired, you one complete turn . 3. ...
Instruction Manual - Page 18
... 7 for changing the presser foot. 2.
Do not press the thread cutter button when
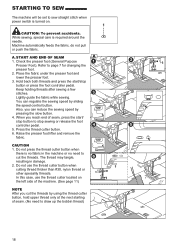
there is required around the needle. While sewing, special care is no fabric in damage. 2. STARTING TO SEW
The machine will be set to cut the threads by sliding the speed control button. CAUTION: To prevent accidents. START AND END...
Instruction Manual - Page 19
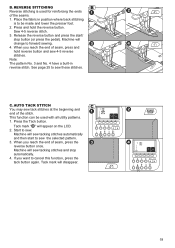
...sewing. 4. Machine will sew tacking stitches automatically and then start /
stop automatically. 4. When you reach the end of the stitch. Sew 4-5 reverse stitch. 3.
Tack mark will appear on the LCD. 2. Machine will sew...to cancel this function, press the tack button again. Press the Tack button. Machine will change to sew. Note: The pattern No. 3 and No. 4 have a built-in ...
Instruction Manual - Page 20
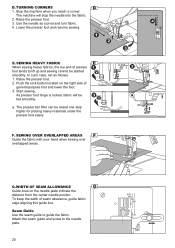
... the presser foot. 2. Seam Guide Use the seam guide to the needle plate.
20 The machine will be raised one step higher for placing heavy materials under the presser foot easily. Lower the presser foot and resume sewing. The presser bar lifter can be fed smoothly. Raise the presser foot. 3. As presser...
Similar Questions

Manual En Español
Hola ya tengo el Manual en PDF pero lo necesito en español por favor que puedo hacer?
Hola ya tengo el Manual en PDF pero lo necesito en español por favor que puedo hacer?
(Posted by Yoleimys 2 years ago)

I Have Er Code 5 On My Singer Modern Quilter 8500q. What Can I Do To Get It Work
I have Er code 5 on my Singer Modern Quilter 8500Q. What can I do to get it working again? I brought...
I have Er code 5 on my Singer Modern Quilter 8500Q. What can I do to get it working again? I brought...
(Posted by val2102 2 years ago)

Singer Brilliance Marca E5
No achica la medida de la puntada. Es más notorio en los bordados. Cómo lo soluciono?
No achica la medida de la puntada. Es más notorio en los bordados. Cómo lo soluciono?
(Posted by Anigarofani 3 years ago)

Que Pueda Tener Mi Maquina De Cocer Singer Brilliance Modelo 6199
problemas de E7 en maquina singer brilliance modelo 6199
problemas de E7 en maquina singer brilliance modelo 6199
(Posted by roarjar 10 years ago)