Singer 9100 Professional Support Question
Singer 9100 Professional Support Question
Find answers below for this question about Singer 9100 Professional.Need a Singer 9100 Professional manual? We have 2 online manuals for this item!
Question posted by Shanncantwell09 on December 31st, 2013
Lcd Screen
I cannot get my LCD screen to change the stitch pattern. It will not do anything With the screen but it is sewing.
Current Answers
Related Singer 9100 Professional Manual Pages
Instruction Manual - Page 3
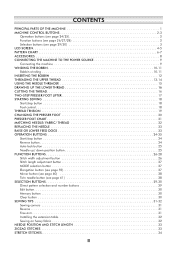
... (see page 29/30 3 LCD SCREEN 4-5 PATTERN CHART 6-7 ACCESSORIES 8 CONNECTING THE MACHINE TO THE POWER SOURCE 9 Connecting the machine 9 WINDING THE BOBBIN 10-11...LIFTER 17 STARTING SEWING 18 Start/stop button 18 Foot control 18 THREAD TENSION 19 CHANGING THE PRESSER ... button 25 FUNCTION BUTTONS 26-28 Stitch width adjustment button 26 Stitch length adjustment button 27 MODE selection ...
Instruction Manual - Page 4
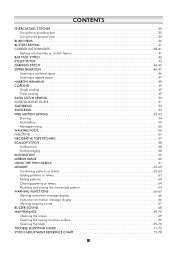
... 64 Recalling and sewing the memorized pattern 65 WARNING FUNCTIONS 66-67 Warning animation message display 66 Instruction animation message display 66 Warning beeping sound 67 BUZZER SOUND 68 MAINTENANCE 69-70 Cleaning the screen 69 Cleaning the sewing machine surface 69 Cleaning the hook 69-70 TROUBLE SHOOTING GUIDE 71-72 STITCH ADJUSTMENT REFERENCE CHART...
Instruction Manual - Page 5
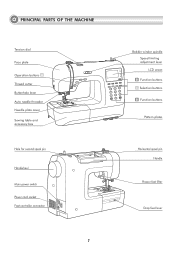
... THE MACHINE
Tension dial Face plate Operation buttons A Thread cutter Buttonhole lever Auto needle threader Needle plate cover Sewing table and accessory box
Hole for second spool pin
Handwheel Main power switch Power cord socket Foot controller connector
1
Bobbin winder spindle Speed limiting adjustment lever LCD screen
B Function buttons C Selection buttons B Function buttons
Pattern plates...
Instruction Manual - Page 9

LCD SCREEN
Pattern
Reverse Auto-lock Needle up
position
Twin needle
Suggested presser foot and identification letter
Bobbin winding
Buttonhole lever Sound on
Pattern
Needle position
Tension
Stitch length
Auto-stop Mirror
Needle down position
Pattern number
Sound off
Alphabet
Stitch width Stitch length
Suggested presser foot and identification letter
Pattern number
Stitch width
Tension...
Instruction Manual - Page 10

LCD SCREEN
Memory Editing patterns
Edit mode Memory group
Number of current unit
M EDIT
Total number of unit
Sewing the memorized pattern
Memory mode
M
Elongation
Elongation
Pattern to edit Amount of elongation
5
Instruction Manual - Page 16
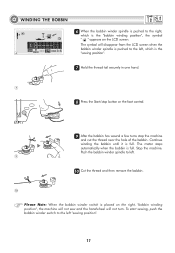
... Cut the thread and then remove the bobbin.
10
Please Note: When the bobbin winder switch is placed on the right, "bobbin winding position", the machine will not sew and the handwheel will disappear from the LCD screen when the
bobbin winder spindle is pushed to the left...
Instruction Manual - Page 29
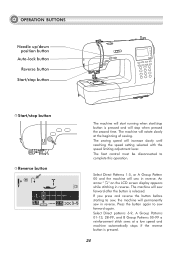
...button is released. Select Direct patterns 6-9, A Group Patterns 01-13, 28-99, and B Group Patterns 00-99 a reinforcement stitch sews at the beginning of sewing. An arrow " " on the LCD screen display appears while stitching in reverse.
If you press and reverse the button before starting to sew, the machine will permanently sew in reverse. The machine will rotate slowly at a low...
Instruction Manual - Page 30
... in the lowest position.
25
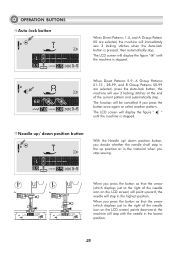
The LCD screen will display the figure " " until the machine is stopped. OPERATION BUTTONS Auto-lock button
When Direct Patterns 1-4, and A Group Pattern 00 are selected, press the Auto-lock button, the machine will sew 3 locking stitches at the end of the current pattern and automatically stop.
The LCD screen will display the figure " " until the...
Instruction Manual - Page 31
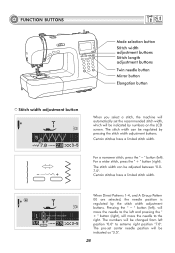
... a limited stitch width. For a narrower stitch, press the " – " button (left position "0.0" to the right. The stitch width can be indicated by numbers on the LCD screen. When Direct Patterns 1-4, and A Group Pattern 00 are selected, the needle position is regulated by pressing the stitch width adjustment buttons.
The pre-set the recommended stitch width, which will be changed from...
Instruction Manual - Page 32
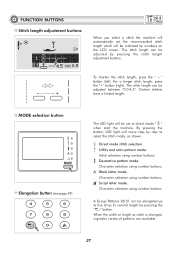
...BUTTONS Stitch length adjustment buttons
When you select a stitch the machine will automatically set the recommended stitch length which will be set at direct mode " " when start the machine. For a longer stitch length, press the "+" button (right). Utility and satin pattern mode: Stitch selection using number buttons. A Group Patterns 28-51 can be adjusted by numbers on the LCD screen...
Instruction Manual - Page 33
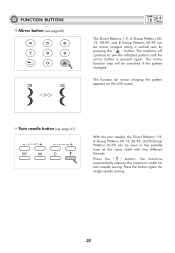
... for twin needle sewing. Press the " " button, the machine automatically reduces the maximum width for mirror imaging the pattern appears on the LCD screen. Press the button again for single needle sewing.
28 Twin needle button (see page 60)
The Direct Patterns 1-9, A Group Patterns 0013, 28-99, and B Group Patterns 00-99 can be canceled if the pattern changed.
FUNCTION BUTTONS...
Instruction Manual - Page 38
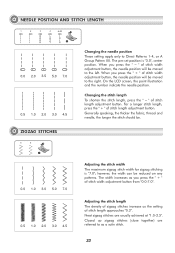
...reduced on any patterns. Neat zigzag stitches are referred to Direct Patterns 1-4, or A Group Pattern 00. NEEDLE POSITION AND STITCH LENGTH
A-00
0.0 2.0 3.5 5.0 7.0
0.5 1.0 2.0 3.0 4.5
ZIGZAG STITCHES
Changing the needle position These setting apply only to as a satin stitch.
33 When you press the " – " of stitch length approaches "0.3". On the LCD screen, the point illustration...
Instruction Manual - Page 44
... with the center of upper
thread and start sewing.
5
39
Starting
3
point
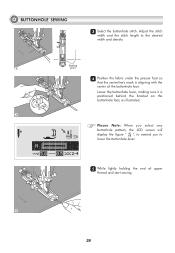
4 Position the fabric under the presser foot so
that the centerline's mark is positioned behind the bracket on the buttonhole foot, as illustrated.
4
Please Note: When you select any buttonhole pattern, the LCD screen will display the figure " ", to remind you to...
Instruction Manual - Page 50
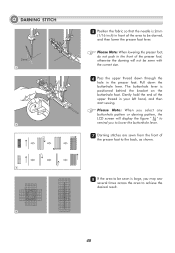
...front of the area to lower the buttonhole lever.
77 Darning stitches are sewn from the front of the upper thread in your left hand, and then start sewing. DARNING STITCH
2mm 5
6 7 8
55 Position the fabric so that ... darning will display the figure " " to remind you select any buttonhole pattern or darning pattern, the LCD screen will not be darned, and then lower the presser foot lever.
Instruction Manual - Page 55

... A-51 A-52 A-53 A-54 A-55 A-56 A-57 A-58 A-59 A-60 A
3.5~7.0 0.5~2.0
Use the satin stitch foot for satin stitching and sewing decorative stitches.
To change the satin or decorative stitch pattern, you may adjust the length and width of the fabric.
50 Please Note: When sewing very light weight fabrics, it is recommended that you achieve the desired length...
Instruction Manual - Page 60

...
Secure with the machine.
55 When the letter is not included with reinforcement stitches at a constant speed, moving the hoop slowly along the outline of the design by moving the embroidery hoop.
Monogramming
Select the zigzag stitch pattern and adjust the stitch width as desired. FREE MOTION SEWING Embroidery
Stitch along the lettering. Select zigzag stitch pattern and adjust...
Instruction Manual - Page 65
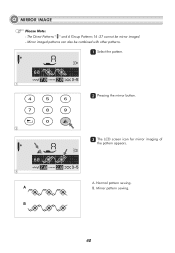
A. Normal pattern sewing. Mirror pattern sewing.
60 The Direct Patterns " " and A Group Patterns 14 -27 cannot be combined with other patterns.
11 Select the pattern.
1
22 Pressing the mirror button.
2
3
A B
33 The LCD screen icon for mirror imaging of
the pattern appears. Mirror imaged patterns can also be mirror imaged. -
B. MIRROR IMAGE
Please Note: -
Instruction Manual - Page 68
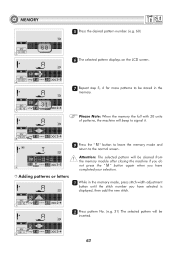
... with 20 units of patterns, the machine will be stored in the memory mode, press stitch width adjustment
button until the stitch number you have completed your selection.
11 While in the
memory. MEMORY
55 Press the desired pattern number. (e.g. 60)
M
5
66 The selected pattern displays on the LCD screen. M
6
77 Repeat step 5, 6 for more patterns to signal it.
Instruction Manual - Page 70
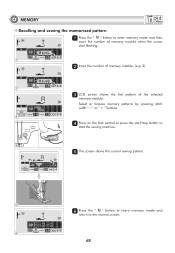
... memory mode and then
input the number of the selected
memory module. M
1
22 Input the number of memory module. (e.g. 2)
M
2
33 LCD screen shows the first pattern of memory module when the cursor start the sewing machine.
4
M
55 The screen shows the current sewing pattern.
5
66 Press the "000" button to leave memory mode and
return to the normal...
Instruction Manual - Page 71
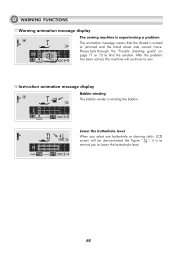
... or jammed and the hand wheel axle cannot move.
After the problem has been solved, the machine will be demonstrated the figure " ", it is to remind you select any buttonhole or darning stitch, LCD screen will continue to sew.
Please look through the "Trouble shooting guide" on page 71 or 72 to lower the buttonhole...
Similar Questions

The Lcd Screen Is Very Dim.
The screen still works, but it is so dim that I can barely read it. The backlighting seems to be bri...
The screen still works, but it is so dim that I can barely read it. The backlighting seems to be bri...
(Posted by brenthenry1991 2 years ago)

Singer 9100 Sewing Machine
Brand new machine, on switch on, loud noise, needle area seems to vibrate, unable to sew, help.
Brand new machine, on switch on, loud noise, needle area seems to vibrate, unable to sew, help.
(Posted by jimluisanelson 8 years ago)

Singer Futura 420 Straight Sewing. While I Am Sewing The Stitch Pattern Changes
the stitch pattern changes from straight to a scalloped pattern and won't sew for me... Wait a few s...
the stitch pattern changes from straight to a scalloped pattern and won't sew for me... Wait a few s...
(Posted by Stevie9963 9 years ago)
Brand New Singer 4423 Machine. The 3 Needle Position Will Not Change.
Tried changing it in 0 stitch and straight stitch only.
Tried changing it in 0 stitch and straight stitch only.
(Posted by laraandandy 9 years ago)

Singer Professional 9100...bobbin Trouble
I constantly have to thead then re thread machine....careful to follow instructions. Still a mess. T...
I constantly have to thead then re thread machine....careful to follow instructions. Still a mess. T...
(Posted by Motherofmen 10 years ago)