Singer 8280 Support Question
Singer 8280 Support Question
Find answers below for this question about Singer 8280.Need a Singer 8280 manual? We have 1 online manual for this item!
Question posted by doontoothers on June 18th, 2014
Singer Prelude 8280 Reverse Lever
Said reverse lever keeps falling off. How do I replace/install said lever? Plse & thanx
Current Answers
Related Singer 8280 Manual Pages
Instruction Manual - Page 2
... making any object into water. Replace bulb with any adjustments in the instruction manual.
11. Use this appliance only for household use only. Keep fingers away from accumulation of lint, dust, and loose cloth.
5. Do not pull or push fabric while stitching. SAVE THESE INSTRUCTIONS
This sewing machine is intended for its intended use...
Instruction Manual - Page 5
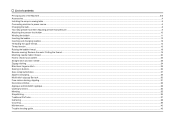
...contents
Principal parts of the Machine...2/3 Accessories ...4 Installing the snap-in sewing table ...5 Connecting machine to power source...6 Changing ...Reverse sewing/ Remove the work/ Cutting the thread ...19 Matching needle/ fabric/ thread...20 How to choose your pattern ...22 Straight stitch and twin needle ...23 Zigzag stitching ...24 Blind hem/ lingerie stitch ...25 Sewing on buttons...26 Sew...
Instruction Manual - Page 11
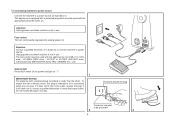
...machine to a power source as to connect machine to power source.
Sewing light Press main switch (A) for power and light on " l ".
1
IMPORTANT NOTICE For appliance with the appropriate polarized outlet. (2)
Attention: Unplug power cord when machine...outlet, reverse the plug. Polarized attachment plug
Conductor intended
to install the proper outlet. Unplug power cord when machine is ...
Instruction Manual - Page 13
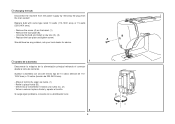
... tornillo. Changing the bulb
Disconnect the machine from the power supply by removing the plug from the main socket! Remove the screw (A) as illustrated. (1) -
Replace the face plate and tighten screw. ... se ilustra. (1) -
Unscrew the bulb and install a new one (C). (2) - Should there be any problem, ask your local dealer for advice. Replace bulb with same type rated 10 watts (110-120V...
Instruction Manual - Page 19
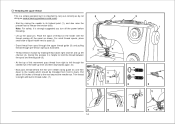
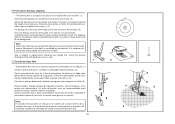
...eye of this process it is important to carry out correctly as by not doing so several sewing problems could result.
- Lift up left through pre-tension spring as shown. Thread tension module...power before threading.
- Draw thread from right to back. At the top of the take-up lever and then downwards again. (5)
- Start by leading thread down to the needle which should be ...
Instruction Manual - Page 21

... side of your fabric.
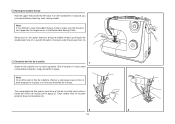
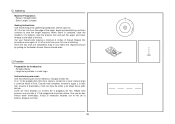
Correct thread tension is usually only
desirable for straight stitch construction sewing.
- 90% of the bobbin case. Proper setting of fabric. A balanced tension (...lower number. To adjust, turn the dial to higher number. For zig zag and decorative sewing stitch functions, thread tension should generally be between "3" and "5" .
To reduce the tension...
Instruction Manual - Page 23
... hacia arriba a través del orificio de la placa de la aguja (2). Note: If it is not trapped by the hinged cover or the Removable Sewing Table. Nota: Si es dificil subir el hilo de la bobina, Revisar y este segura que el hilo no este atrapado en la placa o en el...
Instruction Manual - Page 25
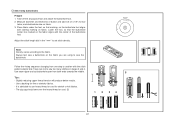
... upholstery. (Leaves smaller hole than standard large needle.)
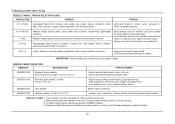
Note twin needle: 1. When sewing with twin needles, sew only in cotton, nylon, polyester or
knits, tricot, jerseys, crepes, woven polyester... FABRIC
Natural woven fabrics-wool, cotton, silk, etc. SINGER 2045
Semi-ball point needle, scarfed. 9 (70) to medium). Replace needle often (approximately every other garment ) and/ or at...
Instruction Manual - Page 32
...upper thread tension will produce better results. - It is advisable to the fabric. The zig-zag should sew over the heavy thread or cord. (5)
10 2
5 1 2 34
43
4
1
3
2
27 Measure diameter and ...thickness of the buttonhole foot. Take care not to sew too many stitches in the " " to set stitch density. Use a backing for stretch or knit fabrics. -...
Instruction Manual - Page 36
... Primera hilada: Trabaje siempre de izquierda a derecha. Sew a straight or zigzag stitch following your machine. (1) Install the darning plate (2) and Remove the presser foot ... 4
432
a
b 5 For stippling, stitch in any direction without the sewing machine internal feed system. The lever (a) should be behind with your design line.
Presione el prensatelas zurcidor con firmeza...
Instruction Manual - Page 39
... sin un pie. For template quilting transfer a design from a template (plastic stencil) to your machine. For better control use un aro, as a Darning and Embroidery foot. Para acolchar * El ... guide it by hand, allowing you are used to stitch in any direction. The above techniques are sewing without a foot. El punteado es un movimiento para acolchonar en donde usted le da vuelta a la...
Instruction Manual - Page 43
... to it's highest, raise the presser foot and pull the upper and lower threads to sew the length required. Cut your first row of the foot. Cuando esté completo, ... una vez más a 1/4 de pulgada de la primera hilera. Pattern: Straight Stitch - Gathering
Machine Preparation: - Repeat this technique for gathering waistbands, sleeve caps etc. Una vez las dos hileras est...
Instruction Manual - Page 45
...
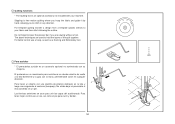
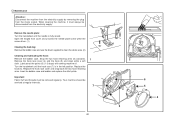
Cleaning and lubricating the hook:
Remove the bobbin case. When cleaning the machine, it must be serviced at the points (6) (1-2 drops) with sewing machine oil. Lubricate at regular intervals.
7
40
2
6 5
4 3 ... arms. Insert he bobbin case and bobbin and replace the stitch plate.
Maintenance
Attention: Disconnect the machine from the electricity supply by removing the plug from...
Instruction Manual - Page 47
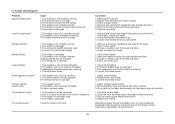
... the stitch length 3. Do not pull on the fabric while sewing, let it be lubricated 2. Lubricate as described
1. Only use good quality sewing machine oil 4. The thread is not attached correctly
1. The bobbin... pin 6. Replace the needle
1. Select the correct foot
1. Replace the needle
Remove the upper thread and bobbin case, turn the handwheel backwards and forwards by the machine
1. The ...
Similar Questions

I Get E7 Error Message On My Singer Model 7258 Sewing Machine. There Is No Refe
Error message E7 is up on my Singer Stylist model 7258 sewing machine. It is not working at all. I t...
Error message E7 is up on my Singer Stylist model 7258 sewing machine. It is not working at all. I t...
(Posted by ebellamybellamy9 5 years ago)

Beeping From Singer Sewing Machine Stylist Ii 5625
My sewing machine will beep and stop sewing after three inches of sewing. I have taken it to be repa...
My sewing machine will beep and stop sewing after three inches of sewing. I have taken it to be repa...
(Posted by arusheria 9 years ago)


Prelude 8280 How To Put The Light On
just bought this machine singer prelude 8280 shows you how to change the bulb but can't find the lig...
just bought this machine singer prelude 8280 shows you how to change the bulb but can't find the lig...
(Posted by marlenejeffs 10 years ago)

What Size Bobbin Does The 8280 Prelude Use? I Could Not Find It In The Manual!
What size Bobbin does the Prelude 8280 use? I looked thru the manual twice and could NOT find it. Th...
What size Bobbin does the Prelude 8280 use? I looked thru the manual twice and could NOT find it. Th...
(Posted by sharonmc79 10 years ago)