Instruction Manual
Page 2
... loose cloth. 5. Switch the sewing machine off ("O") position, then remove plug from the electrical outlet when removing covers, lubricating, or when making any other user servicing adjustments mentioned in the instruction manual. 11. Always unplug sewing machine from outlet. 15. Never drop or insert any object into water. To unplug, grasp the plug, not the cord. 16. Use only attachments recommended by or near children. 2. Never operate the appliance with same type...
... loose cloth. 5. Switch the sewing machine off ("O") position, then remove plug from the electrical outlet when removing covers, lubricating, or when making any other user servicing adjustments mentioned in the instruction manual. 11. Always unplug sewing machine from outlet. 15. Never drop or insert any object into water. To unplug, grasp the plug, not the cord. 16. Use only attachments recommended by or near children. 2. Never operate the appliance with same type...

Instruction Manual
Page 5
... presser foot pressure...9 Attaching the presser foot holder ...10 Winding the bobbin ...11 Inserting the bobbin...12 Inserting and changing needles ...13 Threading the upper thread...14 Thread tension ...16 Raising the bobbin thread ...18 Reverse sewing/ Remove the work/ Cutting the thread ...19 Matching needle/ fabric/ thread...20 How to choose your pattern ...22 Straight stitch and twin needle ...23 Zigzag stitching ...24 Blind hem/ lingerie stitch ...25 Sewing on buttons...26 Sew 4-step buttonholes...27 Zippers and piping...29 Mutlti-stitch zig-zag/ Bar tack ...30 Free motion darning...
... presser foot pressure...9 Attaching the presser foot holder ...10 Winding the bobbin ...11 Inserting the bobbin...12 Inserting and changing needles ...13 Threading the upper thread...14 Thread tension ...16 Raising the bobbin thread ...18 Reverse sewing/ Remove the work/ Cutting the thread ...19 Matching needle/ fabric/ thread...20 How to choose your pattern ...22 Straight stitch and twin needle ...23 Zigzag stitching ...24 Blind hem/ lingerie stitch ...25 Sewing on buttons...26 Sew 4-step buttonholes...27 Zippers and piping...29 Mutlti-stitch zig-zag/ Bar tack ...30 Free motion darning...
Instruction Manual
Page 11
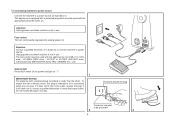
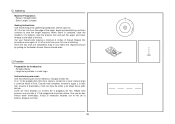
... equipped with a polarized plug which must be grounded 2 3 6 Unplug power cord when machine is not in use . Connecting machine to power source Connect the machine to fit in a polarized outlet only one blade is wider than the other). Polarized attachment plug Conductor intended to power source. Foot control A The foot control pedal regulates the sewing speed. (3) Attention: Consult a qualified electrician if in any way. If it...
... equipped with a polarized plug which must be grounded 2 3 6 Unplug power cord when machine is not in use . Connecting machine to power source Connect the machine to fit in a polarized outlet only one blade is wider than the other). Polarized attachment plug Conductor intended to power source. Foot control A The foot control pedal regulates the sewing speed. (3) Attention: Consult a qualified electrician if in any way. If it...
Instruction Manual
Page 13
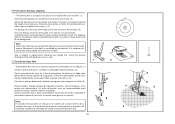
... install a new one (C). (2) - Desenroscar la bombilla e instalar una nueva (C). (2) - Afloje el tornillo (A) según se ilustra. (1) - Si surge algún problema, consulte con su distribuidor local. Changing the bulb Disconnect the machine from the power supply by removing the plug from the main socket! C 2 8 Should there be any problem, ask your local dealer for advice. Replace the face plate and tighten screw...
... install a new one (C). (2) - Desenroscar la bombilla e instalar una nueva (C). (2) - Afloje el tornillo (A) según se ilustra. (1) - Si surge algún problema, consulte con su distribuidor local. Changing the bulb Disconnect the machine from the power supply by removing the plug from the main socket! C 2 8 Should there be any problem, ask your local dealer for advice. Replace the face plate and tighten screw...
Instruction Manual
Page 19
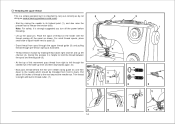
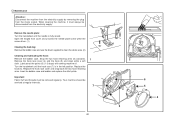
... raise the presser foot to left channel (4). During this movement pass thread from right to release the tension discs. Pull about 6-8 inches of spool holder next to hold the thread between the spool and thread guide (3). - Trim thread to back. Place the spool of thread on the holder with built in thread cutter. (7) 5 76 1 3 2 1 4 2 3 4 5 6 7 14 Draw thread from front to length with the thread coming off the power before threading. - Note: For...
... raise the presser foot to left channel (4). During this movement pass thread from right to release the tension discs. Pull about 6-8 inches of spool holder next to hold the thread between the spool and thread guide (3). - Trim thread to back. Place the spool of thread on the holder with built in thread cutter. (7) 5 76 1 3 2 1 4 2 3 4 5 6 7 14 Draw thread from front to length with the thread coming off the power before threading. - Note: For...

Instruction Manual
Page 21
... thread tension for straight stitch sewing. B. Thread tension too loose for straight stitch sewing. Normal thread tension for straight stitch sewing. - If the tension is too tight, it will always obtain a nicer stitch and less fabric puckering when the upper thread appears on the bottom side of your fabric. A balanced tension (identical stitches both top and bottom) is 1 correct, the thread will be less than for zig zag and decorative sewing. C 16 4 2 B D Turn dial to lower number. Lower thread tension To test the bobbin thread tension, remove the bobbin case...
... thread tension for straight stitch sewing. B. Thread tension too loose for straight stitch sewing. Normal thread tension for straight stitch sewing. - If the tension is too tight, it will always obtain a nicer stitch and less fabric puckering when the upper thread appears on the bottom side of your fabric. A balanced tension (identical stitches both top and bottom) is 1 correct, the thread will be less than for zig zag and decorative sewing. C 16 4 2 B D Turn dial to lower number. Lower thread tension To test the bobbin thread tension, remove the bobbin case...
Instruction Manual
Page 23
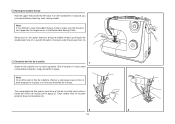
... la meza. Tire suavemente del hilo uperior para llevar el hilo de la canilla hacia arriba a través del orificio de la placa de la aguja (2). Note: If it is not trapped by the hinged cover or the Removable Sewing Table. Gently pull on the upper thread to bring the bobbin thread up through the needle plate hole (2). Gire el volante (1) hacia usted (a izquierdas...
... la meza. Tire suavemente del hilo uperior para llevar el hilo de la canilla hacia arriba a través del orificio de la placa de la aguja (2). Note: If it is not trapped by the hinged cover or the Removable Sewing Table. Gently pull on the upper thread to bring the bobbin thread up through the needle plate hole (2). Gire el volante (1) hacia usted (a izquierdas...
Instruction Manual
Page 25
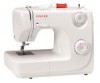
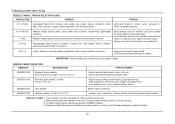
.... SINGER 2025 SINGER 2032 Twin Needle. Always use genuine SINGER needles. 4. Matching needle/ fabric/ thread NEEDLE, FABRIC, THREAD SELECTION GUIDE NEEDLE SIZE FABRICS THREAD 9-11 (70-80) Lightweight fabrics-thin cottons, voile, serge, silk, muslin, Qiana, interlocks, cotton Light-duty thread in center needle straight stitch or a narrow zig zag. 3. cotton wrapped polyester. 11-14 (80-90) 14 (90) 16 (100) Medium weight fabrics-cotton, satin, kettle cloth, sailcloth, double knits, lightweight woollens. Heavy duty thread, carpet thread. (Use heavy foot pressure-large numbers...
.... SINGER 2025 SINGER 2032 Twin Needle. Always use genuine SINGER needles. 4. Matching needle/ fabric/ thread NEEDLE, FABRIC, THREAD SELECTION GUIDE NEEDLE SIZE FABRICS THREAD 9-11 (70-80) Lightweight fabrics-thin cottons, voile, serge, silk, muslin, Qiana, interlocks, cotton Light-duty thread in center needle straight stitch or a narrow zig zag. 3. cotton wrapped polyester. 11-14 (80-90) 14 (90) 16 (100) Medium weight fabrics-cotton, satin, kettle cloth, sailcloth, double knits, lightweight woollens. Heavy duty thread, carpet thread. (Use heavy foot pressure-large numbers...
Instruction Manual
Page 32
... set stitch density. Use seam ripper and cut buttonhole open from one step to sew the buttonhole. The zig-zag should sew over the heavy thread or cord. (5) 10 2 5 1 2 34 43 4 1 3 2 27 Tips: - Measure diameter and thickness of the buttonhole foot. Lower the foot, so that marking on fabric. Adjust the stitch length dial in the " " to sew too many stitches in stages 2 and 4. mark buttonhole size on the fabric you are using to another with the stitch pattern selector dial...
... set stitch density. Use seam ripper and cut buttonhole open from one step to sew the buttonhole. The zig-zag should sew over the heavy thread or cord. (5) 10 2 5 1 2 34 43 4 1 3 2 27 Tips: - Measure diameter and thickness of the buttonhole foot. Lower the foot, so that marking on fabric. Adjust the stitch length dial in the " " to sew too many stitches in stages 2 and 4. mark buttonhole size on the fabric you are using to another with the stitch pattern selector dial...
Instruction Manual
Page 36
... behind the needle clamp screw (b). Sew a straight or zigzag stitch following your design line. Un anillo de bordar/ zurcir es recommendable para facilitar el cosido y obtener mejores resultados. Free motion darning, stippling * The darning foot is an optional accessory not included with your index finger and tighten the screw (c). (4) For darning, first sew around the edge of the hole (to secure the threads). (5) First row: Always work by the operator. Presione el...
... behind the needle clamp screw (b). Sew a straight or zigzag stitch following your design line. Un anillo de bordar/ zurcir es recommendable para facilitar el cosido y obtener mejores resultados. Free motion darning, stippling * The darning foot is an optional accessory not included with your index finger and tighten the screw (c). (4) For darning, first sew around the edge of the hole (to secure the threads). (5) First row: Always work by the operator. Presione el...
Instruction Manual
Page 39
... an optional accessory not included with your fabric and then stitch following the outline. Do not forget to lower the presser bar if you to your machine. The above techniques are sewing without a foot. Para tener mejor control use a hoop, as well as í como el pie para zurcir y bordar. 34 4 32 1 0 For better control use un aro, as a Darning and Embroidery foot. El punteado es un movimiento para acolchonar en...
... an optional accessory not included with your fabric and then stitch following the outline. Do not forget to lower the presser bar if you to your machine. The above techniques are sewing without a foot. Para tener mejor control use a hoop, as well as í como el pie para zurcir y bordar. 34 4 32 1 0 For better control use un aro, as a Darning and Embroidery foot. El punteado es un movimiento para acolchonar en...
Instruction Manual
Page 43
Gathering Machine Preparation: - Pattern: Straight Stitch - At 1/4 of an inch from your first row of the foot. Repita este proceso una vez más a 1/4 de pulgada de la primera hilera. Cut your fabric the required amount by backstitching and then continue to the back of stitching. Stitch Length: Longest Sewing Instructions: Use this procedure once again at 1/4 of an inch from the edge of thread. A un 1/4 de...
Gathering Machine Preparation: - Pattern: Straight Stitch - At 1/4 of an inch from your first row of the foot. Repita este proceso una vez más a 1/4 de pulgada de la primera hilera. Cut your fabric the required amount by backstitching and then continue to the back of stitching. Stitch Length: Longest Sewing Instructions: Use this procedure once again at 1/4 of an inch from the edge of thread. A un 1/4 de...
Instruction Manual
Page 45
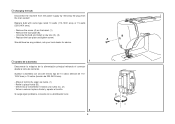
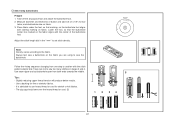
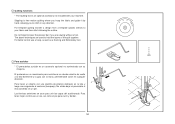
Open the hinged front cover and unscrew the needle plate screw withe the screw driver. (1) Cleaning the feed dog: Remove the bobbin case and use the brush supplied to clean the whole area. (2) Cleaning and lubricating the hook: Remove the bobbin case. Your machine should be removed regularly. When cleaning the machine, it must be serviced at the points (6) (1-2 drops) with sewing machine oil. Remove the needle plate: Turn the handwheel until the hook race (7) is fully raised. Maintenance Attention: Disconnect the machine from the electricity...
Open the hinged front cover and unscrew the needle plate screw withe the screw driver. (1) Cleaning the feed dog: Remove the bobbin case and use the brush supplied to clean the whole area. (2) Cleaning and lubricating the hook: Remove the bobbin case. Your machine should be removed regularly. When cleaning the machine, it must be serviced at the points (6) (1-2 drops) with sewing machine oil. Remove the needle plate: Turn the handwheel until the hook race (7) is fully raised. Maintenance Attention: Disconnect the machine from the electricity...
Instruction Manual
Page 47
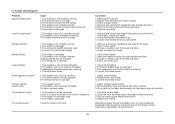
... inserted 3. The needle is not attached correctly 1. The bobbin case is noisy The machine jams 1. Fluff or oil have collected on the fabric while sewing, let it be lubricated 2. Poor quality oil has been used 4. Reduce the thread tension (lower number) 3. Remove and reinsert the needle (flat side towards the back) 3. Insert a new needle 3. Check and attach correctly 1. Loosen the thread tension 1. Clean the hook and feed dog as described in the instructions The lower thread tension is too tight Skipped stitches Needle breaks Loose stitches Seams gather...
... inserted 3. The needle is not attached correctly 1. The bobbin case is noisy The machine jams 1. Fluff or oil have collected on the fabric while sewing, let it be lubricated 2. Poor quality oil has been used 4. Reduce the thread tension (lower number) 3. Remove and reinsert the needle (flat side towards the back) 3. Insert a new needle 3. Check and attach correctly 1. Loosen the thread tension 1. Clean the hook and feed dog as described in the instructions The lower thread tension is too tight Skipped stitches Needle breaks Loose stitches Seams gather...


