Get support for Singer 7285Q Patchwork

Singer 7285Q Patchwork Support Question

Singer 7285Q Patchwork Support Question

Find answers below for this question about Singer 7285Q Patchwork.
Need a Singer 7285Q Patchwork manual? We have 1 online manual for this item!
Question posted by ngsteffy on August 20th, 2013

What Does A Code E-7 Mean

The person who posted this question about this Singer product did not include a detailed explanation. Please use the "Request More Information" button to the right if more details would help you to answer this question.

Current Answers

There are currently no answers that have been posted for this question.
Be the first to post an answer!

Remember that you can earn up to 1,100 points for every answer you submit. The better the quality of your answer, the better chance it has to be accepted.

Related Singer 7285Q Patchwork Manual Pages

Instruction Manual - Page 2

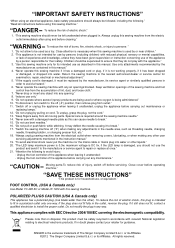
...7KH6LQJHU&RPSDQ\/LPLWHG6jUORULWV$I¿OLDWHV ‹7KH6LQJHU&RPSDQ\/LPLWHG6jUORULWV$I¿OLDWHV$OOULJKWVUHVHUYHG Return the sewing machine to avoid injury: - "Never operate the sewing machine with any adjustments in the needle area, such as described in doubt please contact your retailer for examination, repair, electrical or mechanical...
Instruction Manual - Page 5

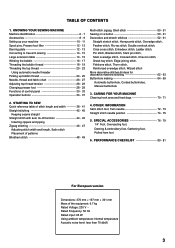
... and piping Zigzag stitching 46 - 47 Adjusting stitch width and length, Satin stitch Placement of control panel 30 - 33 Operation buttons 34 - 37 2. KNOWING YOUR SEWING MACHINE 0DFKLQHLGHQWL¿FDWLRQ 6 - 7 Accessories 8 - 9 Setting up your machine 10 - 11 Spool pins, Presser foot lifter 12 - 13 Darning plate 12 - 13 Converting to free-arm...
Instruction Manual - Page 8

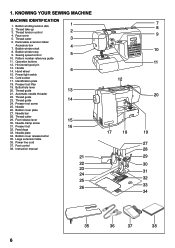
... screw 25. Large extension table 36. Foot release lever 15 30. Thread guide 13 21. Automatic needle threader 22. Bobbin cover plate 27. KNOWING YOUR SEWING MACHINE MACHINE IDENTIFICATION 1. Sewing speed control 5 10. Horizontal spool pin 13.
Instruction Manual - Page 10

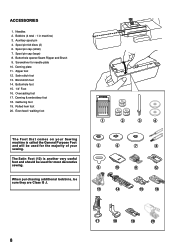
... plate 11. Auxiliary spool pin 4. Even feed / walking foot The Foot that comes on your sewing. Spool pin felt discs (2) 6. Screwdriver for the majority of your Sewing machine is another very useful foot and should be sure they are Class I5 J. 1 2 3 4 5 6 7 8 9 10 11 12 13 14 15 16 17 18 19 20 8 Rolled...
Instruction Manual - Page 16

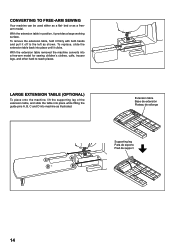
CONVERTING TO FREE-ARM SEWING
Instruction Manual - Page 20

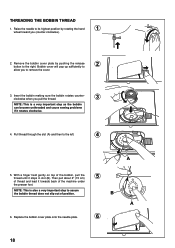
... held gently on top of the bobbin, pull the thread until it towards back of the machine under the presser foot. B A 6. THREADING THE BOBBIN THREAD 1. Raise the needle to ... the cover. 3. NOTE: This is a very important step as the bobbin can become unthreaded and cause sewing problems if it rotates clockwise. 4. Replace the bobbin cover plate onto the needle plate. 6 18 Insert...
Instruction Manual - Page 22

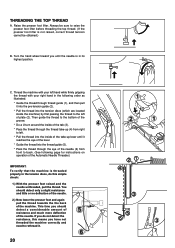
...With the presser foot raised and the needle unthreaded, pull the thread. If you do this means you should detect only a slight resistance and little or no deÀection of the needle... pull the thread towards the the back of the needle. This time you have not threaded the machine correctly and 3 need to back. (See following order as illustrated. * Guide the thread through thread...
Instruction Manual - Page 26

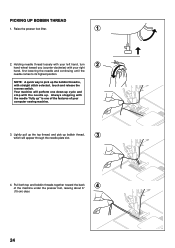
... cycle and stop with your left hand, turn 2 hand wheel toward the back of your computer sewing machine. 3. Pull both top and bobbin threads together toward you (counter-clockwise) with the needle up...needle comes to pick up bobbin thread, 3 which will perform one of the features of the machine under the presser foot, leaving about 6" 4 (15 cm) clear. 24 Holding needle thread ...
Instruction Manual - Page 28

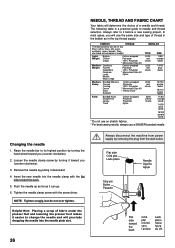
...side toward the back. 5. Insert the new needle into the needle plate slot. 26 Always disconnect the machine from power supply by pulling it easier to its highest position by turning it can be of weight. ... 14/90 blue band 16/100 purple band * Do not use on stretch fabrics. * For best sewing results, always use the same size and type of thread in the bobbin as examples of any ¿...
Instruction Manual - Page 30

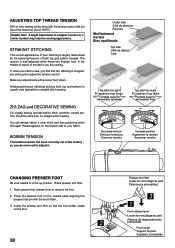
...;n CHANGING PRESSER FOOT Be sure needle is in the middle of layers of the fabric you are sewing. ,IZKHQ\RXVWDUWWRVHZ\RX¿QGWKDWWKHVWLWFKLQJLVLUUHJXODU you do not ...both top and bobbin threads. Lower the presser foot lifter so that the foot holder snaps on top of the machine) set at "AUTO" . BOBBIN TENSION The bobbin tension has been correctly set at the factory , so ...
Instruction Manual - Page 32

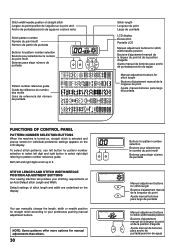
...237;a de referencia del número de puntada FUNCTIONS OF CONTROL PANEL PATTERN NUMBER SELECTION BUTTONS When the machine is turned on, straight stitch is selected and pop-up to pattern number reference guide. You can manually ... display. STITCH LENGTH AND STITCH WIDTH/NEEDLE POSITION ADJUSTMENT BUTTONS Your sewing machine will produce your preference pushing manual adjustment buttons.
Instruction Manual - Page 34

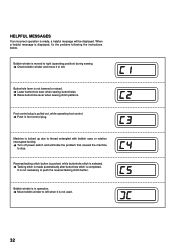
... interrupted forcibly. ÎTurn off power switch and eliminate the problem that caused the machine to left. Bobbin winder is not necessary to push the reverse/tacking stitch button. Buttonhole... buttonhole lever when sewing buttonholes. ÎRaise buttonhole lever when sewing stitch patterns. When a helpful message is moved to right (operating position) during sewing. ÎCheck ...
Instruction Manual - Page 36

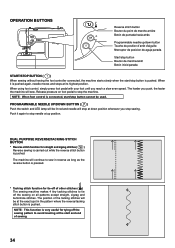
...marche/arrêt Botón inicio/parada START/STOP BUTTON ( ) When sewing without having the foot controller connected, the machine starts slowly when the start /stop button cannot be used. OPERATION BUTTONS Reverse...pushed. The position of other stitches ( ) The sewing machine makes 4 tiny tacking stitches to tie off the sewing pattern to stop sewing. NOTE: This function is pushed.
Instruction Manual - Page 38

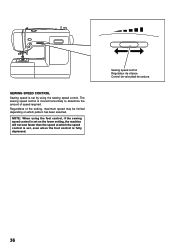
... horizontally to determine the amount of the setting, maximum speed may be limited depending on the lower setting, the machine will not sew faster than the speed at which pattern has been selected. Sewing speed control Régulateur de vitesse Control de velocidad de costura 36 NOTE: When using the foot control, if...
Instruction Manual - Page 44

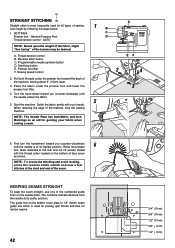
... tuning´ of the material, stop button E. Reverse stitch button C. Programmable needle up/down button D. Start/stop the sewing machine. Presser foot lifter F. Place the fabric under the presser foot toward the back of sewing. When reaching the edge of the tension may be desired. NOTE: The Needle Plate has both threads under...
Instruction Manual - Page 46

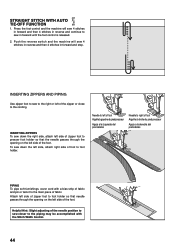
... presseur Aguja a la derecha del prensatelas PIPING To pipe soft furnishings, cover cord with the Stitch Width Control. 44 Push the reverse switch and the machine will sew 4 stitches in forward and then 4 stitches in reverse and continue to presser foot holder so that needle passes through the opening on the left...
Instruction Manual - Page 56

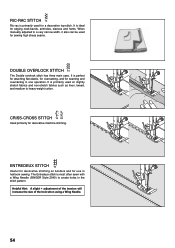
... hems. When manually adjusted to a very narrow width, it also can be used for sewing high stress seams. DOUBLE OVERLOCK STITCH The Double overlock stitch has three main uses. CRISS-CROSS STITCH Used primarily for decorative machine stitching. It is perfect IRUDWWDFKLQJÀDWHODVWLFIRURYHUFDVWLQJDQGIRUVHDPLQJDQG...
Instruction Manual - Page 64

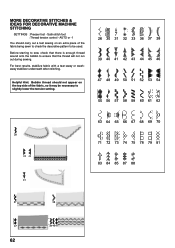
... stabilizer underneath when stitching. Helpful Hint: Bobbin thread should carry out a test sewing on the top side of the fabric being sewn to check the decorative pattern to slightly lower the tension setting. 62 MORE DECORATIVE STITCHES & IDEAS FOR DECORATIVE MACHINE STITCHING SETTINGS :Presser foot - AUTO or -1 You should not appear on...
Instruction Manual - Page 68

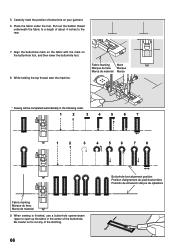
Align the buttonhole mark on the fabric with the mark on your garment. 6. While holding the top thread, start the machine. When sewing is finished, use a buttonhole opener/seam ripper to open up the fabric in the following order. 1 2 3 4 5 6 7 1 2 3 4 5 6 7 8 Fabric marking 0DUTXHGXWLVVX 0DUFDGHPDWHULDO 9. 5. Pull ...
Instruction Manual - Page 72

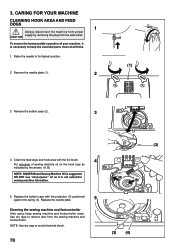
... the essential parts clean at all purpose" oil as indicated by removing the plug from the sewing machine and footcontroller. Use dry rags to keep sewing machine and footcontroller clean. 3. CAUTION To ensure the best possible operation of sewing machine oil on the hook race as it is necessary to remove dust from the wall-outlet...

Similar Questions

I Get E7 Error Message On My Singer Model 7258 Sewing Machine. There Is No Refe
Error message E7 is up on my Singer Stylist model 7258 sewing machine. It is not working at all. I t...
(Posted by ebellamybellamy9 5 years ago)
Beeping From Singer Sewing Machine Stylist Ii 5625
My sewing machine will beep and stop sewing after three inches of sewing. I have taken it to be repa...
(Posted by arusheria 9 years ago)
Oil Leaks
Has the oil leak problem been fixed with the Singer 7285Q sewing machine, I want to purchase one but...
(Posted by donnablankenship 9 years ago)
Feed Dogs?!
i have a singer 7285q, im new to sewing, ive never had a sewing machine before and my machine is fee...
(Posted by sarahwrobleski87 10 years ago)
Error Message E7
I recently purchased a 7285Q Singer Sewing Machine and am getting an E7 error message. The machine w...
(Posted by joycebogard 10 years ago)
Ask a New Question
Use the box below to post a new question about this Singer product .
Points & Prizes
  • You can earn points for nearly everything you do on HelpOwl.com
  • You can trade in those points for gift cards at leading retailers such as Amazon.com and Walmart
  • It's that simple!
See How it Works
Create a Free Account

Singer Manuals

Find free Singer 7285Q Patchwork manuals and user guides available at ManualOwl.com. Try out our unique manual viewer allowing you to interact with manuals from directly within your browser!

Singer Reviews

View thousands of Singer user reviews and customer ratings available at ReviewOwl.com.

Contact Information

Complete Singer customer service contact information including steps to reach representatives, hours of operation, customer support links and more from ContactHelp.com.

Scoreboard Ratings

See detailed Singer customer service rankings, employee comments and much more from our sister site.