Singer 7285Q Patchwork Support Question
Singer 7285Q Patchwork Support Question
Find answers below for this question about Singer 7285Q Patchwork.Need a Singer 7285Q Patchwork manual? We have 1 online manual for this item!
Question posted by sarahwrobleski87 on January 25th, 2014
Feed Dogs?!
i have a singer 7285q, im new to sewing, ive never had a sewing machine before and my machine is feeding the fabric. my coworkers said i need to make sure the feed dogs are raised. how ever, ive looked in the manual multiple times and cannot find that anywhere. can someone help!
Current Answers
Related Singer 7285Q Patchwork Manual Pages
Instruction Manual - Page 2
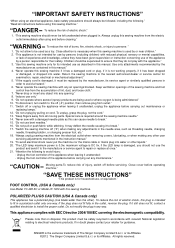
..., if it unattended: - Close attention is necessary when this manual. "Switch off ("0") when making any air openings blocked. Keep ventilation openings of the sewing machine and foot
control free from the electrical outlet when removing covers, lubricating, or when making any object into water or other ). Unplug the foot controller of lint, dust, and...
Instruction Manual - Page 5
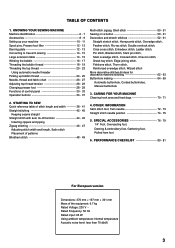
...5. CARING FOR YOUR MACHINE Cleaning hook area and feed dogs 70 - 71
...fabric chart 26 - 27 Adjusting top thread tension 28 - 29 Changing presser foot 28 - 29 Functions of patterns Blindhem stitch 48 - 49
0XOWLVWLWFK]LJ]DJ6KHOOVWLWFK 50 - 51 Sewing...machine stitching 62 - 63 Buttonhole making 64 - 69
Automatic buttonhole, Corded buttonholes, 0DQXDOEXWWRQKROH
3. STARTING TO SEW...
Instruction Manual - Page 8
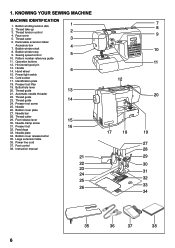
.... Thread guide 23. Needle bar
28. Hand wheel
6
15. Thread guide
14
24. Needle
26. Feed dogs
33. Buttonhole lever 20. Presser foot screw
25. Bobbin cover release button
35. Large extension table
36. KNOWING YOUR SEWING MACHINE
MACHINE IDENTIFICATION
1. Presser foot
16
32. Bobbin winder stop 9. Presser foot lifter
19. Operation buttons
12. Bobbin...
Instruction Manual - Page 10
...HPEURLGHU\IRRW 18.
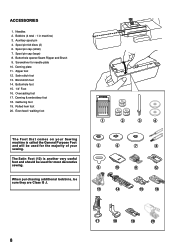
When purchasing additional bobbins, be used for the majority of your Sewing machine is another very useful foot and should be sure they are Class I5 J.
1
2
3
4
5
6
7
8
9
10
11
... 10. Spool pin cap (small) 7. Even feed / walking foot
The Foot that comes on your sewing.
Bobbins (4 total - 1 in machine) 3. ACCESSORIES
1. Blind stitch foot 14. Rolled hem...
Instruction Manual - Page 14

...sewing, free motion work and free motion darning.
DARNING PLATE
Use the darning plate when you need to accommodate thicker fabrics... a felt disc over it to its highest position to control fabric feeding for your presser foot.
1. Lift it . Place a spool...spool cap to the right.
Raise the lifter to the middle position to insert or remove fabric, and to sew.
2.
Lower the presser ...
Instruction Manual - Page 16
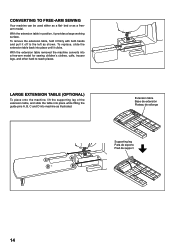
CONVERTING TO FREE-ARM SEWING
Instruction Manual - Page 20
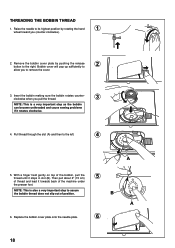
Raise the needle to assure the bobbin thread does not slip out of the bobbin, pull the thread until it stops in slot (B). With a finger held gently on top of position.
Insert the bobbin making sure...is a very important step as the bobbin can become unthreaded and cause sewing problems if it towards back of the machine under
the presser foot. Then pull about 6" (15 cm)
5
of thread ...
Instruction Manual - Page 26
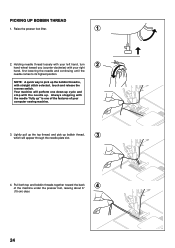
... together toward you (counter-clockwise) with straight stitch selected, touch and release the reverse switch. NOTE: A quick way to pick up " is , with your computer sewing machine.
3. Raise the presser foot lifter.
1
2. Lightly pull up the top thread, and pick up . PICKING UP BOBBIN THREAD
1. Holding needle thread loosely with your left hand...
Instruction Manual - Page 28
.../100 purple band
* Do not use on stretch fabrics. * For best sewing results, always use the same size and type of thread in the bobbin as in the top thread supply. Insert the new needle into the needle plate slot.
26
Always disconnect the machine from power supply by turning the hand wheel toward...
Instruction Manual - Page 30
Raise presser foot lifter. 1.
Place the desired foot on the needle plate aligning the
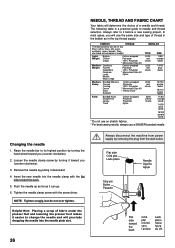
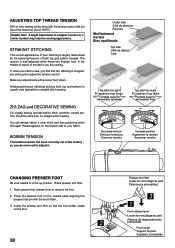
presser foot pin with the tension control dial (on top of the machine) set at "AUTO" . ADJUSTING TOP THREAD TENSION
90% of your sewing will be less than for straight stitch sewing. You will need to adjust the tension control. 0DNHDQ...
Instruction Manual - Page 32
... on the LCD display.
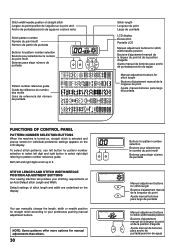
STITCH LENGTH AND STITCH WIDTH/NEEDLE POSITION ADJUSTMENT BUTTONS
Your sewing machine will produce your preference pushing manual adjustment buttons. Stitch width/needle position of stitch ... número de puntada
FUNCTIONS OF CONTROL PANEL
PATTERN NUMBER SELECTION BUTTONS
When the machine is turned on, straight stitch is selected and pop-up to pattern number reference ...
Instruction Manual - Page 34
...QRWXVHG
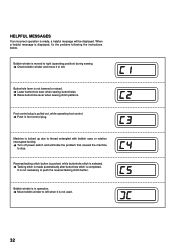
32 Foot control plug is not lowered or raised. ÎLower buttonhole lever when sewing buttonholes. ÎRaise buttonhole lever when sewing stitch patterns. When a helpful message is not necessary ...switch and eliminate the problem that caused the machine
to left.
Bobbin winder is moved to right (operating position) during sewing. ÎCheck bobbin winder and move it to stop.
Instruction Manual - Page 36
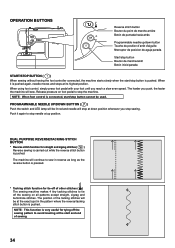
...again to avoid raveling at the start and end of other stitches ( ) The sewing machine makes 4 tiny tacking stitches to stop needle at down button Touche de position d'arrê...de marche/arrêt Botón inicio/parada
START/STOP BUTTON ( )
When sewing without having the foot controller connected, the machine starts slowly when the start /stop button cannot be at its highest position. ...
Instruction Manual - Page 38
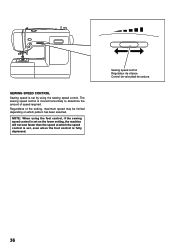
... amount of the setting, maximum speed may be limited depending on the lower setting, the machine will not sew faster than the speed at which pattern has been selected.
NOTE: When using the sewing speed control. Regardless of speed required. Sewing speed control Régulateur de vitesse Control de velocidad de costura
36 The...
Instruction Manual - Page 50

... the foot. If it does not, adjust the guide (B) on curtains, trousers, skirts, etc. NOTE: In addition to the left. Sew slowly, guiding the fabric carefully along the edge of the
fabric. Turn the handwheel towards you (counter-clockwise) by hand until the needle
3
swings fully to the adjustment on the foot, the...
Instruction Manual - Page 52
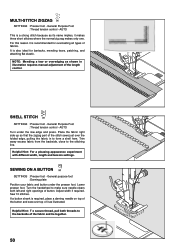
... appearance experiment with different width, length and tension settings. SEWING ON A BUTTON
SETTINGS :Presser foot - General purpose foot :Darning plate
Position your fabric and button under the raw edge and press. Turn the handwheel to make sure needle clears both threads to the backside of fabrics. Adjust width if required. If a button shank is required...
Instruction Manual - Page 72

... AREA AND FEED DOGS
1
Always disconnect the machine from the sewing machine and footcontroller. Clean the feed dogs and hook area with the projection (3) positioned against the spring (4). CAUTION
To ensure the best possible operation of sewing machine oil on the hook race as it is necessary to remove dust from power supply by the arrows. (A, B)
NOTE: SINGER Brand Sewing Machine Oil...
Instruction Manual - Page 78

Machine Preparation ‡)RU IUHH PRWLRQ HPEURLGHU\ DQG PRQRJUDPV
6HW PDFKLQH
for Zigzag Stitch in
the correct position. 3. Stencil or draw your pattern onto the right side of cotton fabric, right sides together, under presser foot. 3. Place two pieces of your design lines. Select a Straight Stitch, making sure needle is used for narrow seams, such...
Instruction Manual - Page 80
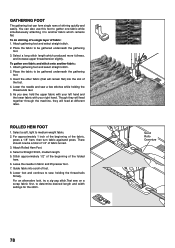
.... 4. Though they will feed together through the machine, they will feed at different rates.
Stitch approximately 1/2" of the beginning of fabric turned. 3. You can form single rows of fabric: 1. Lower the needle and sew a few stitches while holding the thread tails ¿UPDO\ For an alternative look, try a zig-zag stitch.Test sew on a scrap fabric first, to medium...
Instruction Manual - Page 82
... * Fabric is too tight. - Raise buttonhole lever. * Buttonhole lever is not raised when sewing stitch ...fabric (see page
26 - 27). 0DFKLQHLVQRWWKUHDGHGFRUUHFWO\
VHHSDJH Top thread tension is bent. - Guide it gently. * Bobbin has not been wound evenly. -
Replace needle (see page 26 - 27). * Needle size is being pulled or pushed against machine feeding
action. - Fabric...
Similar Questions

Where Is The Feed Dog Control On Singer Patchwork 7285q
(Posted by dmssohre 6 months ago)

Bh Lever
What is the lever behind the needle threader labeled BH used for
What is the lever behind the needle threader labeled BH used for
(Posted by caporter2257 2 years ago)

C6 Error Continues. Re-threaded The Machine Multiple Times Ensuring The Thread W
have rethreaded the machine sooooo many times following the video to ensure the thread was "under th...
have rethreaded the machine sooooo many times following the video to ensure the thread was "under th...
(Posted by Kblakey11 7 years ago)

Problem With My Singer Patchwork 7285q
My machine continues sewing after I have released the foot peddle. Not just for a few stitches but r...
My machine continues sewing after I have released the foot peddle. Not just for a few stitches but r...
(Posted by runner2be 9 years ago)

Everything Seems Ok, But Not Sewing Once I Insert Fabric
I have sheen troubleshooting everything and my machine appears to be working but then the threads ar...
I have sheen troubleshooting everything and my machine appears to be working but then the threads ar...
(Posted by shanna 10 years ago)