Get support for Singer 7285Q Patchwork

Singer 7285Q Patchwork Support Question

Singer 7285Q Patchwork Support Question

Find answers below for this question about Singer 7285Q Patchwork.
Need a Singer 7285Q Patchwork manual? We have 1 online manual for this item!
Question posted by mhart1995 on May 12th, 2020

Trying To Wind The Bobbin And Get An E To Code. This Is On My Singer Patchwork 7

The person who posted this question about this Singer product did not include a detailed explanation. Please use the "Request More Information" button to the right if more details would help you to answer this question.

Current Answers

Answer #1: Posted by Troubleshooter101 on May 13th, 2020 5:07 AM
This answer was accepted by the poster of the original question.
Troubleshooter101

Member since:
September 30th, 2015

Points: 2,927,060
1,100
points
Just follow these steps properly and get rid off E code:-

Winding a bobbin is quick and easy when you follow the directions below. Always wind the bobbin before threading the machine and needle.

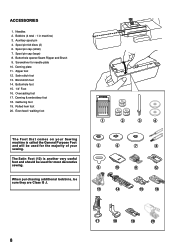
1. Place spool of thread on spool pin.

2. Slide spool pin holder/cap firmly over the rim of spool to prevent the thread from tangling.

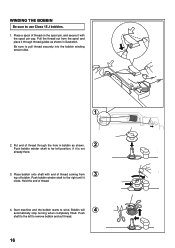
3. Push bobbin winder pin to the far left if it is not already there.

4. Pass the thread from the spool through thread guide as shown (illustration 1).

5. Pass thread end, from inside, through the small hole in the rim of the bobbin (illustration 2).

6. Place bobbin onto the pin.

7. Push bobbin winder pin to the right (illustration 3). This will stop the needle from moving.

8. Holding thread end, step on speed controller to run the machine until the desired amount of thread is wound. (Winding stops automatically once bobbin is full.)

9. Cut thread; push bobbin to the left and remove it from bobbin winder pin (illustration 4).

10. Trim thread ends from top of the bobbin.


Thanks


Please respond to my effort to provide you with the best possible solution by using the "Acceptable Solution" and/or the "Helpful" buttons when the answer has proven to be helpful. Please feel free to submit further info for your question, if a solution was not provided. I appreciate the opportunity to serve you!
Troublshooter101

Related Singer 7285Q Patchwork Manual Pages

Instruction Manual - Page 2

...." 12. "Do not operate where aerosol (spray) products are being used as threading needle, changing needle, threading bobbin, or changing presser foot, etc." 18. "Do not unplug by or near children." 2. "Switch the sewing machine off ("0") when making any object into water. Unplug the foot controller of the appliance by the manufacturer as...
Instruction Manual - Page 5

...: less than 70 db(A) 3 KNOWING YOUR SEWING MACHINE 0DFKLQHLGHQWL¿FDWLRQ 6 - 7 Accessories 8 - 9 Setting up your machine 10 - 11 Spool pins, Presser foot lifter 12 - 13 Darning plate 12 - 13 Converting to free-arm sewing 14 - 15 Large extension table 14 - 15 Winding the bobbin 16 - 17 Threading the bobbin thread 18 - 19 Threading the top thread...
Instruction Manual - Page 8

... 13. Power/light switch 16. Presser foot lifter 19. Automatic needle threader 22. Bobbin winder shaft 8. Buttonhole lever 20. Thread guide 23. Presser foot screw 25. Needle clamp screw 31. Large extension table 36. KNOWING YOUR SEWING MACHINE MACHINE IDENTIFICATION 1. Presser foot 16 32. Bobbin cover release button 35. Thread cutter 29. Feed dogs 33.
Instruction Manual - Page 10

...15. 1/4" Foot 16. Even feed / walking foot The Foot that comes on your sewing. Auxiliary spool pin 4. Spool pin cap (large) 8. Zipper foot 12. Overcasting foot ...very useful foot and should be used for the majority of your Sewing machine is called the General Purpose Foot and will be used for needle plate 10. When purchasing additional bobbins, be sure they are Class I5 J. 1 2 3 4 ...
Instruction Manual - Page 18

... stop turning when completely filled. Be sure to remove bobbin and cut thread. 16 Push bobbin winder shaft to far left to pull thread securely into the bobbin winding tension disk. 1 2. Pull the thread out from 3 top of bobbin. Start machine and the bobbin starts to use Class 15 J bobbins. 1. Place a spool of thread on the spool pin...
Instruction Manual - Page 20

... the machine under the presser foot. Remove the bobbin cover plate by rotating the hand 1 wheel toward you pull the thread. 3 NOTE: This is also a very important step to assure the bobbin thread does not slip out of position. NOTE: This is a very important step as the bobbin can become unthreaded and cause sewing problems...
Instruction Manual - Page 26

... selected, touch and release the reverse switch. Pull both top and bobbin threads together toward you (counter-clockwise) with your computer sewing machine. 3. Raise the presser foot lifter. 1 2. Always stopping with the needle up the bobbin thread is one of the features of the machine under the presser foot, leaving about 6" 4 (15 cm) clear. 24...
Instruction Manual - Page 28

...fabrics. * For best sewing results, always use the same size and type of thread in the bobbin as in the top thread... needle into the needle plate slot. 26 Always disconnect the machine from power supply by turning the hand wheel toward the back... Loosen the needle clamp screw by pulling it before a new sewing project. NEEDLE, THREAD AND FABRIC CHART Your fabric will determine the...
Instruction Manual - Page 30

... presser foot release lever to a higher number or a lower number may improve sewing appearance. Lower the presser foot lifter so that the foot holder snaps on top of the machine) set at "AUTO" . BOBBIN TENSION The bobbin tension has been correctly set at the factory , so you will need to adjust the tension control...
Instruction Manual - Page 34

.... It is moved to right (operating position) during sewing. ÎCheck bobbin winder and move it to push the reverse/tacking stitch button. Bobbin winder is not necessary to left. Bobbin winder is made automatically after buttonhole stitch is displayed, ... URWDWLRQ interrupted forcibly. ÎTurn off power switch and eliminate the problem that caused the machine to stop.
Instruction Manual - Page 44

... Programmable needle up/down button D. Start the machine. Guide the fabric gently with the thread cutter located on the bobbin cover plate is 1/4" (6mm) seam guide... the stitching and avoid raveling, press the reverse stitch switch and sew a few stitches at its center position. Start/stop the sewing machine. Place the fabric under the presser foot toward you (counter-clockwise...
Instruction Manual - Page 48

...stitch length between 0.5 and 2.0 for appliqué, bar-tacking, etc. making it possible to avoid puckering. If bobbin thread is a closely spaced stitch for satin stitching. STITCH LENGTH LONGUEUR DU POINT LARGO PUNTADA STITCH WIDTH LARGEUR DU ...depending on the thread, fabric, type of stitch and sewing speed, but the bobbin thread must never appear on the top of stabilizer or ...
Instruction Manual - Page 56

... often sewn with a Wing Needle (SINGER Style 2040) to a very narrow width, it also can be used for decorative machine stitching. ENTREDEUX STITCH Useful for decorative ...stitching on slightly stretch fabrics and non-stretch fabrics such as linen, tweed, and medium to heavy-weight cotton. It is primarily used for use in heirloom sewing...
Instruction Manual - Page 64

MORE DECORATIVE STITCHES & IDEAS FOR DECORATIVE MACHINE STITCHING SETTINGS :Presser foot - AUTO or -1 You should not appear on an extra piece of the fabric, so it may be used. Helpful Hint: Bobbin thread should carry out a test sewing on the top side of the fabric being sewn to check the decorative pattern to be...
Instruction Manual - Page 66

... Lengüeta A PROCEDURE * Use an interfacing in one of buttonhole patterns. Then try the buttonhole with the buttonhole foot. (Refer to "Using buttonhole foot" above.) 4. Tab... B Languette B Lengüeta B 2. BUTTONHOLE MAKING AUTOMATIC BUTTONHOLE USING BUTTONHOLE FOOT Your machine offers you two different widths of bartack, keyhole and round end buttonholes sewn by a system that...
Instruction Manual - Page 68

... 7. Place the fabric under the foot. Pull out the bobbin thread underneath the fabric to a length of about 4 inches ...PDWHULDO 0DUN 0DUTXH 0DUFD * Sewing will be completed automatically in the center of buttonhole on ...the buttonhole foot, and then lower the buttonhole foot. 8. When sewing is finished, use a buttonhole opener/seam ripper to open up the fabric in ...
Instruction Manual - Page 72

...from power supply by the arrows. (A, B) NOTE: SINGER Brand Sewing Machine Oil is not suited for sewing machine lubrication. (2) (A) (B) 5. Replace the bobbin case with the lint brush. 4 Put one drop of your machine, it is suggested. Remove the bobbin case (2). 3 4. Replace the needle plate. 5 Cleaning the sewing machine and footcontroller After using, keep the essential parts...
Instruction Manual - Page 74

...needle from front to pass under the presser foot to the General Purpose Foot when sewing Stretch Stitches. Pick up bobbin thread as one thread through each spool pin. 4. It is strongly recommended. ...twin-needle produces two rows of a SINGER Brand 3mm (Style 2025) Twin Needle is most useful for sewing satin stitches and as an alternative to the back of the machine, leaving about 6" (15 cm)...
Instruction Manual - Page 80

... gathered underneath the gathering foot. 3. Though they will feed together through the machine, they will feed at different rates. For approximately 1 inch of the beginning...Lower the needle and sew a few stitches while holding the thread tails ¿UPDO\ For an alternative look, try a zig-zag stitch.Test sew on a scrap fabric first, to another fabric: 1. As you sew, hold the upper...
Instruction Manual - Page 82

...WKUHDGHGFRUUHFWO\ VHHSDJH Thread is being pulled or pushed against machine feeding action. - Replace needle (see page 16 - 17). 0DFKLQHMDPVNQRFNV * Thread is not lowered when sewing buttonhole. - Clean hook (see page 70 - 71). Needle breaks. * Fabric is caught in bobbin case or hook. - Draw both threads back under presser foot...

Similar Questions

I Get E7 Error Message On My Singer Model 7258 Sewing Machine. There Is No Refe
Error message E7 is up on my Singer Stylist model 7258 sewing machine. It is not working at all. I t...
(Posted by ebellamybellamy9 5 years ago)
Beeping From Singer Sewing Machine Stylist Ii 5625
My sewing machine will beep and stop sewing after three inches of sewing. I have taken it to be repa...
(Posted by arusheria 9 years ago)
Oil Leaks
Has the oil leak problem been fixed with the Singer 7285Q sewing machine, I want to purchase one but...
(Posted by donnablankenship 9 years ago)
Feed Dogs?!
i have a singer 7285q, im new to sewing, ive never had a sewing machine before and my machine is fee...
(Posted by sarahwrobleski87 10 years ago)
Error Message E7
I recently purchased a 7285Q Singer Sewing Machine and am getting an E7 error message. The machine w...
(Posted by joycebogard 10 years ago)
Ask a New Question
Use the box below to post a new question about this Singer product .
Points & Prizes
  • You can earn points for nearly everything you do on HelpOwl.com
  • You can trade in those points for gift cards at leading retailers such as Amazon.com and Walmart
  • It's that simple!
See How it Works
Create a Free Account

Singer Manuals

Find free Singer 7285Q Patchwork manuals and user guides available at ManualOwl.com. Try out our unique manual viewer allowing you to interact with manuals from directly within your browser!

Singer Reviews

View thousands of Singer user reviews and customer ratings available at ReviewOwl.com.

Contact Information

Complete Singer customer service contact information including steps to reach representatives, hours of operation, customer support links and more from ContactHelp.com.

Scoreboard Ratings

See detailed Singer customer service rankings, employee comments and much more from our sister site.