Singer 7258 Stylist Support Question
Singer 7258 Stylist Support Question
Find answers below for this question about Singer 7258 Stylist.Need a Singer 7258 Stylist manual? We have 1 online manual for this item!
Question posted by melissacorn on May 26th, 2014
The Start/stop Light And 2nd Light On The 2nd Row Are Blinking.
I have just installed the machines software and turned the machine on. Why are these lights blinking?
Current Answers
Answer #1: Posted by TechSupport101 on May 26th, 2014 4:46 AM
TechSupport101

Member since:
May 24th, 2013 Points: 12,171,285

Member since:
May 24th, 2013 Points: 12,171,285
Hi. What blinking lights mean may differ from one singer model to the other. You can either try out the troubleshooting tips on the tutorial here http://www.ehow.com/how-does_4857036_troubleshooting-singer-sewing-machine.html or kindly repost including your particular Singer machine model number.
Related Singer 7258 Stylist Manual Pages
Instruction Manual - Page 3
... foot
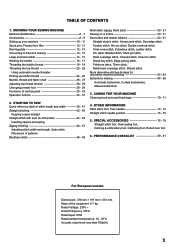
6. KNOWING YOUR SEWING MACHINE Machine identification 6 - 7 Accessories 8 - 9 Setting up your machine 10 - 11 Spool pins, Presser foot lifter 12 - 13 Darning plate 12 - 13 Converting to free-arm sewing 14 - 15 Large ... 301 mm Mass of control panel 30 - 33 Operation buttons 34 - 37
2. STARTING TO SEW Quick reference table of stitch length and width 38 - 41 Straight stitching 42 - 45...
Instruction Manual - Page 6
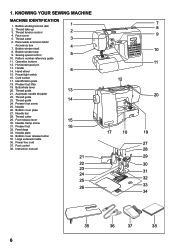
... Thread cutter
3
6. Bobbin winder stop 9. Hand wheel
6
15. Cord...Handle 14. Identification plate
18. Presser foot screw
25. Bobbin winder shaft
8. Sewing speed control
5
10. Needle bar
28. Power line cord
37. Thread ...clamp screw
31. KNOWING YOUR SEWING MACHINE
MACHINE IDENTIFICATION
1. Thread tension control
2
4. Feed dogs
33. Pattern number reference guide
11....
Instruction Manual - Page 10
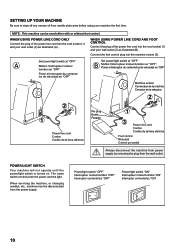
... cord into the cord socket (1) and your wall outlet (2) as illustrated (A). POWER/LIGHT SWITCH
Your machine will not operate until the power/light switch is turned on. Power/light switch "OFF" Interrupteur moteur/lumière "OFF" Interruptor corriente/luz "OFF"
Power/light switch "ON" Interrupteur moteur/lumière "ON" Interruptor corriente/luz "ON"
10...
Instruction Manual - Page 16
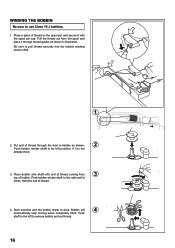
.... Place a spool of thread through thread guides as shown.
2
Push bobbin winder shaft to the right until it is not
already there.
3. Bobbin will
4
automatically stop turning when completely filled. Start machine and the bobbin starts to use Class 15 J bobbins.
1.
Instruction Manual - Page 18
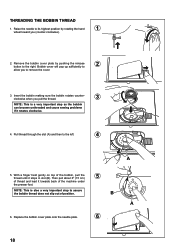
... important step as the bobbin can become unthreaded and cause sewing problems if it rotates clockwise.
4. Pull thread through the...thread does not slip out of the bobbin, pull the thread until it towards back of the machine under
the presser foot. With a finger held gently on top of position. B
A
6....)
5
of thread and lead it stops in slot (B).
Raise the needle to the right.
Instruction Manual - Page 24

...24 Holding needle thread loosely with your computer sewing machine.
3. Pull both top and bobbin threads together toward you (counter-clockwise) with your left hand, turn
2
hand wheel toward the back of your...the bobbin thread is one down-up . Always stopping with the needle "fully up" is , with the needle up cycle and stop with straight stitch selected, touch and release the reverse...
Instruction Manual - Page 26
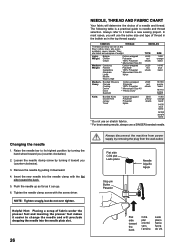
... The following table is a practical guide to it before a new sewing project. FABRICS
THREAD
The fabrics below can go. 6. Bonded Wovens Heavy...26
Always disconnect the machine from power supply by pulling it easier to its highest position by turning it can be ... Flat side Côté plat Lado plano
Needle Aiguille Aguja
Stop pin Butée Pasador
Flat side toward the back. 5.
...
Instruction Manual - Page 28
...always obtain a nicer stitch and less puckering when the upper thread appears on top of the machine) set at "AUTO" .
BOBBIN TENSION
The bobbin tension has been correctly set at the factory...to adjust the tension control. If, when you start to adjust it. Push presser foot release lever to a higher number or a lower number may improve sewing appearance. Place the desired foot on the foot....
Instruction Manual - Page 32
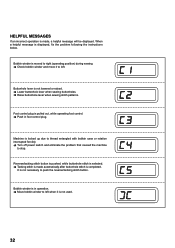
... to stop.
It is locked up due to thread entangled with bobbin case or rotation interrupted forcibly. Turn off power switch and eliminate the problem that caused the machine
to... is not lowered or raised. Lower buttonhole lever when sewing buttonholes. Raise buttonhole lever when sewing stitch patterns. Buttonhole lever is displayed, fix the problem following the...
Instruction Manual - Page 34
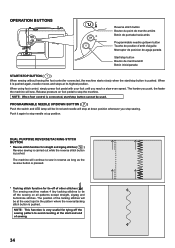
... stitch button is very useful for tie-off of other stitches ( ) The sewing machine makes 4 tiny tacking stitches to tie off the sewing pattern to sew in reverse as long as the reverse button is connected, start /stop needle at its highest position. The position of sewing.
34 NOTE: This function is pushed.
When it again to...
Instruction Manual - Page 42
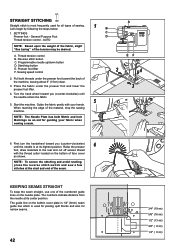
.... The guide line on the needle plate. NOTE: The Needle Plate has both threads under the presser foot and lower the
3
presser foot lifter.
4. Start/stop the sewing machine. First turn the handwheel toward you (counter-clockwise) until the needle enters the fabric.
5
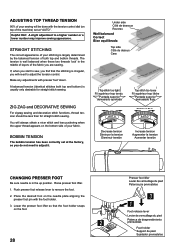
5. STRAIGHT STITCHING
A
Straight stitch is most frequently used for piecing quilt blocks...
Instruction Manual - Page 44
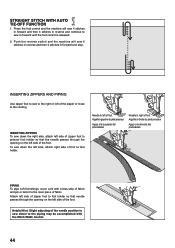
... strip of fabric.
Push the reverse switch and the machine will sew 4 stitches in forward and then 4 stitches in reverse and continue to the main piece of fabric and pin or tack it to sew in forward and stop. Press the foot control and the machine will sew 4 stitches in reverse and then 4 stitches in forward...
Instruction Manual - Page 46
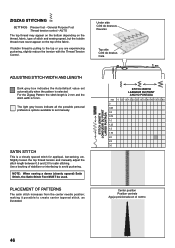
... of stabilizer or interfacing to set automatically when the pattern is a closely spaced stitch for satin stitching. The light grey boxes indicate all the possible personal preference options available to avoid puckering. NOTE: When sewing a dense (closely spaced) Satin Stitch, the Satin Stitch Foot MUST be used.
For the Zigzag Pattern the...
Instruction Manual - Page 52
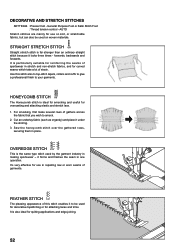
... repairing raw or worn seams of gathers across
the fabric that you wish to your garments. For smocking, first make several rows of garments. Sew the honeycomb stitch over the gathered rows,
securing them in one operation. It's very effective for use in stretch and non-stretch fabrics, and for overcasting and attaching...
Instruction Manual - Page 62
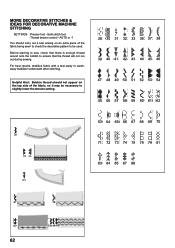
...be used. MORE DECORATIVE STITCHES & IDEAS FOR DECORATIVE MACHINE STITCHING
SETTINGS :Presser foot - Helpful Hint: Bobbin thread should carry out a test sewing on the top side of the fabric being sewn... the bobbin to slightly lower the tension setting.
62 Before starting to sew, check that the thread will not run out during sewing. For best results, stabilize fabric with a tear-away or...
Instruction Manual - Page 66
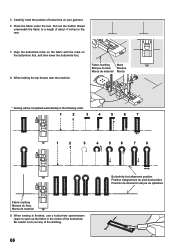
... Fabric marking Marque du tissu Marca de material
Mark Marque Marca
* Sewing will be completed automatically in the center of the stitching.
66
Buttonhole ... foot, and then lower the buttonhole foot.
8. When sewing is finished, use a buttonhole opener/seam
ripper to cut any of the buttonhole. While holding the top thread, start the machine. Be careful not to open up the fabric in the...
Instruction Manual - Page 68
...automatic buttonhole foot up to create larger buttonholes.
* Carefully mark the buttonhole length on your garment. Start the machine to complete buttonhole.
3
4. When completed, release the cord from foot and snip off the ...the end of buttonhole mark to form first bartack and left side of
buttonhole.
1
2. Sew buttonhole so that the needle pierces the fabric at 0.8 (mm) for step 3 as ...
Instruction Manual - Page 72
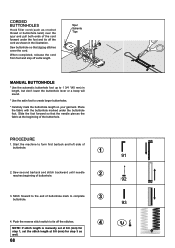
... to the General Purpose Foot when sewing Stretch Stitches. A twin-needle produces two rows of a SINGER Brand 3mm (Style 2025) Twin Needle is grooved to permit dense stitching to pass under the presser foot to avoid puckering. Use of parallel stitches for to the back of the machine, leaving about 6" (15 cm) of...
Instruction Manual - Page 78
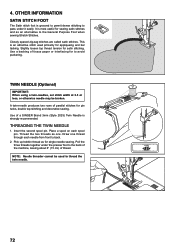
.... 3. Guide fabric into the slot of
the foot. 4. You can form single rows of the fabric,
press a 1/8" hem, then turn fabric againand press. Place the fabric to medium weight fabric. 2. Attach gathering foot and select straight stitch. 2. As you sew, hold the upper fabric with your left hand and
the lower fabric with...
Instruction Manual - Page 84
...sewing machine ... 8. "Never sew with any air...install the proper outlet. Always unplug this sewing machine...around the sewing machine needle." ...sewing machine." Replace bulb with EEC Directive 2004/108/EC covering the electromagnetic compatibility. "Use this sewing machine...sewing machine from the accumulation of the sewing machine...before replacing light bulb. "This sewing machine should always...
Similar Questions

How Do I Change The Light Bulb In My 9340 Sewing Machine?
(Posted by keistuff 2 years ago)


E4- Not E7!
Thank you for your time. I had written earlier today about my Singer Stylist, 7258 sewing machine re...
Thank you for your time. I had written earlier today about my Singer Stylist, 7258 sewing machine re...
(Posted by eboski 6 years ago)

Start Stop Button
Hello, I just purchased this machine and turned it on. The start stop button was green. I was puttin...
Hello, I just purchased this machine and turned it on. The start stop button was green. I was puttin...
(Posted by ursmoore 10 years ago)

I Have A Singer 7258, Almost New. E7 Error Code! Help!
I have a Singer 7258 Stylist. Ive had it for about 6 months but i have just started using it within ...
I have a Singer 7258 Stylist. Ive had it for about 6 months but i have just started using it within ...
(Posted by brandyscoggins 10 years ago)