Singer 5523 SCHOLASTIC Support Question
Singer 5523 SCHOLASTIC Support Question
Find answers below for this question about Singer 5523 SCHOLASTIC.Need a Singer 5523 SCHOLASTIC manual? We have 1 online manual for this item!
Question posted by elizabeth59137 on February 15th, 2014
How Do I Mount Singer Model 5523 To A Sewing Cabinet
How do I mount Singer model 5523 to a sewing cabinet
Current Answers
Related Singer 5523 SCHOLASTIC Manual Pages
Instruction Manual - Page 2
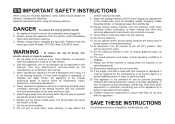
...all controls to break. 9. This appliance is not operating properly. 18. Always unplug this sewing machine.
Return the appliance to ensure that is used by the manufacturer as described in this
...rated 15 watts (110-120V area / 220-240V area). Keep ventilation openings of the sewing machine and foot controller free from accumulation of burns, fire,
electric shock, or injury to break...
Instruction Manual - Page 6
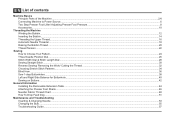
... Step Presser Foot Lifter/ Adjusting Presser Foot Pressure...8 Accessories...10
Threading the Machine Winding the Bobbin...12 Inserting the Bobbin ...14 Threading the Upper Thread...16 Automatic Needle Threader ...18 Raising the Bobbin Thread ...20 Thread Tension ...22
Sewing How to Choose Your Pattern...24 Three Needle Position Dial ...26 Stitch Width...
Instruction Manual - Page 9
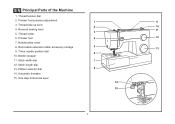
... dial
6
10. Pattern selector dial
8
14. Thread tension dial
2. Thread cutter
6. Presser foot
4
12
7. Stitch width dial
7
12. One step buttonhole lever
14
15
2 Reverse sewing lever
11
3
5. Bobbin stopper
11. Automatic threader 15. Thread take-up lever 2
10
4. Presser foot pressure adjustment
1
9
3. Needle plate cover
8. Stitch length dial
13. EN...
Instruction Manual - Page 13
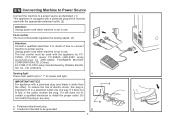
... power and light. IMPORTANT NOTICE For appliance with a polarized plug (one way. Foot control The foot control pedal regulates the sewing speed. (3)
Attention: Consult a qualified electrician if in use . Unplug power cord when machine is not in doubt of electric shock, this plug is intended to fit in use . Co., Ltd. (Vietnam...
Instruction Manual - Page 15
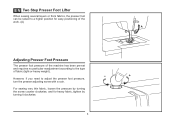
EN Two Step Presser Foot Lifter
When sewing several layers or thick fabrics, the presser foot can be raised to a higher position for...The presser foot pressure of fabric (light-or-heavy weight). For sewing very thin fabric, loosen the pressure by turning it clockwise.
8 However, if you need to the type of the machine has been pre-set and requires no particular readjustment according to adjust...
Instruction Manual - Page 17
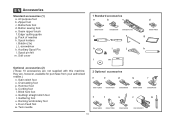
...k. Overcasting foot p. Cording foot r. Quilting/ straight stitch foot t. Gathering foot u. Button sewing foot e. Blind hem foot s. Zipper foot c. Hemmer foot q. Buttonhole foot d. Spool ...n. Even Feed foot w. Spool pin felt m. they are not supplied with this machine; Twin needle
2 Optional accessories
n
o
p
q
r
006172008 006907008
006900008
006813008...
Instruction Manual - Page 19

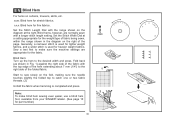
... and corresponding spool holder on foot control pedal. (8)
- Please Note:
When the bobbin winder spindle is in "bobbin winding"
position, the machine will not sew and the handwheel turn. To start sewing, push the bobbin winder spindle to spool pin. (1/2)
- Thread bobbin as illustrated and place on spindle. (5)
-
Snap thread into thread guide...
Instruction Manual - Page 23
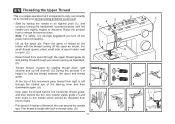
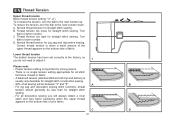
... descend. Note: For safety, it is helpful to hold the thread between the spool and thread guide.
- Thread tension module by not doing so several sewing problems could result.
-
Trim thread to back.
- Now pass the thread behind the horizontal thread guide, and then behind the thin wire needle clamp guide...
Instruction Manual - Page 29
... tension (identical stitches both top and bottom) is important for straight stitch sewing. B. Normal thread tension for straight stitch sewing. There is when a small amount of the upper thread appears on the...been set correctly at the factory, so you will be less than for straight stitch
sewing.
- EN Thread Tension
Upper thread tension Basic thread tension setting: "4". (1) To increase...
Instruction Manual - Page 31

...diagram are indicated on the Pattern Selector Dial in the top of the diagram are indicated on the machine. Pattern Selector Dial
ABCDE FGH I JK
ABCDE FGH I JK
S1
24 To select the patterns... with the gray color, turn the Pattern Selector Dial. (e) Use the Stitch Length Dial (d) to sew these stretch patterns is a stretch stitch pattern, and information on page 34.
Stitch Width Dial d. ...
Instruction Manual - Page 33
...
26
L
M
R
a b
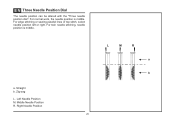
EN Three Needle Position Dial
The needle position can be altered with the "Three needle position dial". a. Middle Needle Position R. For edge stitching or sewing parallel lines of top stitch, select needle position left or right. Straight b. For twin needle stitching, needle position is middle.
Instruction Manual - Page 37
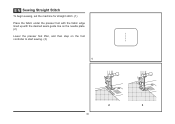
EN Sewing Straight Stitch
To begin sewing, set the machine for straight stitch. (1) Place the fabric under the presser foot with the fabric edge lined up with the desired seam guide line on the needle plate. (2) Lower the presser foot lifter, and then step on the foot controller to start sewing. (3)
1
2
3
30
Instruction Manual - Page 39
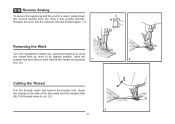
Pull threads down
the reverse sewing lever (A). A
Release the lever and the machine will sew forward again. (1)
Removing the Work
Turn the handwheel toward you (counterclockwise) to bring
the thread take up lever to the side of a seam, press down to cut. (3)
32
B 3 EN Reverse Sewing
To secure the beginning and the end of the...
Instruction Manual - Page 41
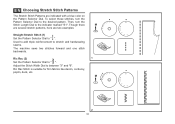
... stretch patterns, here are indicated with a blue color on the Pattern Selector Dial. Then, turn the Pattern Selector Dial to stretch and hardwearing seams. The machine sews two stitches forward and one stitch backwards.
Instruction Manual - Page 43
...of the
page. Blind Hem:
Turn up the hem to make blind hem sewing even easier, use a blind hem foot, available from your SINGER® retailer. (See page 10 for part number)
36 Generally, a ...the machine settings are normally sewn
with the range shown on curtains, trousers, skirts, etc. Fold back
(as shown in the diagram on the right of the folded fabric.
1
Start to sew slowly ...
Instruction Manual - Page 45
... overcast the cord.
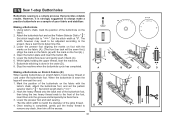
1. Open the button plate and insert the button (B). 5. Stop the machine when the buttonhole cycle has completed. a
b
A
PUSH
B
C
Making a Buttonhole on Stretch Fabrics (E)
When sewing buttonholes on the
fabric. 2. Lower the presser foot and start the machine. 7. Set the stitch width at "6". Making a Buttonhole 1. Set stitch length dial to the...
Instruction Manual - Page 49
....
1
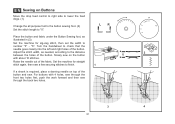
If a shank is required, place a darning needle on top of the button and sew. For buttons with about 10 stitches. "6". Set the machine for straight
a
2
ba b
stitch again, then sew a few securing stitches to number "3" - Turn the handwheel to "0". EN Sewing on Buttons
Move the drop feed control to right side to lower the...
Instruction Manual - Page 55
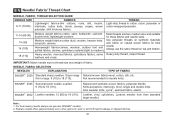
... threads on synthetic materials
terrycloth, denims.
and cotton on top and bottom. Always use genuine SINGER® needles. 2. Heavy woolen, overcoat fabrics, upholstery fabrics, some Heavy duty thread, carpet...174;, swimsuit fabric, elastic.
SINGER® 2032 Leather needles. 12 (80) to 18 (110). Not recommended for these fabrics and needle sizes. For best sewing results always use the same...
Instruction Manual - Page 60
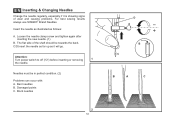
The flat side of wear and causing problems. For best sewing results always use SINGER® Brand Needles. Attention:
Turn power switch to off ("O") before inserting or removing
1
the needle. Bent needles B. Blunt needles
2
53
D A
B C
B
A
C
Loosen the needle clamp screw ...
Instruction Manual - Page 64
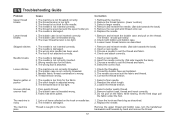
... The wrong size needle has been used. 4. The needle is damaged. Thread tension wrong.
1. Rethread the machine. 2. Select a finer needle. 2. The needle is damaged. 2. The needle is not correctly inserted. 3....feed
1. Check both bobbin and bobbin case. 3. Do not pull on the fabric while sewing, let the feed dogs pull
the fabric under the foot.
1. The thread tension is ...
Similar Questions

Can The Singer Model 1060 Be Mounted In A Sewing Cabinet
(Posted by rusburcham 3 years ago)

Sewing Machine Model 5523 Page 53 In Manual Does Not Show Me How To Attach Pres
The page in your instructions I had and was reading it when it deleted
The page in your instructions I had and was reading it when it deleted
(Posted by ramseyrobert 7 years ago)

Singer Heavy Duty 4423 Sewing Cabinet Mounting Instructions
How do I mount the Singer Heavy Duty 4423 in a sewing cabinet or on a table?
How do I mount the Singer Heavy Duty 4423 in a sewing cabinet or on a table?
(Posted by pamjdeg 9 years ago)

Can Free Form Stitching Be Done On Model 5523 With The Regular Presser Foot?
(Posted by kopitkin 9 years ago)

I Cannot Pick Up Bobbin Thread On Model 5523, Singer
(Posted by ginnih 10 years ago)