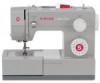
Singer 4423 Heavy Duty Support Question
Singer 4423 Heavy Duty Support Question
Find answers below for this question about Singer 4423 Heavy Duty.Need a Singer 4423 Heavy Duty manual? We have 1 online manual for this item!
Question posted by pamjdeg on May 21st, 2015
Singer Heavy Duty 4423 Sewing Cabinet Mounting Instructions
How do I mount the Singer Heavy Duty 4423 in a sewing cabinet or on a table?
Current Answers
Related Singer 4423 Heavy Duty Manual Pages
Instruction Manual - Page 2

... of experience and knowledge, unless they do not play with foot controller is not intended for examination, repair, electrical or mechanical adjustment. 4. Use this sewing machine. Please turn all instructions before using this appliance only for household use only. To reduce the risk of lint, dust, and loose cloth. 5. Always unplug before cleaning...
Instruction Manual - Page 6

... Machine Winding the Bobbin...12 Inserting the Bobbin ...14 Threading the Upper Thread...16 Automatic Needle Threader ...18 Raising the Bobbin Thread ...20 Thread Tension ...22
Sewing How......34 Blind Hem ...36 Sew 1-step Buttonholes ...38 Left and Right Side Balance for Buttonhole ...40 Sewing on Buttons ...42
General Information Installing the Removable Extension Table ...44 Attaching the Presser ...
Instruction Manual - Page 9
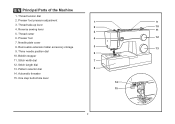
... threader 15. Thread take-up lever 2
10
4. Needle plate cover
8. Stitch width dial
7
12. Presser foot
4
12
7. Stitch length dial
13. Removable extension table/ accessory storage
5
13
9. Thread tension dial
2. Reverse sewing lever
11
3
5. Bobbin stopper
11. EN Principal Parts of the Machine
1. Presser foot pressure adjustment
1
9
3. One step buttonhole lever
14
15
2
Instruction Manual - Page 13

... CORPORATION LTD. (China) 4C-316Q (110-125V area) manufactured by Wakaho Electric Ind. If it does not fit fully in use . Unplug power cord when machine is intended to install the proper outlet.
Co., Ltd. (Vietnam)
Sewing light
1
Press main switch (A) to power source. To reduce the risk of how to connect...
Instruction Manual - Page 15
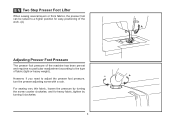
... pressure of fabric (light-or-heavy weight). However, if you need to the type of the machine has been pre-set and requires no particular readjustment according to adjust the presser foot pressure, turn the presser adjusting screw with a coin. EN Two Step Presser Foot Lifter
When sewing several layers or thick fabrics...
Instruction Manual - Page 17

Button sewing foot e. L-screwdriver k. Auxiliary Spool Pin l. Satin stitch foot o. Overcasting foot p. Cording foot r. Gathering foot u. Twin ...i. Seam ripper/ brush f. Bobbin (3x) j. Darning/ embroidery foot v. they are not supplied with this machine; Pack of needles h. Spool pin felt m. Hemmer foot q. All purpose foot b. Even Feed foot w. Buttonhole foot d. EN ...
Instruction Manual - Page 19

... as illustrated and place on foot control pedal. (8)
- Hold thread end. (7) 1
- Please Note:
When the bobbin winder spindle is in "bobbin winding"
position, the machine will not sew and the handwheel turn. Wind thread clockwise around bobbin winder tension discs. (4)
- Push bobbin spindle to spool pin. (1/2)
-
Place thread and corresponding spool holder...
Instruction Manual - Page 23

... thread to length with the thread coming off the power before threading.
- Lift up left through pre-tension spring as by not doing so several sewing problems could result.
- Thread tension module by raising the needle to its highest point (1), and continue turning the handwheel counterclockwise until the needle just slightly...
Instruction Manual - Page 29

...the next number up.
A.
Normal thread tension for straight stitch sewing.
Turn
dial to higher number. For all sewing will always obtain a nicer
stitch and less fabric puckering when the...next number down. Correct thread tension is
usually only desirable for straight stitch
sewing.
- Lower thread tension
The bobbin tension has been set correctly at the factory, ...
Instruction Manual - Page 31

...
The diagram on this page display the stitch patterns available on the machine. Three Needle Position Dial c. Pattern Selector Dial
ABCDE FGH I JK
ABCDE FGH I JK
S1
24 EN How to sew these stretch patterns is on page 34. To select the patterns indicated... Selector Dial may be turned in the top of the stitch as desired for the project. Reverse Sewing Lever b. Stitches in either direction.
Instruction Manual - Page 33

For edge stitching or sewing parallel lines of top stitch, select needle position left or right. Straight b. Left Needle Position M. a. Right Needle Position
26
L
M
R
a b For twin needle stitching, needle position ...
Instruction Manual - Page 35

... of stitch width dial The maximum zigzag stitch width for when straight stitching
For straight stitch sewing, turn the Pattern Selector Dial to zig-zag. "0" position is full left, "6" is...zag stitches increase as you move zigzag dial from "0" - Generally speaking, use a longer stitch length when sewing heavier weight fabrics or when using a finer needle or thread.
2
28
4 3 2 1 0.5
The ...
Instruction Manual - Page 37

EN Sewing Straight Stitch
To begin sewing, set the machine for straight stitch. (1) Place the fabric under the presser foot with the fabric edge lined up with the desired seam guide line on the needle plate. (2) Lower the presser foot lifter, and then step on the foot controller to start sewing. (3)
1
2
3
30
Instruction Manual - Page 39

...the end of the face plate and into thread cutter (B). Pull threads down
the reverse sewing lever (A). Guide the threads to the side of a seam, press down to its... the Thread
Pull the threads under and behind the presser foot.
A
Release the lever and the machine will sew forward again. (1)
Removing the Work
Turn the handwheel toward you (counterclockwise) to bring
the thread take up lever...
Instruction Manual - Page 41

To select these stitches, turn the Stitch Length Dial to the indicator marked "S1". Adjust the Stitch Width Dial to stretch and hardwearing seams. The machine sews two stitches forward and one stitch backwards. EN Choosing Stretch Stitch Patterns
The Stretch Stitch Patterns are two examples:
Straight Stretch Stitch (1) Set the Pattern ...
Instruction Manual - Page 43

...Blind hems, however, are
appropriate for heavier weight fabrics. Sew a test first to make blind hem sewing even easier, use a blind hem foot, available from your SINGER retailer. (See page 10 for the weight/type of... is completed and press.
2 Note: To make sure the machine settings are normally sewn
with the range shown on the
diagram at
a setting appropriate for part number)
36
Instruction Manual - Page 45
... the machine when the buttonhole cycle has completed. Once sewing is done in the order (D). 8. Sew a test first to " ".
2. While lightly holding the upper thread, start sewing.
*Set...Making a Buttonhole on Stretch Fabrics (E)
When sewing buttonholes on stretch fabric, hook heavy thread or
cord under the buttonhole foot.
Hook the heavy thread onto the back end of the ...
Instruction Manual - Page 49
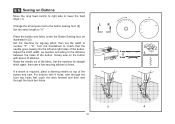
... holes of the button. Raise the needle out of the button and sew. Set the machine for zig-zag stitch, then set the width to "0". Slowly sew on top of the fabric. Adjust the stitch width, as illustrated in (3).
EN Sewing on Buttons
Move the drop feed control to right side to lower the...
Instruction Manual - Page 55

...for these fabrics and needle sizes. For best sewing results always use the same thread on natural ...Heavy duty thread, carpet thread. EN Needle/ Fabric/ Thread Chart
NEEDLE, FABRIC, THREAD SELECTION GUIDE
NEEDLE SIZE 9-11 (70-80)
FABRICS
Lightweight fabrics-thin cottons, voile, silk, muslin, interlocks, cotton knits, tricots, jerseys, crepes, woven polyester, shirt & blouse fabrics. SINGER...
Instruction Manual - Page 60

... towards the back. Bent needles B. C/D.Insert the needle as far up as follows:
A. Damaged points C.
The flat side of wear and causing problems. For best sewing results always use SINGER® Brand Needles.
Similar Questions

My Singer Sewing Machine 4423 Will Not Do Anything. All You Can Hear Is Motor
I hear motor the shaft spins how to change bel
I hear motor the shaft spins how to change bel
(Posted by Marybeverly4576477 8 years ago)

Instructions For Machine Cutter Attachment Or Serger
(Posted by brendaprather 9 years ago)

How Do I Oil My Singer 4423 Heavy Duty
How do I clean and oil my singer 4423 heavy duty sewing machine? It is not in the manual. Thanks!
How do I clean and oil my singer 4423 heavy duty sewing machine? It is not in the manual. Thanks!
(Posted by iochoa69 9 years ago)

I Have A Heavy Duty Singer Sewing Machine (model 4432)
stopped sewing after bobbin replacement?
stopped sewing after bobbin replacement?
(Posted by sueisforme 9 years ago)
Does This Sewing Machine Work In Australia As We Have 220 V Here Please
(Posted by jennymonte 11 years ago)