Singer 4423 Heavy Duty Support Question
Singer 4423 Heavy Duty Support Question
Find answers below for this question about Singer 4423 Heavy Duty.Need a Singer 4423 Heavy Duty manual? We have 1 online manual for this item!
Question posted by iochoa69 on November 8th, 2014
How Do I Oil My Singer 4423 Heavy Duty
How do I clean and oil my singer 4423 heavy duty sewing machine? It is not in the manual. Thanks!
Current Answers
Answer #1: Posted by BusterDoogen on November 8th, 2014 6:43 PM
BusterDoogen

Member since:
October 30th, 2011 Points: 28,565,407

Member since:
October 30th, 2011 Points: 28,565,407
Go here for the process, although not model specific.
I hope this is helpful to you!
Please respond to my effort to provide you with the best possible solution by using the "Acceptable Solution" and/or the "Helpful" buttons when the answer has proven to be helpful. Please feel free to submit further info for your question, if a solution was not provided. I appreciate the opportunity to serve you!
Related Singer 4423 Heavy Duty Manual Pages
Instruction Manual - Page 2

...cleaning. 3. Keep ventilation openings of the sewing machine and foot controller free from outlet. 15. Special care is 75dB(A). 17. Do not pull or push fabric while stitching. Switch the sewing machine... or mechanical adjustment. 4. This appliance is necessary
when this
manual.
SAVE THESE INSTRUCTIONS
This sewing machine is not working properly, if it must be supervised to ...
Instruction Manual - Page 6

... Step Presser Foot Lifter/ Adjusting Presser Foot Pressure...8 Accessories...10
Threading the Machine Winding the Bobbin...12 Inserting the Bobbin ...14 Threading the Upper Thread...16 Automatic Needle Threader ...18 Raising the Bobbin Thread ...20 Thread Tension ...22
Sewing How to Choose Your Pattern...24 Three Needle Position Dial ...26 Stitch Width...
Instruction Manual - Page 9
...
1
9
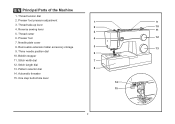
3. Reverse sewing lever
11
3
5. Presser foot
4
12
7. Three needle position dial
6
10. Thread tension dial
2. Needle plate cover
8. Removable extension table/ accessory storage
5
13
9. Bobbin stopper
11. One step buttonhole lever
14
15
2 Thread take-up lever 2
10
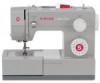
4. Automatic threader 15. EN Principal Parts of the Machine
1. Pattern selector dial...
Instruction Manual - Page 11
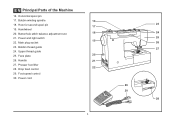
.... Presser foot lifter 22
28. Buttonhole stitch balance adjustment slot
18
21. Main plug socket
23. Foot speed control 30. EN Principal Parts of the Machine
16. Bobbin winding spindle
16
18. Handwheel
20. Horizontal spool pin
17.
Instruction Manual - Page 13

... (China) 4C-316Q (110-125V area) manufactured by Wakaho Electric Ind.
Unplug power cord when machine is not in a polarized outlet only one blade is intended to fit in use . Conductor intended ... electrician to " l " for power and light. Co., Ltd. (Vietnam)
Sewing light
1
Press main switch (A) to install the proper outlet. a b
a. Foot control The foot control pedal regulates the...
Instruction Manual - Page 15
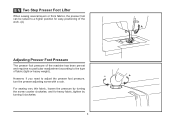
... can be raised to a higher position for heavy fabric, tighten by turning it clockwise.
8 For sewing very thin fabric, loosen the pressure by turning the screw counter clockwise, and for easy positioning of the work. (A)
A
Adjusting Presser Foot Pressure
The presser foot pressure of the machine has been pre-set and requires no...
Instruction Manual - Page 17

Buttonhole foot d. Button sewing foot e. Edge/ quilting guide g. Spool holders i. Overcasting foot p. Cording foot r. Gathering foot u. Pack of ... EN Accessories
Standard accessories (1) a. All purpose foot b. L-screwdriver k. they are not supplied with this machine; Zipper foot c. Hemmer foot q. Darning/ embroidery foot v. Seam ripper/ brush f. Spool pin felt ...
Instruction Manual - Page 19

... pin. (1/2)
- Wind thread clockwise around bobbin winder tension discs. (4)
- Cut thread. (9) 2
- Please Note:
When the bobbin winder spindle is in "bobbin winding"
position, the machine will not sew and the handwheel turn. Thread bobbin as illustrated and place on foot control pedal. (8)
- Step on spindle. (5)
-
Place thread and corresponding spool holder on...
Instruction Manual - Page 23

... out correctly as shown. Place the spool of this process it is strongly suggested you turn off the spool as by not doing so several sewing problems could result.
-
Instruction Manual - Page 31

...The Pattern Selector Dial may be turned in blue. a
b
c d e
a. Stitch Width Dial d. Reverse Sewing Lever b. Three Needle Position Dial c. Stitch Length Dial e. To select the patterns indicated with the gray color,... the stitch is a stretch stitch pattern, and information on how to sew these stretch patterns is on the machine. EN How to Choose Your Pattern
The diagram on this page display ...
Instruction Manual - Page 37

EN Sewing Straight Stitch
To begin sewing, set the machine for straight stitch. (1) Place the fabric under the presser foot with the fabric edge lined up with the desired seam guide line on the needle plate. (2) Lower the presser foot lifter, and then step on the foot controller to start sewing. (3)
1
2
3
30
Instruction Manual - Page 39

Pull threads down
the reverse sewing lever (A). A
Release the lever and the machine will sew forward again. (1)
Removing the Work
Turn the handwheel toward you (counterclockwise) to bring
the thread take up lever to cut. (3)
32
B 3 Sew a few reverse stitches. EN Reverse Sewing
To secure the beginning and the end of the face plate and into...
Instruction Manual - Page 41

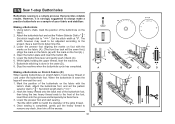
... Stitch (1) Set the Pattern Selector Dial to the desired pattern. To select these stitches, turn the Stitch Length Dial to stretch and hardwearing seams. The machine sews two stitches forward and one stitch backwards.
Instruction Manual - Page 43

... blind hem sewing even easier, use a blind hem foot, available from your SINGER retailer. (See page 10 for stretch fabrics.
Blind hems, however, are
appropriate for heavier weight fabrics. Generally, a narrower stitch is used for lighter weight
fabrics, and a wider stitch is completed and press.
2 Note: To make sure the machine settings are...
Instruction Manual - Page 45
... tailor's chalk, mark the position of the gimp thread.
4. Hook the heavy thread onto the back end of the foot,
insert them into the grooves and temporarily tie them there.
3. Stop the machine when the buttonhole cycle has completed. Sew a test first to always make a
M
practice buttonhole on a sample of the buttonhole on...
Instruction Manual - Page 49
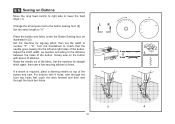
...
Place the button and fabric under the Button Sewing foot, as needed, according to check that the needle goes cleanly into the left and right holes of the ...fabric. Turn the handwheel to the distance between the holes of the button and sew. For buttons with about 10 stitches. "6". Adjust the stitch width, as illustrated in (3). Set the machine...
Instruction Manual - Page 55

... (70) to thread size and weight of fabric.
For best sewing results always use the same thread on natural woven fabrics for double... & blouse fabrics.
Always use genuine SINGER® needles. 2. Heavy woolen, overcoat fabrics, upholstery fabrics, some Heavy duty thread, carpet thread. IMPORTANT: Match needle size to 18 (110).
THREAD
Light-duty thread in cotton, nylon, polyester or...
Instruction Manual - Page 60

... should be in perfect condition. (2)
Problems can occur with: A. Needles must be towards the back. The flat side of wear and causing problems. For best sewing results always use SINGER® Brand Needles. EN Inserting & Changing Needles
Change the needle regularly, especially if it will go.
Instruction Manual - Page 62

... (B). - Unscrew the bulb and install a new one (C). (2) - Loosen screw (A) as illustrated. (1) - Replace the face plate and tighten screw. B A
Should there be any problem, consult your SINGER® retailer. 1
C
2
55
EN Changing the Bulb
Disconnect the machine from the power supply by removing the plug from the main socket!
Instruction Manual - Page 64

... 5. Lint or oil have collected on the fabric while sewing, let the feed... dogs pull
the fabric under the foot.
1. Choose a needle to suit the thread and fabric. 4. The needle size must suit the fabric and thread. 4. Do not pull on the hook or needle bar. 2. Clean... 2. Readjust the stitch length. 3. The machine is not inserted correctly. 2. The thread tension...
Similar Questions


Oiling 4423
Nowhere in your manual does it show how and where to oil this machine? I use it a lot and need to kn...
Nowhere in your manual does it show how and where to oil this machine? I use it a lot and need to kn...
(Posted by shyrle72 8 years ago)

Singer Pixie-plus Craft Machine Manual
The black plastic bobbin case has popped out. How do you re-align it under the pressure plate? Is th...
The black plastic bobbin case has popped out. How do you re-align it under the pressure plate? Is th...
(Posted by jfrancorn 8 years ago)

Singer Heavy Duty 4423 Sewing Cabinet Mounting Instructions
How do I mount the Singer Heavy Duty 4423 in a sewing cabinet or on a table?
How do I mount the Singer Heavy Duty 4423 in a sewing cabinet or on a table?
(Posted by pamjdeg 8 years ago)

Singer Sew Mate Manual
I cannot make button holes. The bobbin area is totally knotted and the top breaks.
I cannot make button holes. The bobbin area is totally knotted and the top breaks.
(Posted by almiller1 10 years ago)