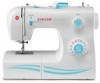
Singer 2263 Simple Support Question
Singer 2263 Simple Support Question
Find answers below for this question about Singer 2263 Simple.Need a Singer 2263 Simple manual? We have 2 online manuals for this item!
Question posted by kalger1 on April 8th, 2013
My Stitches Are Not Straight ... Ocassionally Go At An Angle
The person who posted this question about this Singer product did not include a detailed explanation. Please use the "Request More Information" button to the right if more details would help you to answer this question.
Current Answers
Related Singer 2263 Simple Manual Pages
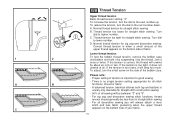
Instruction Manual - Page 2
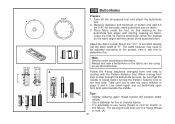
.... 6. Always unplug sewing machine from outlet. 15. Do not operate where aerosol spray products are being administered. 14. Do not allow to ensure that is intended for examination, repair, electrical or mechanical adjustment. 4. Do not pull or push fabric while stitching. Do not unplug by or near children. 2. Never place anything on cord...
Instruction Manual - Page 6
... Presser Foot Lifter...8 Accessories ...9
Threading the Machine Winding the Bobbin ...11 Inserting the Bobbin ...13 Thread Tension ...15 Threading the Upper Thread ...17 Automatic Needle Threader ...19 Raising the Bobbin Thread...21
Sewing How to Choose Your Pattern...23 Stitch Width Dial & Stitch Length Dial ...25 Sewing Straight Stitch ...27 Reverse Sewing/ Removing the Work/ Cutting the Thread...
Instruction Manual - Page 9
1 2 3 4 5 6
12
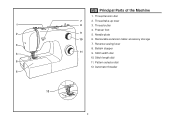
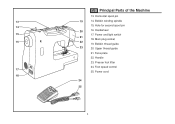
GB Principal Parts of the Machine
1. Thread take-up lever
8
3. Reverse sewing lever
8. Stitch length dial
11. Thread cutter
4. Presser foot
9
5. Needle plate
10
6. Stitch width dial
10. Pattern selector dial
12. Bobbin stopper
11
9. Removable extension table/ accessory storage
7. Automatic threader
2 Thread tension dial
7
2.
Instruction Manual - Page 11
Bobbin winding spindle
14
15. Face plate
22. Foot speed control 17
25. Main plug socket
16
22
19. GB Principal Parts of the Machine
13. Horizontal spool pin
13
19
14. Hole for second spool pin
20
16. Handwheel
15
17. Bobbin thread guide
23
20. Handle
23. Power ...
Instruction Manual - Page 13
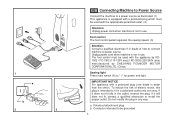
... control must be used with a polarized plug (one way. Foot control The foot control pedal regulates the sewing speed. (3)
Attention: Consult a qualified electrician if in any way.
A
1 a
b
2
3
GB Connecting Machine to Power Source
Connect the machine to a power source as illustrated. (1) This appliance is equipped with a polarized plug which must be used with...
Instruction Manual - Page 16
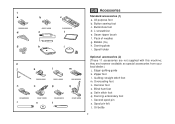
Button sewing foot c. they are not supplied with this machine; Zipper foot l. Blind hem foot p. Second spool pin s. L-screwdriver e. Quilting/ straight stitch foot m. 1 a
006806008
d
b
c
006914008
e
006909008
f
g
h
i
2
j
k
l
m
006905008
006916008
006803008
n
o
p
q
006800008
r
006812008
s
006804008
t
006016008
GB Accessories
Standard accessories (1) a. ...
Instruction Manual - Page 18
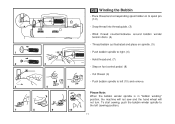
... tension discs. (4)
- Push bobbin spindle to the left (10) and remove.
4
5
6
Please Note:
When the bobbin winder spindle is in "bobbin winding" position, the machine will not sew and the hand wheel will not turn. Cut thread. (9)
- Hold thread end. (7) - Thread bobbin as illustrated and place on foot control pedal. (8)
- To start...
Instruction Manual - Page 22
... too much. To adjust, turn the small screw on the bottom side of all stitch functions, thread or fabric.
- A balanced tension (identical stitches both top and bottom) is usually only desirable for straight stitch sewing.
Thread tension too tight for straight stitch construction sewing.
- 90% of fabric.
1
2
Lower thread tension
To test the bobbin thread tension, remove the...
Instruction Manual - Page 24
... take-up lever and then
4
downwards again. (6)
- 6
43
2
8
7
5
1
2
3
5
6
7
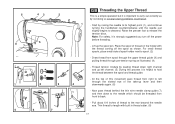
GB Threading the Upper Thread
This is a simple operation but it is strongly suggested you turn off the spool as illustrated. (4)
- Start by not doing so several sewing problems could result.
1
- At the top of thread on the holder with built in thread cutter...
Instruction Manual - Page 30
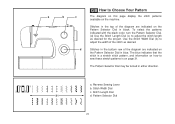
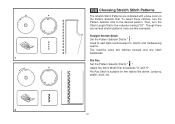
... indicated on
the Pattern Selector Dial in blue. The blue indicates that the
stitch is a stretch stitch pattern, and information on how to Choose Your Pattern
a
b
c
The diagram on this page display the stitch patterns
available on the machine. GB How to
sew these stretch patterns is on page 31. To select the patterns indicated...
Instruction Manual - Page 32
... using a thicker needle or thread. however, the width can be reduced on any patterns. Neat zig-zag stitches are usually achieved at "2.5" or below. (2) Dense zig-zag stitches are called satin stitches. (2)
Function of stitch length dial for straight stitching For straight stitch sewing, turn the Pattern Selector Dial to zig-zag. The width increases as the setting of...
Instruction Manual - Page 34
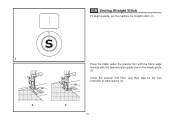
GB Sewing Straight Stitch
To begin sewing, set the machine for straight stitch. (1)
1 2
Place the fabric under the presser foot with the fabric edge lined up with the desired seam guide line on the needle plate. (2) Lower the presser foot lifter, and then step on the foot controller to start sewing. (3)
3
27
Instruction Manual - Page 36
...side of a seam, press down to descend. A
1
2
B
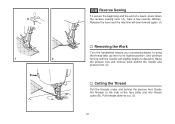
GB Reverse Sewing
To secure the beginning and the end of the face plate and into thread ...Thread
Pull the threads under and behind the presser foot. Pull threads down the reverse sewing lever (A). Release the lever and the machine will sew forward again. (1)
Removing the Work
Turn the handwheel toward you (counterclockwise) to bring ...
Instruction Manual - Page 38
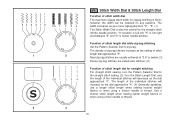
Used to add triple reinforcement to stretch and hardwearing seams. The machine sews two stitches forward and one stitch backwards. 1 Ric Rac Set the Pattern Selector Dial to between "3" and "5". To select these stitches, turn the Stitch Length Dial to the indicator marked "S1". Adjust the Stitch Width Dial to " ". Though there are several stretch patterns, here are...
Instruction Manual - Page 40
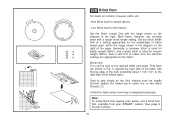
... being sewn, within the range shown in Fig. 1) against the right side of the fabric with a longer stitch length setting.
Sew a test first to the
right side of the page. Note:
To make sure the machine settings are normally sewn with
the top edge of the hem extending about 7 mm (1/4") to make blind...
Instruction Manual - Page 42
... Dial. Slightly reducing upper thread tension will produce better results.
- Measure diameter and thickness of the buttonhole foot. Note: Density varies according to set stitch density. Always test sew a buttonhole on fabric.
3. Use a stabilizer for bar tacks; Place fabric under the foot, so that the needle is advisable to determine this. When...
Instruction Manual - Page 44
... the left and right holes of the fabric. To sew a few securing stitches to finish. Set the machine for straight stitch, with about 10 stitches.
Raise the needle out of the button. Set the machine for zigzag stitch, then set at "0" sew a few securing stitches, set the machine for straight stitch again, with 4 holes, sew through the front two holes first, push the work...
Instruction Manual - Page 50
... needle often (approximately every other garment ) and/ or at first thread breakage or skipped stitches.
43 Medium weight fabrics-cotton duck, woolen, heavier knits, Use polyester threads on synthetic ...and double knits. quilted fabrics, denims, upholstery material (light to medium).
For best sewing results always use the same thread on natural woven fabrics for double knits. NEEDLE, ...
Instruction Manual - Page 59
... and bobbin case. 3. Select the correct foot.
1. The bobbin case is caught in the hook. The stitch length is damaged.
1. Select a better quality thread. 2. Clean the hook and feed dog as described.
1. Only use good quality sewing machine oil.
4. The thread is too thick for the fabric. 4. The needle is incorrectly adjusted. 3. Remove...
Instruction Manual 2 - Page 1
...the area. (2)
Cleaning and Lubricating the Hook: Remove the bobbin case.
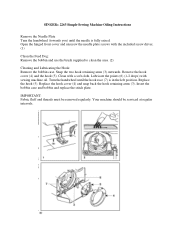
SINGER® 2263 Simple Sewing Machine Oiling Instructions
Remove the Needle Plate Turn the handwheel (towards you) until the hook ...with sewing machine oil. Clean with a soft cloth. Replace the hook cover (4) and snap back the hook retaining arms (3). Insert the bobbin case and bobbin and replace the stitch plate...
Similar Questions

I Get E7 Error Message On My Singer Model 7258 Sewing Machine. There Is No Refe
Error message E7 is up on my Singer Stylist model 7258 sewing machine. It is not working at all. I t...
Error message E7 is up on my Singer Stylist model 7258 sewing machine. It is not working at all. I t...
(Posted by ebellamybellamy9 5 years ago)

My Sewing Machine Is Not Sewing The Correct Stitch.
When I push the automated button to sew a special stitch it will not sew it. What can I do?
When I push the automated button to sew a special stitch it will not sew it. What can I do?
(Posted by tammywood16 7 years ago)

How Do You Install The Bobbin Driver In A Singer 2263
(Posted by fallanjones 9 years ago)
Beeping From Singer Sewing Machine Stylist Ii 5625
My sewing machine will beep and stop sewing after three inches of sewing. I have taken it to be repa...
My sewing machine will beep and stop sewing after three inches of sewing. I have taken it to be repa...
(Posted by arusheria 9 years ago)

Edge/quilting Guide
how do I attach and use the edge/quilting guide on the singer machine 2263
how do I attach and use the edge/quilting guide on the singer machine 2263
(Posted by lneff354 11 years ago)