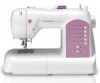
Singer 8763 Curvy Support Question
Singer 8763 Curvy Support Question
Find answers below for this question about Singer 8763 Curvy.Need a Singer 8763 Curvy manual? We have 1 online manual for this item!
Question posted by tammywood16 on February 28th, 2017
My Sewing Machine Is Not Sewing The Correct Stitch.
When I push the automated button to sew a special stitch it will not sew it. What can I do?
Current Answers
Related Singer 8763 Curvy Manual Pages
Instruction Manual - Page 3
...50 - 51 Ideas on design stitching Continuous patterns 52 - 53 Sewing on a button 52 - 53 Sewing a buttonhole 54 - 59
Using buttonhole foot, Procedure, Corded buttonholes
3. OTHER INFORMATION Satin stitch foot, Twin needle, Straight stitch needle position 62 - 63
5. KNOWING YOUR SEWING MACHINE Machine identification 6 - 7 Accessories 8 - 9 Setting up your machine 10 - 11 Spool pins 12...
Instruction Manual - Page 6
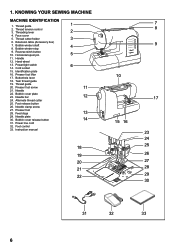
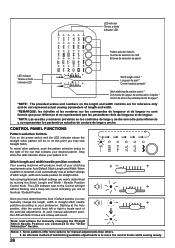
...guide
19. Needle clamp screw
27. Bobbin cover release button
14
31. Thread cutter/holder
3
6. Reverse stitch button 10. Alternate thread cutter
25. Presser foot 28. Feed dogs
13
29. Presser foot lifter
17. Horizontal spool pin
5
11. Handle
12. KNOWING YOUR SEWING MACHINE
MACHINE IDENTIFICATION
1. Cord socket
6
15. Thread tension control 3. Presser...
Instruction Manual - Page 8
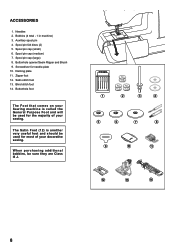
...
1. Buttonhole foot
The Foot that comes on your Sewing machine is another very useful foot and should be used for most of your decorative sewing. Spool pin cap (medium) 7. Buttonhole opener/Seam Ripper and Brush 9. Satin stitch foot 13. Bobbins (4 total - 1 in machine) 3.
Spool pin cap (small) 6. Spool pin felt discs (2) 5. Zipper foot 12. The...
Instruction Manual - Page 12
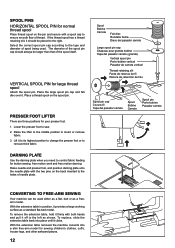
...as shown. PRESSER FOOT LIFTER
There are three positions for button sewing, free motion work and free motion darning. Spool Bobine Carrete... foot. 1. CONVERTING TO FREE-ARM SEWING
Your machine can be placed to
remove thick fabric. With the extension ...the lifter to the middle position to sew. 2. The diameter of thread. Select the correct spool pin cap according to the holes of ...
Instruction Manual - Page 20
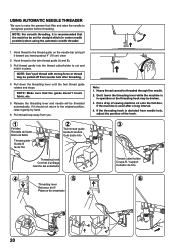
...For smooth threading, it is
in operation or the threading hook may be set for straight stitch (in center needle position) when using the automatic needle threader.
1.
If the threading ... and B).
3. Pull thread loop away from needle hole,
adjust the position of sewing machine oil onto the felt disc,
if the machine is deviated from you leaving about 4" (10 cm) clear.
2. Hook thread ...
Instruction Manual - Page 22
... by pulling it before a new sewing project.
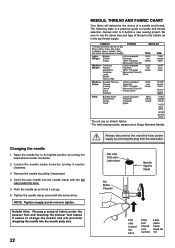
FABRICS
THREAD
The fabrics below can go. 6. Remove the needle by turning the hand wheel counter clockwise.
2. Push the needle up as far as ...fuera de Vd. Insert the new needle into the needle plate slot.
22
Always disconnect the machine from power supply by turning it easier to it downward. 4. NOTE: Tighten snugly, but ...
Instruction Manual - Page 24
... slightly on the bottom side of the machine.
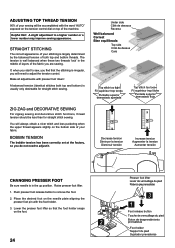
STRAIGHT STITCHING
The correct appearance of your stitching is usually only desireable for straight stitch sewing. A balanced tension (identical stitches both top and bobbin threads.
Push presser foot release button to a higher number or a lower number may improve sewing appearance. If, when you start to sew, you find that the foot holder...
Instruction Manual - Page 26
...
Pattern selection buttons
Turn on the length and width controls are contained in the "Other Information" Section. Stitch length and width/needle position controls
Your sewing machine will produce most...the straight stitch pattern will be lit. To select other patterns, push the pattern selection button to your desired pattern.
When a pattern is selected, it will automatically sew at the...
Instruction Manual - Page 28
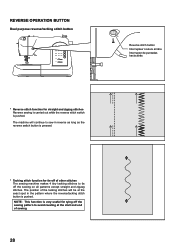
...;re interruptor de puntadas hacia atrás
* Reverse stitch function for tie-off of other stitches The sewing machine makes 4 tiny tacking stitches to tie off the sewing pattern to sew in the pattern where the reverse/tacking stitch button is pushed. The position of sewing.
28
NOTE: This function is pushed. The machine will be at the start and end of the...
Instruction Manual - Page 32
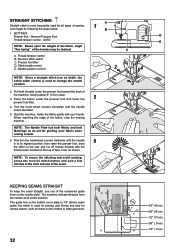
...Metric and Inch Markings as an aid for guiding your hands. Start the machine. KEEPING SEAMS STRAIGHT
To keep the seam straight, use one of the numbered...) 1/2" (13 mm) 3/8" ( 9 mm) 1/4" ( 6 mm) NOTE: To secure the stitching and avoid raveling, press the reverse stitch button and sew a few stitches at its highest position, then raise the presser foot, draw
6
the fabric to change the needle ...
Instruction Manual - Page 34
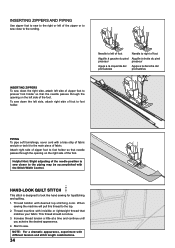
... the right side, attach left side of the zipper or to sew close to foot holder. HAND-LOOK QUILT STITCH
This stitch is designed to the top. 2.
This thread should not show. 3.
Start to foot holder so that
matches your fabric. Thread machine with the Stitch Width Control. Attach right side of zipper foot to...
Instruction Manual - Page 36
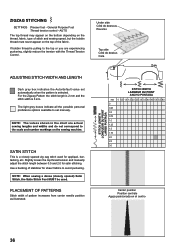
... If bobbin thread is a closely spaced zig zag stitch used . ZIGZAG STITCHING
SETTINGS :Presser foot -
Use a backing of the fabric. SATIN STITCH
This is pulling to avoid puckering.
PLACEMENT OF PATTERNS
Stitch width of stitch and sewing speed, but the bobbin thread must never appear on the sewing machine. AUTO
The top thread may appear on the bottom...
Instruction Manual - Page 38
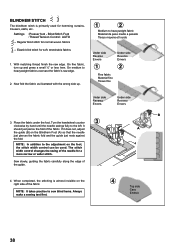
... Foot (A) so that the needle
just pierces the fabric fold and the guide just rests against
the fold. B A
4. Regular blind stitch for soft, stretchable fabrics
1. NOTE: In addition to sew blind hems. Always make a sewing test first.
4
Top side Cara Endroit
38
NOTE: It takes practice to the adjustment on the foot, the...
Instruction Manual - Page 40
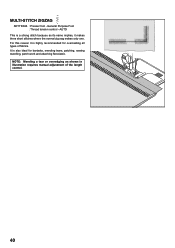
For this reason it makes three short stitches where the normal zig-zag makes only one. It is highly recommended for bartacks, mending tears, patching, sewing towelling, patch-work and attaching flat elastic. NOTE: Mending a tear or overedging as its name implies, it is also ideal for overcasting all types of ...
Instruction Manual - Page 50
... enough thread wound onto the bobbin to cut the stitch at this stitch pattern for sewing both edges of the actual fabric from your project.
* Before starting to sew, check that the thread will not run out during sewing.
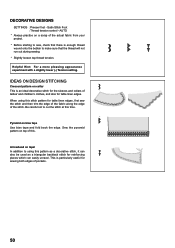
* Slightly loosen top thread tension. IDEAS ON DESIGN STITCHING
Crescent pattern on a scrap of pockets.
50
Arrowhead...
Instruction Manual - Page 52
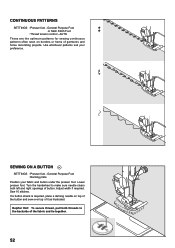
... :Presser foot - Turn the handwheel to make sure needle clears both threads to the backside of button. General Purpose Foot
or Satin Stitch Foot
:Thread tension control - Sew 10 stitches. Helpful Hint: To secure thread, pull both left and right openings of the fabric and tie together.
52 General Purpose Foot :Darning plate
Position...
Instruction Manual - Page 56
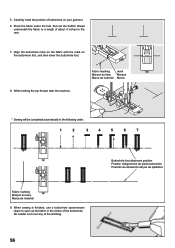
... the top thread, start the machine. Align the buttonhole mark on the fabric with the mark on your garment.
6. Place the fabric under the foot.
5. When sewing is finished, use a buttonhole opener... then lower the buttonhole foot.
8. Carefully mark the position of the stitching.
56
Buttonhole foot alignment position Position d'alignement du pied boutonnière Posición de ...
Instruction Manual - Page 62
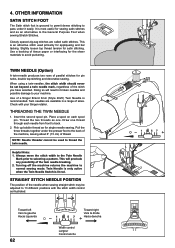
.... TWIN NEEDLE (Option)
A twin-needle produces two rows of parallel stitches for satin stitching.
Turning off the machine returns the machine to avoid puckering. Closely spaced zig-zag stitches are available in broken needles and possible damage to the General Purpose Foot when sewing Stretch Stitches.
THREADING THE TWIN NEEDLE
1. Thread the two threads as an alternative...
Instruction Manual - Page 64
...pushed against machine feeding
action. - Disengage bobbin winder (see page 60 - 61). Lengthen stitch length. * Darning plate is placed on the switch. * Buttonhole lever is not raised when sewing stitch patterns.
- Stitches... being used but stitch width is not lowered when sewing buttonhole.
- Replace needle (see page 24 - 25). * Stitch length is not correct for thread and ...
Instruction Manual - Page 68
... push fabric while stitching.
To reduce the risk of The Singer Company Ltd or its intended use , or equivalent." It means that at the end of the life of the equipment you must dispose of electric shock:"
1.
"Never operate the sewing machine with a damaged needle plate as a toy. "Never drop or insert any other ). Special...
Similar Questions

Not Sewing Any Stitch, I Have 7256 Fashion Mate Model
(Posted by maryannsandoval 3 years ago)

My Singer Curvy 8763 Is Beeping
My sewing machine slows mid stitch, starts beeping then stops. I can resume stitching but it repeats...
My sewing machine slows mid stitch, starts beeping then stops. I can resume stitching but it repeats...
(Posted by leapday04 7 years ago)

Singer Sewing Machine 8763 Bobbin Thread Does Not Sew After Material Jam
(Posted by Anonymous-151081 9 years ago)

Question For Future Singer Sewing Machine
My sewing machine keeps beeping and displays a "E1" I have re threaded a couple times??
My sewing machine keeps beeping and displays a "E1" I have re threaded a couple times??
(Posted by Nanalora13 9 years ago)

How Do I Set Up The Machine To Correctly Sew On Jersey And Stretch Materials?
I tried the S1 and S2 and it didn't continue sewing but got stuck.
I tried the S1 and S2 and it didn't continue sewing but got stuck.
(Posted by shirlblissj 9 years ago)