Singer 2263 Simple Support Question
Singer 2263 Simple Support Question
Find answers below for this question about Singer 2263 Simple.Need a Singer 2263 Simple manual? We have 2 online manuals for this item!
Question posted by fallanjones on May 21st, 2015
How Do You Install The Bobbin Driver In A Singer 2263
The person who posted this question about this Singer product did not include a detailed explanation. Please use the "Request More Information" button to the right if more details would help you to answer this question.
Current Answers
Related Singer 2263 Simple Manual Pages
Instruction Manual - Page 2
... use of lint, dust, and loose cloth. 5. Switch the sewing machine off the machine or unplug when the machine is intended for examination, repair, electrical or mechanical adjustment. 4. ...have been given supervision or instruction concerning use as threading needle, changing needle, threading bobbin, or changing presser foot, and the like.
10.
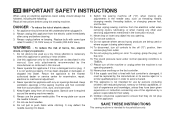
GB IMPORTANT SAFETY INSTRUCTIONS
When ...
Instruction Manual - Page 6
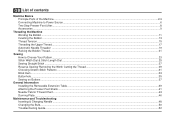
GB List of contents
Machine Basics Principle Parts of the Machine...2/4 Connecting Machine to Power Source ...6 Two Step Presser Foot Lifter...8 Accessories ...9
Threading the Machine Winding the Bobbin ...11 Inserting the Bobbin ...13 Thread Tension ...15 Threading the Upper Thread ...17 Automatic Needle Threader ...19 Raising the Bobbin Thread...21
Sewing How to Choose Your Pattern...23 Stitch ...
Instruction Manual - Page 9
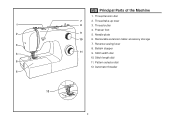
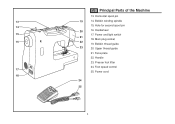
Presser foot
9
5. Pattern selector dial
12. Needle plate
10
6. Automatic threader
2 Thread cutter
4. Removable extension table/ accessory storage
7. Bobbin stopper
11
9. Stitch width dial
10. Stitch length dial
11. 1 2 3 4 5 6
12
GB Principal Parts of the Machine
1. Reverse sewing lever
8. Thread take-up lever
8
3. Thread tension dial
7
2.
Instruction Manual - Page 11
GB Principal Parts of the Machine
13. Handwheel
15
17. Bobbin thread guide
23
20. Hole for second spool pin
20
16. Upper thread guide
21. Foot speed control 17
25. Power and light switch
21
... foot lifter
24. Handle
23. Power cord 18
24
25
4 Face plate
22. Main plug socket
16
22
19. Horizontal spool pin
13
19
14. Bobbin winding spindle
14
15.
Instruction Manual - Page 13
...still does not fit, contact a qualified electrician to install the proper outlet. A
1 a
b
2
3
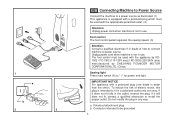
GB Connecting Machine to Power Source
Connect the machine to a power source as illustrated. (1) This ...which must be grounded
6 Unplug power cord when machine is not in use . Foot control The foot control pedal regulates the sewing speed. (3)
Attention: Consult a qualified electrician if...
Instruction Manual - Page 16
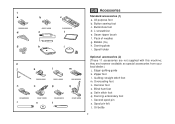
... foot l. Blind hem foot p. Darning/ embroidery foot r. Second spool pin s. they are not supplied with this machine; Button sewing foot c. Quilting/ straight stitch foot m. L-screwdriver e. Hemmer foot o. Bobbin (3x) h. Seam ripper/ brush f. Darning plate i. Overcasting foot n. Spool pin felt t. 1 a
006806008
d
b
c
006914008
e
006909008
f
g
h
i
2
j
k
l
m
006905008...
Instruction Manual - Page 18
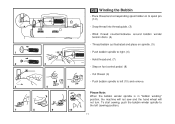
... right. (6) - GB Winding the Bobbin
- Step on spindle. (5)
1
2
3
- To start sewing, push the bobbin winder spindle to left (sewing position).
7
8
9
10
11 Snap thread into thread guide. (3)
- Push bobbin spindle to the left (10) and remove.
4
5
6
Please Note:
When the bobbin winder spindle is in "bobbin winding" position, the machine will not sew and the hand wheel...
Instruction Manual - Page 22
... next number down.
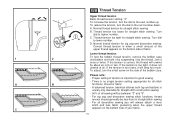
Jerk it by about an inch or two. Normal thread tension for straight stitch construction sewing.
- 90% of the bobbin case. Correct thread tension is usually only desirable for straight stitch sewing. Turn dial to the next number up. GB Thread Tension
Upper thread tension Basic thread tension setting: "4" To...
Instruction Manual - Page 30
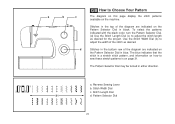
... page 31. To select the patterns indicated with the black color, turn the Pattern Selector Dial. (d) Use the Stitch Length Dial (c) to
sew these stretch patterns is on the machine. The Pattern Selector Dial may be turned in blue.
Pattern Selector Dial
23
Use the Stitch Width Dial (b) to adjust the width...
Instruction Manual - Page 34
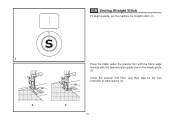
GB Sewing Straight Stitch
To begin sewing, set the machine for straight stitch. (1)
1 2
Place the fabric under the presser foot with the fabric edge lined up with the desired seam guide line on the needle plate. (2) Lower the presser foot lifter, and then step on the foot controller to start sewing. (3)
3
27
Instruction Manual - Page 36
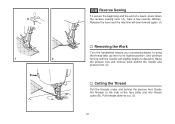
... the Thread
Pull the threads under and behind the presser foot. Pull threads down the reverse sewing lever (A). Guide the threads to the side of a seam, press down to descend. Release the lever and the machine will sew forward again. (1)
Removing the Work
Turn the handwheel toward you (counterclockwise) to bring the thread...
Instruction Manual - Page 38
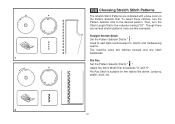
... Stitch Patterns are two examples:
Straight Stretch Stitch Set the Pattern Selector Dial to " ". Used to add triple reinforcement to stretch and hardwearing seams. The machine sews two stitches forward and one stitch backwards. 1 Ric Rac Set the Pattern Selector Dial to the indicator marked "S1". Then, turn the Pattern Selector Dial...
Instruction Manual - Page 40
... to the desired width and press.
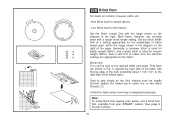
Blind hem for firm fabrics. Note:
To make sure the machine settings are normally sewn with
the top edge of the hem extending about 7 mm (1/4") to the...shown in the diagram on the diagram at the right. Sew a test first to make blind hem sewing even easier, use a blind hem foot, available from your SINGER® retailer. (See page 9
for part number)
...
Instruction Manual - Page 44
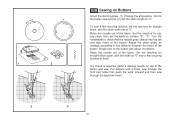
... the stitch width set the width to the distance between the holes of the fabric. Set the machine for zigzag stitch, then set at "0" sew a few securing stitches, set the machine for straight stitch again, with the width at "0". Slowly sew on Buttons
Install the darning plate. (1) Change the all purpose foot to the button...
Instruction Manual - Page 50
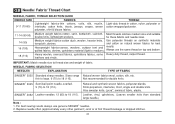
...: Match needle size to 18 (110). NEEDLE, FABRIC SELECTION
NEEDLES
EXPLANATION
TYPE OF FABRIC
SINGER® 2020 Standard sharp needles.
Replace needle often (approximately every other garment ) and/ or... Also sweater knits, Lycra®, swimsuit fabric, elastic. For best sewing results always use the same thread on natural woven fabrics for best
Heavyweight fabrics-canvas, woolens...
Instruction Manual - Page 53
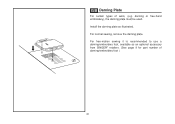
GB Darning Plate
For certain types of darning/embroidery foot )
46 For normal sewing, remove the darning plate. For free-motion sewing it is recommended to use a darning/embroidery foot, available as illustrated. Install the darning plate as an optional accessory from SINGER® retailers. (See page 9 for part number of work, (e.g. darning or free...
Instruction Manual - Page 55
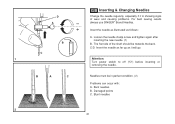
... if it will go. Insert the needle as far up as follows:
A. Damaged points C. The flat side of wear and causing problems. For best sewing results always use SINGER® Brand Needles. Loosen the needle clamp screw and tighten again after inserting the new needle. (1)
B. Attention: Turn power switch to off ("O") before...
Instruction Manual - Page 57
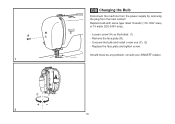
... the Bulb
Disconnect the machine from the power supply by removing the plug from the main socket! Should there be any problem, consult your SINGER® retailer.
50 Replace... the face plate and tighten screw. Replace bulb with same type rated 10 watts (110-120V area) or 15 watts (220-240V area). - Loosen screw (A) as illustrated. (1) - Unscrew the bulb and install...
Instruction Manual - Page 59
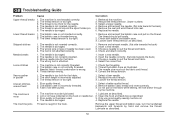
... remove the thread. Fabric has been pulled.
1. The machine must suit the fabric and thread. 4. Check both bobbin and bobbin case. 3. Remove and reinsert needle. (flat side towards the back) 5. The machine is not inserted correctly. 2. Correct the thread tension.
1. Only use good quality sewing machine oil.
4. Thread is not inserted correctly. 5. Lint or...
Instruction Manual 2 - Page 1
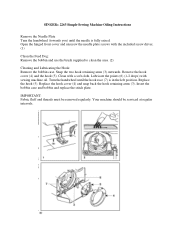
...left position. Insert the bobbin case and bobbin and replace the stitch plate. IMPORTANT: Fabric fluff and threads must be serviced at regular intervals. SINGER® 2263 Simple Sewing Machine Oiling Instructions
Remove the...and unscrew the needle plate screws with the included screw driver. (1)
Clean the Feed Dog: Remove the bobbin and use the brush supplied to clean the area. (2)
Cleaning and...
Similar Questions

I Have A M3500 Singer Sewing Machine .got Tread Tangled In The Bobbin Area .just
(Posted by guitijoon 2 years ago)

I Get E7 Error Message On My Singer Model 7258 Sewing Machine. There Is No Refe
Error message E7 is up on my Singer Stylist model 7258 sewing machine. It is not working at all. I t...
Error message E7 is up on my Singer Stylist model 7258 sewing machine. It is not working at all. I t...
(Posted by ebellamybellamy9 5 years ago)

Problem With Bobbin
i was treating the upper bobbinh the clear one i i did fine but when i try to removed it is stock
i was treating the upper bobbinh the clear one i i did fine but when i try to removed it is stock
(Posted by nilda1153 8 years ago)

Beeping From Singer Sewing Machine Stylist Ii 5625
My sewing machine will beep and stop sewing after three inches of sewing. I have taken it to be repa...
My sewing machine will beep and stop sewing after three inches of sewing. I have taken it to be repa...
(Posted by arusheria 9 years ago)
Edge/quilting Guide
how do I attach and use the edge/quilting guide on the singer machine 2263
how do I attach and use the edge/quilting guide on the singer machine 2263
(Posted by lneff354 11 years ago)