Singer 2263 Simple Support Question
Singer 2263 Simple Support Question
Find answers below for this question about Singer 2263 Simple.Need a Singer 2263 Simple manual? We have 2 online manuals for this item!
Question posted by nilda1153 on July 17th, 2015
Problem With Bobbin
i was treating the upper bobbinh the clear one i i did fine but when i try to removed it is stock
Current Answers
Related Singer 2263 Simple Manual Pages
Instruction Manual - Page 2
... user servicing adjustments mentioned in . 2. Always unplug sewing machine from all controls to be left unattended when plugged in the instruction manual.
11. To disconnect, turn off ("O") position, then
remove plug from accumulation of the appliance by the manufacturer as threading needle, changing needle, threading bobbin, or changing presser foot, and the like.
10...
Instruction Manual - Page 6
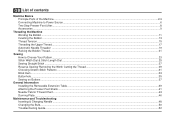
... Foot Lifter...8 Accessories ...9
Threading the Machine Winding the Bobbin ...11 Inserting the Bobbin ...13 Thread Tension ...15 Threading the Upper Thread ...17 Automatic Needle Threader ...19 Raising the Bobbin Thread...21
Sewing How to Choose Your Pattern...23 Stitch Width Dial & Stitch Length Dial ...25 Sewing Straight Stitch ...27 Reverse Sewing/ Removing the Work/ Cutting the Thread 29...
Instruction Manual - Page 9
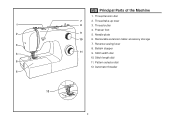
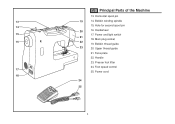
Thread take-up lever
8
3. Needle plate
10
6. Removable extension table/ accessory storage
7. Stitch width dial
10. Thread cutter
4. Reverse sewing lever
8. Pattern selector dial
12. Presser foot
9
5. Stitch length dial
11. Bobbin stopper
11
9. 1 2 3 4 5 6
12
GB Principal Parts of the Machine
1. Thread tension dial
7
2. Automatic threader
2
Instruction Manual - Page 11
Upper thread guide
21. Handle
23. Bobbin winding spindle
14
15. Face plate
22. Handwheel
15
17. Hole for second spool pin
20
16. Bobbin thread guide
23
20. GB Principal Parts of the Machine
13. Presser foot lifter
24. Foot speed control 17
25. Power and light switch
21
18. Power cord 18
24...
Instruction Manual - Page 13
... be grounded
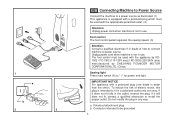
6 Foot control The foot control pedal regulates the sewing speed. (3)
Attention: Consult a qualified electrician if in any way. IMPORTANT NOTICE For appliance with a polarized plug (one blade is intended to power source.
To reduce the risk of how to connect machine to fit in the outlet, reverse the plug. Polarized...
Instruction Manual - Page 16
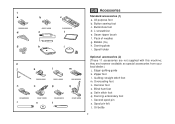
All purpose foot b. Bobbin (3x) h. they are not supplied with this machine; Quilting/ straight stitch foot m. Satin stitch foot q. Oil bottle
9 1 a
006806008
d
b
c
006914008
e
006909008
f
g
h
i...l. Hemmer foot o. Second spool pin s. Overcasting foot n. Blind hem foot p. Button sewing foot c. Buttonhole foot d. Pack of needles g. Edge/ quilting guide k. L-screwdriver e....
Instruction Manual - Page 18
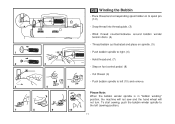
... counterclockwise around bobbin winder tension discs. (4)
- To start sewing, push the bobbin winder spindle to left (sewing position).
7
8
9
10
11 Thread bobbin as illustrated and place on foot control pedal. (8)
- Push bobbin spindle to the left (10) and remove.
4
5
6
Please Note:
When the bobbin winder spindle is in "bobbin winding" position, the machine will not sew and the...
Instruction Manual - Page 20
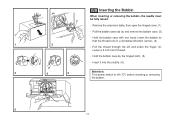
... tail of thread.
- Insert the bobbin so that the thread runs in a clockwise direction (arrow). (3)
- Hold the bobbin case with one hand. Hold the bobbin case by the hinged latch. (5)
- Insert it into the shuttle. (6)
3
4
5
Attention: Turn power switch to off ("O") before inserting or removing
the bobbin.
6
13 Pull the bobbin case tab (a) and remove the bobbin case. (2)
1
2
-
Instruction Manual - Page 22
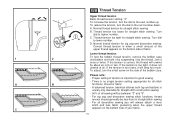
...sewing. Normal thread tension for zig zag and decorative sewing. C. Normal thread tension for straight stitch sewing. Proper setting of fabric.
1
2
Lower thread tension
To test the bobbin thread tension, remove the bobbin case and bobbin... tension is usually only desirable for straight stitch sewing. GB Thread Tension
Upper thread tension Basic thread tension setting: "4" To increase the...
Instruction Manual - Page 24
...the spool pin. 6
43
2
8
7
5
1
2
3
5
6
7
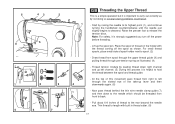
GB Threading the Upper Thread
This is a simple operation but it is important to carry out correctly as shown. Trim thread to back.
- For ...upper thread guide (3) and pulling thread through the slotted eye of thread to release the
tension discs. At the top of spool holder next to descend. Start by not doing so several sewing problems...
Instruction Manual - Page 30
... Your Pattern
a
b
c
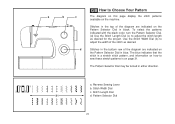
The diagram on this page display the stitch patterns
available on the machine.
To select the patterns indicated with the black color, turn the Pattern Selector Dial. (d) Use... width of the diagram are indicated on
the Pattern Selector Dial in either direction. Reverse Sewing Lever
b.
d
Stitches in the bottom row of the diagram are indicated on the Pattern...
Instruction Manual - Page 34
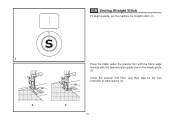
GB Sewing Straight Stitch
To begin sewing, set the machine for straight stitch. (1)
1 2
Place the fabric under the presser foot with the fabric edge lined up with the desired seam guide line on the needle plate. (2) Lower the presser foot lifter, and then step on the foot controller to start sewing. (3)
3
27
Instruction Manual - Page 36
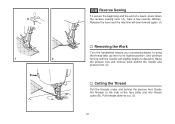
... (A). Release the lever and the machine will sew forward again. (1)
Removing the Work
Turn the handwheel toward you (counterclockwise) to bring the thread take up lever to its highest position, and continue turning until the needle just slightly begins to cut. (3)
29 Raise the presser foot and remove work behind the needle and presser...
Instruction Manual - Page 38
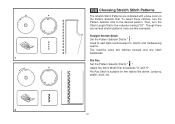
... Stitch Width Dial to " ". Then, turn the Pattern Selector Dial to the desired pattern. Used to add triple reinforcement to stretch and hardwearing seams. The machine sews two stitches forward and one stitch backwards. 1 Ric Rac Set the Pattern Selector Dial to between "3" and "5". GB Choosing Stretch Stitch Patterns
The Stretch Stitch...
Instruction Manual - Page 40
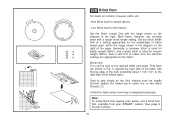
Blind hem for part number)
33
Note:
To make sure the machine settings are normally sewn with the range shown on curtains, trousers, skirts, etc.
Generally... the fabric when hemming is used for stretch fabrics.
Set the Stitch Width Dial at the right. Sew a test first to sew slowly on the right of the hem extending about 7 mm (1/4") to the desired width and press. Start...
Instruction Manual - Page 44
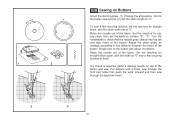
... the stitch length to the distance between the holes of the fabric. Set the machine for straight stitch again, with the stitch width set the machine for straight stitch, with the width at "0". To sew a few securing stitches, set at "0" sew a few securing stitches to check that the needle goes cleanly into the left...
Instruction Manual - Page 55
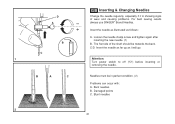
...flat side of wear and causing problems. For best sewing results always use SINGER® Brand Needles. Bent needles B. Blunt needles
2
48 Needles must be towards the back. C/D. Attention: Turn power switch to off ("O") before inserting or removing the needle. Damaged points C. Insert... as it is showing signs of the shaft should be in perfect condition. (2)
Problems can occur with: A.
Instruction Manual - Page 57
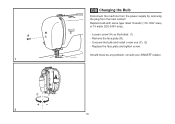
... machine from the power supply by removing the plug from the main socket! Replace bulb with same type rated 10 watts (110-120V area) or 15 watts (220-240V area). - Unscrew the bulb and install a new one (C). (2) - Loosen screw (A) as illustrated. (1) - Replace the face plate and tighten screw. Should there be any problem...
Instruction Manual - Page 59
... thread tension.
1. The needle is wrong. 4. Select a finer needle. 2. Select a better quality thread. 2. Lint or oil have collected on the thread. Only use good quality sewing machine oil.
4. Thread is caught in the hook. Remove the upper thread and bobbin case, turn the handwheel backwards and forwards by the...
Instruction Manual 2 - Page 1
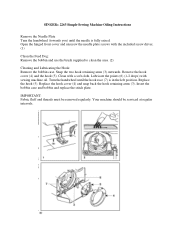
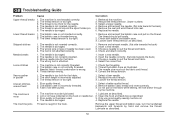
... cover (4) and the hook (5). SINGER® 2263 Simple Sewing Machine Oiling Instructions
Remove the Needle Plate Turn the handwheel (towards you) until the hook race (7) is fully raised. Open the hinged front cover and unscrew the needle plate screws with the included screw driver. (1)
Clean the Feed Dog: Remove the bobbin and use the brush supplied to...
Similar Questions

I Get E7 Error Message On My Singer Model 7258 Sewing Machine. There Is No Refe
Error message E7 is up on my Singer Stylist model 7258 sewing machine. It is not working at all. I t...
Error message E7 is up on my Singer Stylist model 7258 sewing machine. It is not working at all. I t...
(Posted by ebellamybellamy9 5 years ago)

How Do You Install The Bobbin Driver In A Singer 2263
(Posted by fallanjones 8 years ago)

Beeping From Singer Sewing Machine Stylist Ii 5625
My sewing machine will beep and stop sewing after three inches of sewing. I have taken it to be repa...
My sewing machine will beep and stop sewing after three inches of sewing. I have taken it to be repa...
(Posted by arusheria 9 years ago)

Singer Sewing Machine Model 7466 Refilling The Bobbin
Unable to fill bobbin on machine. It runs for about 5 seconds & stops. Have checked manual &...
Unable to fill bobbin on machine. It runs for about 5 seconds & stops. Have checked manual &...
(Posted by ljbrv 10 years ago)
Edge/quilting Guide
how do I attach and use the edge/quilting guide on the singer machine 2263
how do I attach and use the edge/quilting guide on the singer machine 2263
(Posted by lneff354 11 years ago)