Singer 2009 ATHENA Support Question
Singer 2009 ATHENA Support Question
Find answers below for this question about Singer 2009 ATHENA.Need a Singer 2009 ATHENA manual? We have 1 online manual for this item!
Question posted by luchorivera1759 on July 20th, 2023
No Cose Pero Suena Una Alarma 3 Veces Al Opri.mir El Pedal
The person who posted this question about this Singer product did not include a detailed explanation. Please use the "Request More Information" button to the right if more details would help you to answer this question.
Current Answers
Answer #1: Posted by SonuKumar on July 20th, 2023 10:23 AM
SonuKumar

Member since:
May 9th, 2021 Points: 16,617,810

Member since:
May 9th, 2021 Points: 16,617,810
https://www.manualslib.com/manual/154290/singer-athena-2009.html
Please follow manual,not sure about the actual answer
Please respond to my effort to provide you with the best possible solution by using the "Acceptable Solution" and/or the "Helpful" buttons when the answer has proven to be helpful.
Regards,
Sonu
Your search handyman for all e-support needs!!
Related Singer 2009 ATHENA Manual Pages
Instruction Manual - Page 2

...means that at the end of the life of the equipment you must dispose of the sewing machine and foot control free from the electric outlet immediately after using and before cleaning."
2....To reduce the risk of lint, dust, and loose cloth." 5. "Never operate the sewing machine with this sewing machine from the accumulation of burns, fire, electric shock, or injury to the nearest authorized ...
Instruction Manual - Page 5

...KNOWING YOUR SEWING MACHINE Machine identification 6 - 7 Accessories 8 - 9 Setting up your machine 10 - 11 Spool pins 12 - 13 Presser foot lifter, Darning plate 12 - 13 Converting to free-arm sewing 12 - ...temperature: 15 - 35°C Acoustic noise level: less than 70db(A)
3 CARING FOR YOUR MACHINE Cleaning hook area and feed dogs 60 - 61
4. OTHER INFORMATION Satin stitch foot, Twin needle, ...
Instruction Manual - Page 8

... 26 27 28 29 30 31
32
33
34
6 Threading lever 5. Bobbin winder shaft 9. Handle 13. Needle clamp screw 28. Presser foot 29. KNOWING YOUR SEWING MACHINE
MACHINE IDENTIFICATION
1. Twin thread guide 20. Bobbin cover plate 24. Face cover 6. Foot control 34. Needle 23. Feed dogs 30. Buttonhole lever 19. Thread guide 21...
Instruction Manual - Page 10

...) is called the General Purpose Foot and will be used for the majority of your Sewing machine is another very useful foot and should be used for needle plate 10. ACCESSORIES
1. Blind stitch foot 14. Bobbins (4 total - 1 in machine) 3. Auxiliary spool pin 4. Spool pin cap (large) 8. Spool pin cap (medium) 7. Screwdriver for most...
Instruction Manual - Page 12

... de la máquina
2
1
Pin plug
Butée
Pasador
3
Power line cord
Cordon
Cordón de la linea eléctrica
Foot control Rhéostat Control por pedal
POWER/LIGHT SWITCH
Your machine will not operate. Power/light switch "OFF" Interrupteur moteur/lumière "OFF" Interruptor corriente/luz "OFF"
Power/light...
Instruction Manual - Page 14

... motion work and free motion darning. The diameter of the spool pin cap should be used . CONVERTING TO FREE-ARM SEWING
Your machine can be placed to change presser foot. 3. To remove the extension table, hold it firmly with both hands and pull it .
SPOOL PINS HORIZONTAL SPOOL ...
Instruction Manual - Page 16

... the foot control again to continue
to remove
bobbin and cut
4
the thread tail. Hold onto end of thread through thread guides as shown.
2
3. Start machine. The bobbin will automatically stop to use Class 15 J bobbins.
1. WINDING THE BOBBIN
Be sure to cut thread.
14 Place a spool of bobbin. After the...
Instruction Manual - Page 18

... plate until it is a very important step. Replace the clear bobbin cover plate onto the needle plate.
6
A
Cutter Coupeur Cortador
Groove Cannelure Surco
B
A
16 NOTE: Sewing can be started without picking up sufficiently to remove the cover.
3. The bobbin must rotate counterclockwise when thread is pulled.
4. Bobbin cover will pop up...
Instruction Manual - Page 20
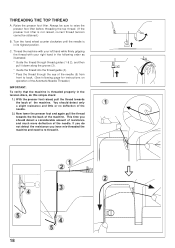
...Now lower the presser foot and again pull the thread towards the back of the machine. Thread the machine with your left hand while firmly gripping the thread with your right hand in ... of resistance and much more deflection of the Automatic Needle Threader.)
IMPORTANT: To verify that the machine is not raised, correct thread tension cannot be sure to re-thread it down along the groove...
Instruction Manual - Page 24
... blends.
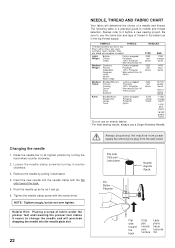
Helpful Hint: Placing a scrap of fabric under the presser foot and lowering the presser foot makes it before a new sewing project. The following table is a practical guide to change the needle and will determine the choice of weight. Light-
Always refer ... Vd. Insert the new needle into the needle plate slot.
22
Always disconnect the machine from the wall-outlet.
Instruction Manual - Page 26

... presser foot lifter so that the machine is largely determined by the balanced tension of both top and bottom) is irregular, you will need to adjust the tension control.
Do this, however, only after you find that the stitching is usually only desireable for straight stitch sewing.
BOBBIN TENSION
The bobbin tension...
Instruction Manual - Page 28
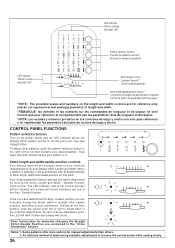
... without blinking and a beep will sound indicating you may sew Straight Stitch.
Stitch length and width/needle position controls
Your sewing machine will produce most of stitch length, width and needle position... que pour référence et ne représentent pas les paramètres réels de longueur et de largeur.
*NOTA: Las escalas y números provistos en los controles de...
Instruction Manual - Page 30

... the reverse/tacking stitch button is very useful for tie-off of sewing.
28
NOTE: This function is pushed. The machine will be at the start and end of other stitches ( ) The sewing machine makes 4 tiny tacking stitches to tie off the sewing on all patterns except straight and zigzag stitches. REVERSE OPERATION BUTTON
Dual...
Instruction Manual - Page 34

...control is used to the rear and cut off excess threads with your fabric when sewing a seam.
6. Start the machine.
Reverse stitch switch C. Pull both Metric and Inch Markings as an aid for narrow... D. Place the fabric under the presser foot toward the back of the fabric, stop the sewing machine. Guide the fabric gently with the
thread cutter located on the top of the seam. General...
Instruction Manual - Page 36

... until
you acheive the desired appearance. 4. Start to the cording. INSERTING ZIPPERS AND PIPING
Use zipper foot to sew to the right or left of the zipper or to sew close to sew.
When
sewing the machine will pull this thread to the piping may be accomplished with the Stitch Width Control. This thread should...
Instruction Manual - Page 38
...
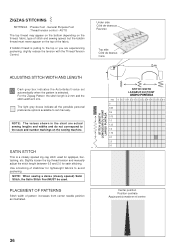
mm 0 0.25 0.5 0.75 1.0 1.25 1.5 1.75 2.0 2.5 3.0
0 0.5 1.0 1.5 2.0 2.5 3.0 3.5 4.0 4.5 5.0 5.5 6.0
Center position Position centrale Aguja posicionada en el centro
36 AUTO
The top thread may appear on the bottom depending on the thread, fabric, type of stitch and sewing speed, but the bobbin thread must never appear on the sewing machine.
ZIGZAG STITCHING
SETTINGS :Presser foot -
Instruction Manual - Page 40
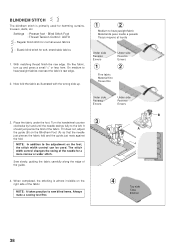
...the fabric under the foot. It
should just pierce the fold of the guide. Sew slowly, guiding the fabric carefully along the edge of the fabric. Elastic blind stitch for normal woven fabrics...
- On medium to sew blind hems. Always make a sewing test first.
4
Top side Cara Endroit
38 NOTE: It takes practice to heavyweight fabrics...
Instruction Manual - Page 42

... foot - AUTO
This is a strong stitch because as shown in illustration requires manual adjustment of fabrics.
It is highly recommended for bartacks, mending tears, patching, sewing towelling, and attaching flat elastic. For this reason it makes three short stitches where the normal zig-zag makes only one. General Purpose Foot :Thread...
Instruction Manual - Page 44

...to top-stitch lapels, collars and cuffs to give a professional finish to a very narrow width it sews and finishes the seam in repairing raw or worn edges of garments.
42 It is particularly suitable ... use on woven fabrics.
Make several rows of
gathering, stitch over the gathers. NOTE: When sewing the honeycomb stitch, the Satin Stitch foot MUST be a series of great stress. it also can...
Instruction Manual - Page 46

... is primarily used for applique work , choose a coarse linen type fabric and after sewing draw the thread out within the ladder for attaching fringe, attaching edgings, couching, applique...making lingerie. Place the stitch in an opposite or same color.
It can also be obtained for sewing over narrow ribbon, yarn or elastic. For drawn thread work . This multi-purpose stitch can also ...
Similar Questions

Manual En Español
Hola ya tengo el Manual en PDF pero lo necesito en español por favor que puedo hacer?
Hola ya tengo el Manual en PDF pero lo necesito en español por favor que puedo hacer?
(Posted by Yoleimys 2 years ago)

I Have A Singer Futura 420 And It Will Not Work The Red Light Flashed Al The Tim
(Posted by ROBE6524 9 years ago)

Bobinn
La Pixie Plus no me cose. Tengo problemas al colocar la bobina
La Pixie Plus no me cose. Tengo problemas al colocar la bobina
(Posted by jelsmr 10 years ago)


E7?
Mí máquina estaba funcionando bien, al volverla a encender me dió E7 y no puedo...
Mí máquina estaba funcionando bien, al volverla a encender me dió E7 y no puedo...
(Posted by unijema 11 years ago)