Sharp CV-2P10SC Support Question
Sharp CV-2P10SC Support Question
Find answers below for this question about Sharp CV-2P10SC.Need a Sharp CV-2P10SC manual? We have 1 online manual for this item!
Question posted by magfDarrel on April 12th, 2014
How To Remove Cv-2p10sc Stopcock
The person who posted this question about this Sharp product did not include a detailed explanation. Please use the "Request More Information" button to the right if more details would help you to answer this question.
Current Answers
Related Sharp CV-2P10SC Manual Pages
CV-2P10SC Operation Manual - Page 3
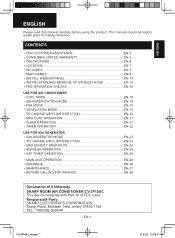
... • INSTALL WINDOW PANEL EN-10 • INSTALLATION AND REMOVAL OF EXHAUST HOSE EN-14 • PRE-OPERATION CHECKS EN-16
USE FOR AIR CONDITIONER • COOL MODE EN-18 • DEHUMIDIFICATION MODE EN-18...8226; BEFORE CALLING FOR SERVICE EN-28
Declaration of Conformity SHARP ROOM AIR CONDITIONER CV-2P10SC This device complies with Part 18 of FCC rules.
Sharp Plaza, Mahwah, New Jersey 07495...
CV-2P10SC Operation Manual - Page 5
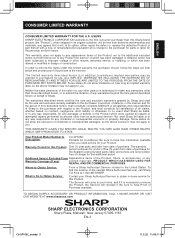
...CONSUMER LIMITED WARRANTY FOR THE U.S.
The limited warranty described herein is necessary to remove the Product, the Servicer will reinstall it will, at its original container,...your home, and if it is in the United States.
Your Product Model Number & Description:
CV-2P10SC Portable Air Conditioner. Be sure to have Proof of which has been damaged or defaced, which has been subjected to...
CV-2P10SC Operation Manual - Page 6
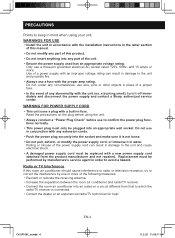
.../TV receiver. • Connect the room air conditioner into the socket and make sure it off immediately and disconnect the power supply and contact a Sharp authorized service center. Read the precautions on a circuit different from the product manufacturer and not repaired. Do not use
in water.
CV-2P10SC_en.indd 4
EN-4
11.3.22 11...
CV-2P10SC Operation Manual - Page 7
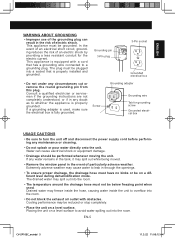
... has a grounding wire connected to overflow into the room. EN-5
CV-2P10SC_en.indd 5
11.3.22 11:00:12 AM This appliance is ... or remove the round grounding pin from this plug. Drained water may spill out while being moved. • Remove the window...spilling out into the room. • Do not block the exhaust air outlet with a cord that is properly installed and grounded. ENGLISH
WARNING...
CV-2P10SC Operation Manual - Page 8
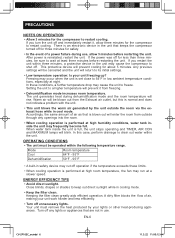
... cooling mode. • Keep the filter clean.
EN-6
CV-2P10SC_en.indd 6
11.3.22 11:00:12 AM If you... 5 minutes. OPERATING CONDITIONS • The unit must remove the heat produced by the unit outside through any lights...Setting the unit to a higher temperature will enter the room from the Exhaust air outlet, but this case, perform drainage to restart cooling. Mode Cool Dehumidification...
CV-2P10SC Operation Manual - Page 9
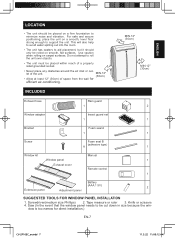
... unit has casters to be cut down in size because the win-
dow is too narrow for
efficient air-conditioning. Do not attempt to support the unit. MIN.12"
(30cm)
• Allow at least ...12" (30cm) of space from the wall for direct installation.)
EN-7
CV-2P10SC_en.indd 7
11.3.22 11:00:12 AM MIN.12" (30cm)
MIN.12" (30cm)
INCLUDED
Exhaust hose
Rain...
CV-2P10SC Operation Manual - Page 10

... Lamp (red)
10
9 ION GENERATOR Lamp (blue)
10
10 Air inlet
10
REAR VIEW
11
11 Exhaust air outlet
12
12 Window adapter
13
13 Exhaust hose
14 Remote control hook
14
15 Air filter
15
16 Grill
17 Air inlet
18 Drainpipe and stopcock
16
19 Power plug
17
20 Casters(4)
18
19
20...
CV-2P10SC Operation Manual - Page 11
ENGLISH
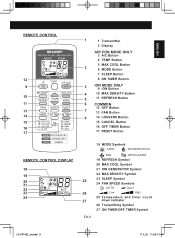
REMOTE CONTROL
12 9
10 11 13 14 15 16 17
REMOTE CONTROL DISPLAY 18 19 20 21 22 23 24
1
1 Tramsmitter
2 Display
AIR CON MODE ONLY 3 A/C Button
4 TEMP Button
5 MAX COOL Button
2
6 MODE Button
7 SLEEP Button
8 ON TIMER Button
3
ION ...: High
25 Temperature and timer count down indicator
26 Transmitting Symbol
27 ON TIMER/OFF TIMER Symbol
CV-2P10SC_en.indd 9
11.3.22 11:00:13 AM
CV-2P10SC Operation Manual - Page 16
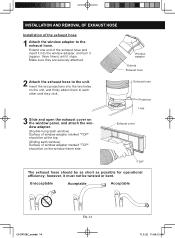
.... Insert the two projections into the window adapter, and turn it stops. Unacceptable
Acceptable
Acceptable
CV-2P10SC_en.indd 14
EN-14
11.3.22 11:00:15 AM three times) until they are securely attached. INSTALLATION AND REMOVAL OF EXHAUST HOSE
Installation of the exhaust hose
1 Attach the window adapter to the unit.
CV-2P10SC Operation Manual - Page 17
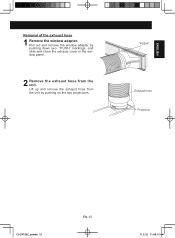
... hose from the unit. Pull out and remove the window adapter by pushing down two "PUSH" markings, and slide and close the exhaust cover in the window panel.
2 Remove the exhaust hose from the unit by pushing on the two projections.
"PUSH"
Exhaust hose Projection
CV-2P10SC_en.indd 15
EN-15
11.3.22...
CV-2P10SC Operation Manual - Page 18
... aligned.
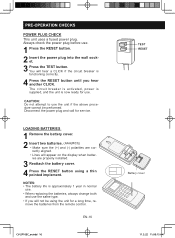
• Lines will not be performed. Disconnect the power plug and call for service. LOADING BATTERIES
1 Remove the battery cover. 2 Insert two batteries. (AAA(R03))
• Make sure the (+) and (-) polarities are... .
1 Press the RESET button. 2 Insert the power plug into the wall sock- EN-16
CV-2P10SC_en.indd 16
TEST RESET
Battery cover
11.3.22 11:00:15 AM
et.
3 Press the TEST...
CV-2P10SC Operation Manual - Page 19

... fluorescent lamp in the same room
may interfere with transmission of the signal. • Do not leave the remote control in use. Remote control hook
CV-2P10SC_en.indd 17
EN-17
11.3.22 11:00:15 AM CAUTION: • Do not expose the receiver window to...
CV-2P10SC Operation Manual - Page 20

... room temperature will blink.
USE FOR AIR CONDITIONER
Use when the unit operates with hose (not included) attached. During operation, Plasmacluster ions are released into the room. • The exhaust hose must be installed in dehumidification mode with the cool, dehumidification, fan or ventilation mode.
Remove the stopcock and attach the hose to the...
CV-2P10SC Operation Manual - Page 21
QUIET
LOW
HIGH
CV-2P10SC_en.indd 19
EN-19
2 1 3
2 1 3
11.3.22 11:00:16 AM
ENGLISH
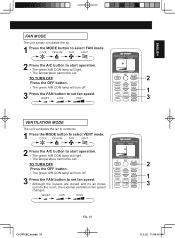
TO TURN OFF Press the OFF button. • The green AIR CON lamp will light. • The temperature cannot be set fan speed. QUIET
LOW
HIGH
VENTILATION MODE
The unit ventilates the air to outdoors.
1 Press the MODE...
CV-2P10SC Operation Manual - Page 22
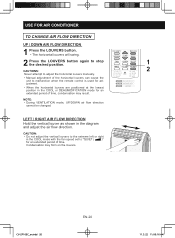
... horizontal louvers are positioned at the lowest position in the diagram and adjust the air flow direction.
NOTE: • During VENTILATION mode, UP/DOWN air flow direction
cannot be changed.
USE FOR AIR CONDITIONER
TO CHANGE AIR FLOW DIRECTION
UP / DOWN AIR FLOW DIRECTION
1 Press the LOUVERS button. • The horizontal louvers will swing.
2 Press the...
CV-2P10SC Operation Manual - Page 24
maining time.
USE FOR AIR CONDITIONER
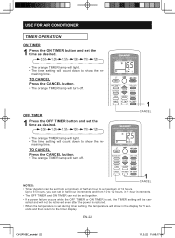
TIMER OPERATION ON TIMER
1 Press the ON TIMER button and set the time as desired. 0.5h 1.0h 1.5h 10h 11h 12h
•...to the timer display.
Up to 9.5 hours, you can set in half-hour increments and from a minimum of 12 hours. EN-22
CV-2P10SC_en.indd 22
11.3.22 11:00:17 AM TO CANCEL Press the CANCEL button. • The orange TIMER lamp will be can be...
CV-2P10SC Operation Manual - Page 25

... fan speed.
For more information, please check our press release such as: http://www.sharp-world.com/corporate/news/080827.html
CV-2P10SC_en.indd 23
EN-23
11.3.22 11:00:17 AM TO TURN OFF Press the OFF button. • The blue ... MODE
The ion generator inside the unit releases Plasmacluster ions into the room. There is SHARP's original technology. Hot air will reduce airborne mold.
CV-2P10SC Operation Manual - Page 26
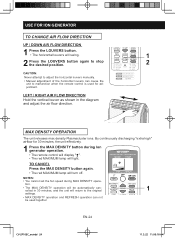
... lamp will light. USE FOR ION GENERATOR
TO CHANGE AIR FLOW DIRECTION
UP / DOWN AIR FLOW DIRECTION
1 Press the LOUVERS button. • The... horizontal louvers will swing.
1
2 Press the LOUVERS button again to stop the desired position.
2
CAUTION:
Never attempt to malfunction when the remote control is used together. EN-24
CV...
CV-2P10SC Operation Manual - Page 28
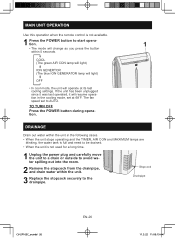
... outside to avoid water spilling out into the room.
2 Remove the stopcock from the drainpipe, and drain water within the unit.
3 Replace the stopcock securely to the drainpipe.
Stopcock Drainpipe
CV-2P10SC_en.indd 26
EN-26
11.3.22 11:00:19 AM COOL (The green AIR CON lamp will light)
ION GENERTOR (The blue ION GENERATOR...
CV-2P10SC Operation Manual - Page 29
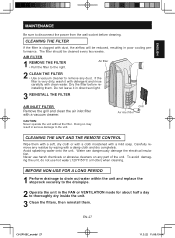
... air inlet filter with clean water. AIR FILTER
1 REMOVE THE FILTER • Pull the filter to the unit. Dry the filter before cleaning. Never use hot water (120°F/50°C or hotter) when cleaning. BEFORE NON-USE FOR A LONG PERIOD
1 Perform drainage to drain out water within the unit and replace the stopcock...
Similar Questions

Parts For Discontinued Sharp Portable Air Conditioner/ Ion Generator..cv-2p10sc.
I need the back plate 9jq26116114 and extender panel 9jq26116121 for window that is 41 inches wide. ...
I need the back plate 9jq26116114 and extender panel 9jq26116121 for window that is 41 inches wide. ...
(Posted by Oldladyanderson 3 years ago)

How To Program A Sharp Cv-2p10sc Portable Air Conditioner
(Posted by bdisda 9 years ago)

How Do You Empty Water From Sharp Portable Air Conditioner Model Cv-2p10sc
(Posted by regg1marc 9 years ago)

How To Remove Cover Of Sharp Air Conditioner
(Posted by a09ro 10 years ago)