Get support for Schwinn Journey 2.0 Recumbent Bike

Schwinn Journey 2.0 Recumbent Bike Support Question

Schwinn Journey 2.0 Recumbent Bike Support Question

Find answers below for this question about Schwinn Journey 2.0 Recumbent Bike.
Need a Schwinn Journey 2.0 Recumbent Bike manual? We have 1 online manual for this item!
Question posted by patcsan on May 16th, 2019

I Bought A Schwinnjourney 2.0 Recumbent Bike Second Hand

I do not have a "user manual" with it and do NOT understand the controls.....especially the "resistance" up and down.... I would like a "user manual" - can you help....have googled and googled and can't find it.

Current Answers

Answer #1: Posted by dinasotic28 on June 4th, 2019 7:19 AM
dinasotic28

Member since:
June 4th, 2019

Points: 7,470
100
points
This is the copy of real manual:How to Use the 10/20 Bike

Seat adjustment

Proper seat adjustment helps ensure maximum exercise efficiency and comfort,

while reducing the risk of injury.

1. Place one pedal in the forward position and center the ball of your foot over the

center of the pedal. Your leg should be slightly bent at the knee.

2. If your leg is too straight or your foot cannot touch the pedal, you will need to

move the seat down on the 10 bike, or forward on the 20 bike. If your leg is bent

too much, you will need to move the seat up on the 10 bike or backward on the

20 bike.

3. Adjust the 10 seat by first dismounting the bike, then pulling out the adjustment

knob on the seat tube and releasing the locking pin. Lower or raise the seat to

the desired height. Release the seat knob, engaging the locking pin. Be sure

that the pin is fully secured in a seat post hole.

To adjust the 20 seat, pull the seat knob up with your right hand to release the

seat. Slide the seat forward or backward to the desired position. The knob will

"pop" up into the next hole; turn the knob to ensure a tight fit.

Foot positioning/pedal strap adjustment

Place the ball of each foot on the pedals. Rotate the pedals until one foot is within

arms reach. Reach down carefully and fasten the rubber strap over your shoe and

secure it to the pedal by slipping the nub at the end of the pedal through one of the

slots in the strap. Pull down on the strap until it snaps into place. Repeat for the

other foot. Point your toes and knees directly forward to ensure maximum pedal

efficiency. Pedal straps can be left in place for subsequent workouts.

Handlebar Adjustment

The 10 offers an adjustable handlebar to ensure a variety of comfortable

hand positions. To adjust the angle of the handlebars, loosen knob, adjust the

handlebars to the desired position and re-tighten.

Resistance adjustment

Using the console, you have control over the levels of resistance integrated into

your workout. Typically, lower resistance levels enable you to move at a faster

pace, placing increased demand on your cardiovascular system. Higher resistance

levels will typically deliver more of a muscle/endurance workout at lower RPMs.

But everyone is different. So experiment and find the beginning of resistance that

is comfortable for you.


Related Schwinn Journey 2.0 Recumbent Bike Manual Pages

Assembly and Owner's Manual - Page 2

... the Machine 19 Important Safety Instructions 20 Features 21 Console Features 22 Operations 27 Adjustments 27 Power Up / Idle Mode 27 Quick Start Program 28 User Profiles 28 Pausing or Stopping 32 Results / Cool Down Mode 33 GOAL TRACK Statistics 33 Console Service Mode 36 Maintenance 37 Maintenance Parts 38 Troubleshooting...
Assembly and Owner's Manual - Page 3

... in connection with the use . Keep the Manual for correct performance in accordance with the Manual. • Read and understand the complete Manual supplied with the normal use of certain medical devices...Magnetic fields can be heavy or awkward. Given the obvious importance of these parts. Users may come into proximity of the magnets in the sequence given. Important Safety Instructions ...
Assembly and Owner's Manual - Page 4

...away. • Not intended for use , read and understand the Owner's Manual. • Injury or death is possible if Caution is...by the party responsible for compliance could void the user's authority to Part 15 of the FCC Rules...help. 4 However, there is no guarantee that interference will not occur in a residential installation. Safety Warning Labels and Serial Number • Read, understand...
Assembly and Owner's Manual - Page 5

...our website at www.nautilus.com/prop65. Specifications 49.9" (126.8 cm) Maximum User Weight: 300 lbs. (136 kg) Power Requirements: Operational Voltage: Operational Voltage ... area where you assemble your machine: • Read and understand the "Important Safety Instructions" before assembly. • Collect all...help insert the bolt through the holes. • The assembly can require 2 people...
Assembly and Owner's Manual - Page 15

The Left Pedal has an "L", the Right Pedal an "R". 13 11 15 Attach Pedals to attach Pedals on the bike. 9. Orientation is reverse-threaded. Be sure to Frame Assembly NOTICE: The Left Pedal is based from a seated position on the proper side of the Bike.
Assembly and Owner's Manual - Page 17

11. Do not use until the machine has been fully assembled and inspected for correct performance in the field provided at the front of this manual. Be sure to Frame Assembly 10 12. Connect AC Adapter to record the serial number in accordance with the Owner's Manual. 17 Final Inspection Inspect your machine to ensure that all hardware is tight and components are properly assembled.
Assembly and Owner's Manual - Page 18

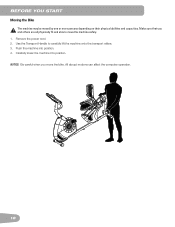
... all physically fit and able to carefully lift the machine onto the transport rollers. 3. Push the machine into position. 4. Carefully lower the machine into position. Make sure that you move the machine safely. 1. Remove the power cord. 2. Use the Transport Handle to move the bike. BEFORE YOU START Moving the Bike The machine...
Assembly and Owner's Manual - Page 19

To adjust the leveler on the Frame Rail. Leveling the Bike Levelers are found on each side of the Rear Stabilizer and on the Frame Rail: 1. Loosen ... detach or unscrew from the machine. Do not adjust the levelers to adjust the stabilizer foot. Injury to you exercise. 19 Make sure the bike is level and stable before you or damage to the machine can occur. 3. Tighten the upper locking nut ...
Assembly and Owner's Manual - Page 20

...is in this equipment, obey the following warnings: Read and understand the complete Manual. This machine contains moving parts of wear. Keep third parties...user. • Exercise on this condition. Before using this manual. • Correctly adjust and safely engage all warnings on this machine for replacement stickers. • Children must not be attentive in speed and resistance...
Assembly and Owner's Manual - Page 22

...Workout Totals and Achievements for the selected User Profile Increase () button- Displays different workout values during a workout, and moves through options Decrease () button- Console Features The Console provides important information about your workout and lets you control the resistance levels while you through the exercise programs. Resistance Level Quick Buttons Fan 10...
Assembly and Owner's Manual - Page 23

... the achievement indicator light will be used as a workout guide for the current User. Shifts the resistance levels to achieve the goal, and the percent completed toward the goal. Goal ... Indicator Lights- Stop exercising if you feel faint. These Heart Rate Zones can be blank. Resistance Level Quick Buttons- The Console display will congratulate and inform the User of breath, or ...
Assembly and Owner's Manual - Page 24

... User Profile" section of this manual. and can be used for the User Profile, or the total operational time of breath, or feel pain or tightness in your doctor before you use the machine again. Level The LEVEL display shows the current resistance level in the workout. Consult a physician before you start an exercise program...
Assembly and Owner's Manual - Page 25

... arms) produces an electrical signal (muscle artifact) that can interfere with pulse detection. Slight hand movement while in contact with the sensors for 10 to be detected by individuals are the ... burn fat during exercise is more fat your individual HRZ could have readings of 40 BPM or lower. After the Console detects four stable pulse signals, your hands comfortably around the ...
Assembly and Owner's Manual - Page 26

Note: As with all exercises and fitness regimens, always use your best judgment when you increase your optimal target rate may be higher or lower. As noted above, your exercise time or intensity. Heart Rate BPM (beats per minute) 250 200 150 100 50 FAT-BURNING TARGET HEART RATE 196 167 118 191 186...
Assembly and Owner's Manual - Page 27

Operations What to ensure maximum Pedal efficiency. How Often Should You Exercise Consult a physician before you to the exercise bike. 1. Rotate the Pedals until one can be used for reference only. • 3 times a week for the other foot. Be sure toes and knees point directly ...
Assembly and Owner's Manual - Page 32

..., and adjusts the workout to keep your Fitness Scores to other User information to set the value for the HRC program to the User Profile. 32 Stop exercising if you to start the workout. The ... 3. The console display then gives prompts for you set up your workout: 1. Select the Heart Rate Control workout level: BEGINNER ( "BEG" ) or ADVANCED ( "ADV" ) and push OK. 2. Push the Increase...
Assembly and Owner's Manual - Page 33

...bike) / STRIDE TO CONTINUE (if an elliptical) - PUSH END TO STOP During a paused workout, you can use the Increase/Decrease buttons to move through the result channels manually...resistance level can push PAUSE/END to move through the result channels manually. You can be adjusted with the Resistance...average) is no RPM signal for 5 seconds (user not pedaling). Stop pedaling and push the PAUSE...
Assembly and Owner's Manual - Page 36

To change between "BIKE" and Elliptical ("ELIP"). 9. Push the Left..., push OK to change between "ON" and "OFF". 11. To change the machine type, control the sound settings ( on/ off), or see maintenance statistics (Error Log and Run Hours - ... the TOTAL RUN HOURS for 3 seconds while in User Statistics, the statistics convert to set . 8. The Console display shows the Machine Type prompt ...
Assembly and Owner's Manual - Page 37

... the machine. Place the power cord in this condition. Weekly: Clean the machine to maintain and repair the equipment. Note: Do not use , examine the exercise machine for smooth seat slider operation. Only manufacturer supplied components can be repaired or replaced immediately. To reduce the risk of electrical shock or unsupervised...
Assembly and Owner's Manual - Page 40

...line up and snap into place. Be sure hands are fine, replace the Console. Replace adapter or connection at medical or some larger fitness stores. If HR still does not function,... replace Console. All wires in cable should be "POLAR®" compatible and uncoded. A conductive electrode cream (heart rate cream) can help ...

Similar Questions

Just Bought A Used 213 Recumbent Exercise Bike.
The first time I used it the speed, calories and rpm showed on console. Now they don't.??
(Posted by mwadamson 3 years ago)
Schwinn Journey 2.0 Ike
want a manual for schwinn journey 2.0 recumbent bik
(Posted by silverfoxy 7 years ago)
Do You Have A Different Manual For The Schwinn 230 / Journey 2.0 Recumbent Bike
Looking for the manual for the Schwinn 230 / Journey 2.0 Recumbent Bike. I only see a manual for the...
(Posted by hntbowen 10 years ago)
Ask a New Question
Use the box below to post a new question about this Schwinn product .
Points & Prizes
  • You can earn points for nearly everything you do on HelpOwl.com
  • You can trade in those points for gift cards at leading retailers such as Amazon.com and Walmart
  • It's that simple!
See How it Works
Create a Free Account

Schwinn Manuals

Find free Schwinn Journey 2.0 Recumbent Bike manuals and user guides available at ManualOwl.com. Try out our unique manual viewer allowing you to interact with manuals from directly within your browser!

Schwinn Reviews

View thousands of Schwinn user reviews and customer ratings available at ReviewOwl.com.

Contact Information

Complete Schwinn customer service contact information including steps to reach representatives, hours of operation, customer support links and more from ContactHelp.com.

Scoreboard Ratings

See detailed Schwinn customer service rankings, employee comments and much more from our sister site.

Schwinn Recalls

Find comprehensive Schwinn recall information updated hourly on RecallOwl.com.