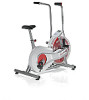
Schwinn Airdyne AD2 Support Question
Schwinn Airdyne AD2 Support Question
Find answers below for this question about Schwinn Airdyne AD2.Need a Schwinn Airdyne AD2 manual? We have 1 online manual for this item!
Question posted by aburgum on November 6th, 2013
Ad2 Noise When Pedaling
My AD2 has started making fairly loud clacking sounds when operating. I hear about 10 low pitched clacks per petal turn. Like the fan is striking something?? Tightened all screws/bolts and lubricated but made no difference. Bike purchased May, 2012- has 2200 miles Any sugestions?
Current Answers
Related Schwinn Airdyne AD2 Manual Pages
Assembly and Owner's Manual - Page 2
... are the property of Contents
Important Safety Instructions - Owner's 15
Features
16
Console Features
17
Operations
19
Adjustments
19
Workout Mode
20
Pausing or Stopping
20
Service Mode
21
Maintenance
22
Replacing the...174;, BOWFLEX®, SCHWINN®, UNIVERSAL® and AIRDYNE® and respective logos. Nautilus, Inc., (800) NAUTILUS / (800) 628-8458, www.NautilusInc.com -
Assembly and Owner's Manual - Page 3
...8226; Do not assemble this machine outdoors or in a wet or moist location. • Make sure assembly is done in accordance with the Manual. • Read and understand the complete Manual... of this machine. Keep the Manual for correct performance in an appropriate work space away from operating correctly and void the warranty. • Do not use only genuine replacement parts and hardware ...
Assembly and Owner's Manual - Page 5

... step. 3. Using the recommended wrenches, turn the bolts and nuts to the right (clockwise) to tighten,
and the left (counterclockwise) to loosen, unless instructed otherwise. 4. When attaching 2 pieces, lightly lift and look through the bolt holes to help insert the bolt
through the holes. 5. The assembly requires 2 people.
5 For safe operation, the location must be on...
Assembly and Owner's Manual - Page 6

PARTS
12 11
10 9 8
7 6
1 2
3 5
4
Item Qty Description
1
1 Main Frame
2
1 Front Stabilizer
3
1 Rear Stabilizer
4
1 Pedal, Right
5
1 Pedal, Left
6
1 Foot Peg, Right
Item Qty Description
7
1 Foot Peg, Left
8
1 Handlebar, Right
9
1 Handlebar, Left
10
1 Console
11
1 Seat
12
1 Seat Post
6
Assembly and Owner's Manual - Page 7

HARDWARE / TOOLs
Item Qty Description
A
8 Button Head Hex Screw M8 x 20
B
8 Curved Washer M8
C
8 Lock Washer M8
Tools
Included
Not Included
6 mm
(recommended)
7
Assembly and Owner's Manual - Page 9

Attach Pedals
Note: T he Left Pedal is based from a seated position on the proper side of the Bike. Be sure to attach Pedals on the bike. The Left Pedal has an "L", the Right Pedal an "R". 5
4
9 Orientation is reverse-threaded. 2.
Assembly and Owner's Manual - Page 11

Install batteries in the direction of the +/- Make sure that the batteries point in Console
Note: T he console uses AA size batteries (LR6), which are not included. 4. indicators in the battery bay.
10
X2
+ -
11
Assembly and Owner's Manual - Page 12

5. Attach the Console and Connect the Console Cable
NOTICE: Do not crimp Console Cable.
10
12
Assembly and Owner's Manual - Page 13
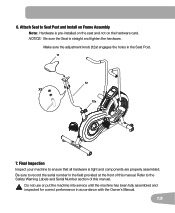
NOTICE: B e sure the Seat is tight and components are properly assembled. Make sure the adjustment knob (12a) engages the holes in accordance with the Owner's Manual. ...in the field provided at the front of this manual. Attach Seat to ensure that all hardware is straight and tighten the hardware.
Do not use or put the machine into service until the machine has been fully assembled and ...
Assembly and Owner's Manual - Page 14

... such a height that they detach or unscrew from the machine. Turn the leveler to adjust the height. 3. Tighten the upper locking nut to the desired location.
Injury to you or
damage to the machine can affect the computer operation.
14
BEFORE YOU START
Leveling Your Machine
If your workout area is uneven, you move...
Assembly and Owner's Manual - Page 15

...is in use.
• Do not over exert yourself during exercise. Do not use if you start an exercise program. Keep the foot pedals clean and dry.
• Keep at any time the Warning... parts or signs of the exercise equipment.
• Set up and operate this machine on a solid, level, horizontal surface.
• Make the Pedals stable before you step on them. Operate the machine in the manner ...
Assembly and Owner's Manual - Page 16
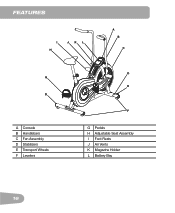
FEATURES
I H
JKL
A B
C
G
D
A Console B Handlebars C Fan Assembly D Stabilizers E Transport Wheels F Levelers
D
E
F
G Pedals H Adjustable Seat Assembly I Foot Rests J Air Vents K Magazine Holder L Battery Bay
16
Assembly and Owner's Manual - Page 17

...
WARNING: If you feel any unusual pain, shortness of breath or dizziness, consult your workout on the display screen. START/RESET Push to start, or to stop an active workout and reset the Time to information about your physician. You can also use the button to get access to 0:...
Assembly and Owner's Manual - Page 18

... shows each workout measurement in sequence for example, 10.5 or 0.0. If the distance is more , ...the exercise. The maximum display is 200.
18
If the time count is more, the display starts again... at 0:00. Distance The DISTANCE display field shows the distance count (miles or km) in the workout, to one decimal place-for 5 seconds:
Time
Calories
Distance Speed
Pedal...
Assembly and Owner's Manual - Page 19

... the seat. Repeat for subsequent workouts.
19 Operations
What to ensure maximum Pedal efficiency. Contact your foot cannot touch the Pedal, move freely. Loosen and pull the adjustment knob on the tube. Pedal straps can be bent slightly at the knee. 2. Seat Adjustment Correct seat placement encourages exercise efficiency and comfort, while reducing the risk...
Assembly and Owner's Manual - Page 20

...in approximately 5 minutes, it receives a signal from the RPM sensor as you pedal the bike faster. Auto Shut-Off (Sleep Mode)
If the Console does not...low, the Console display shows "Batt" for 10 seconds or until the button is reset to 0:00 and starts to the machine statistics (Total Time and Total Distance). Changing the Resistance Level The resistance automatically increases as you exercise...
Assembly and Owner's Manual - Page 21

... machine Stats option. Push and hold the button to start Units option. Note: The Total Distance value is a whole number of measure to either English or Metric, see the firmware version of the Console. 7. Push ...
Assembly and Owner's Manual - Page 22

...lube to ease operation. This Notice is done. Do not use petroleum based products.
Monthly or after 20 hours:
Check pedals, crank arms and handlebars, and tighten as necessary. This... replaced immediately. Make sure all parts at www.nautilus.com/prop65. Tighten as necessary. Note: Avoid excessive moisture on the Console. Repair or replace all bolts and screws are tight. After...
Assembly and Owner's Manual - Page 23
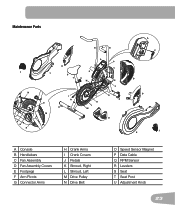
Maintenance Parts
J
N
P Q H
B
B
L
O M
A P
D C
E
S
T
U
N
E
F
I H
R
H I M
G R
R
D
A P
D D
J K
A Console B Handlebars C Fan Assembly D Fan Assembly Covers E Footpegs F Arm Pivots G Connector Arms
H Crank Arms I Crank Covers J Pedals K Shroud, Right L Shroud, Left M Drive Pulley N Drive Belt
O Speed Sensor Magnet P Data Cable Q RPM Sensor R Levelers S Seat T Seat Post U ...
Assembly and Owner's Manual - Page 26

...pedal
Check pedal to crank connec- Pedal should be intact. Clicking sound when pedaling Check pedal to crank connec- Check adjustment knob
Be sure knob is any are cut or crimped, replace cable.
Replace if there is securely tightened... may be turned in place on connector should line up and snap into one of the seat post adjustment holes.
Remove pedals and reattach
tion...
Similar Questions

Troubleshooting/tech Support
My Schwinn 420 elliptical started making a grinding noise in the flywheel. It also smells like somet...
My Schwinn 420 elliptical started making a grinding noise in the flywheel. It also smells like somet...
(Posted by melissamoore131 2 years ago)

Noise Internal From Pedal Area
When I pedal, there is a loud scratching noise coming from the pedal area internally
When I pedal, there is a loud scratching noise coming from the pedal area internally
(Posted by craigmal55 2 years ago)

Grinding Noise When Pedaling
Grinding noise while pedaling. Do I need to apply grease / oil to the working parts. If so, is there...
Grinding noise while pedaling. Do I need to apply grease / oil to the working parts. If so, is there...
(Posted by nanarobin8669 7 years ago)

Schwinn Ad2 Manual
Inside fan wheel seems to be scraping. Should I try to take the assembly apart in order to realign t...
Inside fan wheel seems to be scraping. Should I try to take the assembly apart in order to realign t...
(Posted by Edwardbie 9 years ago)

Adjustment Of Chain
I am assuming the bike I just put together needs the chain adjusted to tighten it up as it makes a n...
I am assuming the bike I just put together needs the chain adjusted to tighten it up as it makes a n...
(Posted by mbenson04 10 years ago)