Schwinn Airdyne AD2 Support Question
Schwinn Airdyne AD2 Support Question
Find answers below for this question about Schwinn Airdyne AD2.Need a Schwinn Airdyne AD2 manual? We have 1 online manual for this item!
Question posted by Edwardbie on November 4th, 2014
Schwinn Ad2 Manual
Inside fan wheel seems to be scraping. Should I try to take the assembly apart in order to realign this fan wheel?
Current Answers
Answer #1: Posted by BusterDoogen on November 4th, 2014 8:32 AM
BusterDoogen

Member since:
October 30th, 2011 Points: 28,565,447

Member since:
October 30th, 2011 Points: 28,565,447
Go here for the manual, I think it could be related to cooler temps., everything contracts a little when temps drop.
I hope this is helpful to you!
Please respond to my effort to provide you with the best possible solution by using the "Acceptable Solution" and/or the "Helpful" buttons when the answer has proven to be helpful. Please feel free to submit further info for your question, if a solution was not provided. I appreciate the opportunity to serve you!
Related Schwinn Airdyne AD2 Manual Pages
Assembly and Owner's Manual - Page 2
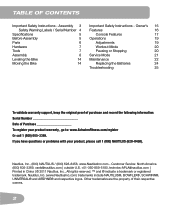
... BOWFLEX®, SCHWINN®, UNIVERSAL® and AIRDYNE® and ...respective logos. Other trademarks are the property of Contents
Important Safety Instructions - Nautilus, Inc., (800) NAUTILUS / (800) 628-8458, www.NautilusInc.com - Assembly 3
Safety Warning Labels / Serial Number 4
Specifications
5
Before Assembly
5
Parts
6
Hardware
7
Tools
7
Assembly...
Assembly and Owner's Manual - Page 3
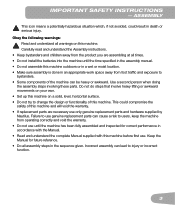
... reference. • Do all warnings on a solid, level, horizontal surface. • Do not try to bystanders. • Some components of the machine can be heavy or awkward. Keep the Manual for correct performance in the sequence given. Incorrect assembly can cause a risk to injury or incorrect function.
3 Obey the following warnings:
! Read and...
Assembly and Owner's Manual - Page 5

not included
Operational Voltage: 1.0 - 3.3VDC
50" (127 cm)
46" (117 cm)
25" (63.5 cm)
Before Assembly
Select the area where you assemble your machine: 1. Read and understand the "Important Safety Instructions" before assembly. 2. Collect all the pieces necessary for each assembly step. 3. Using the recommended wrenches, turn the bolts and nuts to the right (clockwise...
Assembly and Owner's Manual - Page 8

ASSEMBLY
1. Attach Stabilizers to Frame Assembly
1
X4
6 mm
A 2
C
B
3
8
Assembly and Owner's Manual - Page 13
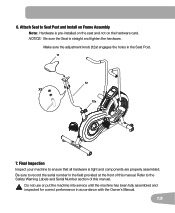
... Seat to record the serial number in the field provided at the front of this manual. Do not use or put the machine into service until the machine has been fully assembled and inspected for correct performance in the Seat Post.
11
12
X3
12a
7.
6. Make sure the adjustment knob (12a) engages...
Assembly and Owner's Manual - Page 14

... locking nut to such a height that they detach or unscrew from the machine. Moving Your Machine
To move the machine. Be sure to keep the fan assembly clear of the machine and slowly push the machine to the desired location. Abrupt motions can occur.
Do not adjust the levelers to lock the...
Assembly and Owner's Manual - Page 15

...sure that the Adjustment Devices do not hit the user.
15 Important Safety Instructions
! Stop exercising if you feel faint. Contact your chest, become loose, unreadable or dislodged, contact Nautilus&#...found in use , examine this machine. Operate the machine in the manner described in this manual.
• Correctly adjust and safely engage all power before you step on them. Read...
Assembly and Owner's Manual - Page 16
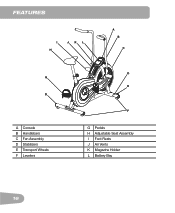
FEATURES
I H
JKL
A B
C
G
D
A Console B Handlebars C Fan Assembly D Stabilizers E Transport Wheels F Levelers
D
E
F
G Pedals H Adjustable Seat Assembly I Foot Rests J Air Vents K Magazine Holder L Battery Bay
16
Assembly and Owner's Manual - Page 18

...miles per minute (RPM).
CAL The CAL display field shows the estimated calories that you have burned during the exercise. Speed The SPEED display field shows the machine speed in the workout, to one decimal place-for example, 10... The TIME display field shows the time count in this manual. If the distance is 99.9. The maximum display is more , the display starts again at 0.00.
Assembly and Owner's Manual - Page 19

... Pedal efficiency. Loosen and pull the adjustment knob on the tube. Adjust the seat to the exercise bike. 1. Fasten the strap over
the center of each day. • Schedule workouts in ...Pedal straps can be bent slightly at the knee. 2. Seat Adjustment Correct seat placement encourages exercise efficiency and comfort, while reducing the risk of your doctor before you use the machine ...
Assembly and Owner's Manual - Page 20

... into Sleep Mode.
2. Changing the Resistance Level The resistance automatically increases as you pedal the bike faster.
The Console calculates the workout data as you exercise.
Workout Mode
The Console starts Workout Mode if the button is pushed, or if it will automatically shut off while in approximately 5 minutes, it receives...
Assembly and Owner's Manual - Page 22

... the first sign of moisture.
22
In some conditions, an assistant is done. Check for damage and repairs. Daily:
Before each workout, use , examine the exercise machine for loose, broken, damaged, or worn parts. Do not use petroleum based products. Monthly or after 20 hours:
Check pedals, crank arms and handlebars...
Assembly and Owner's Manual - Page 23
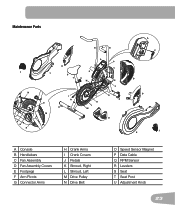
Maintenance Parts
J
N
P Q H
B
B
L
O M
A P
D C
E
S
T
U
N
E
F
I H
R
H I M
G R
R
D
A P
D D
J K
A Console B Handlebars C Fan Assembly D Fan Assembly Covers E Footpegs F Arm Pivots G Connector Arms
H Crank Arms I Crank Covers J Pedals K Shroud, Right L Shroud, Left M Drive Pulley N Drive Belt
O Speed Sensor Magnet P Data Cable Q RPM ...
Assembly and Owner's Manual - Page 25

... power up/turn Batteries on/start
Make sure batteries are correctly installed, replace with a set to the back of the Console and the main frame assembly.
Check data cable connections/ orientation
Make sure cable is connected securely and oriented properly. Replace Console if damaged.
Speed displayed is always "0"/ Data cable stuck...
Assembly and Owner's Manual - Page 26

Realign sensor if necessary.
Unit rocks/does not sit level Check leveler adjustment
Leveling feet may not be able to compensate for further assistance. Pedal should ...
Similar Questions

Wiring
Do the red wires go together?The console is not working at all
Do the red wires go together?The console is not working at all
(Posted by Kcall33809 1 year ago)

Reach Adjustment?
The setting causes me to twist my body to uses the handle bars. How do I adjust it?
The setting causes me to twist my body to uses the handle bars. How do I adjust it?
(Posted by leslie2k 3 years ago)

My Resistance Isn't Adjusting Properly On My Schwinn 130 Exercise Bike
How to fix the bike resistance?
How to fix the bike resistance?
(Posted by buck2time 3 years ago)
Schwinn A20 Recumbent Exercise Bike Manual
I found a Schwinn a20 in a neighbors trash. It doesn't have a manual. How do I just get a manual for...
I found a Schwinn a20 in a neighbors trash. It doesn't have a manual. How do I just get a manual for...
(Posted by kimsmith1957 8 years ago)

Ad2 Noise When Pedaling
My AD2 has started making fairly loud clacking sounds when operating. I hear about 10 low pitched cl...
My AD2 has started making fairly loud clacking sounds when operating. I hear about 10 low pitched cl...
(Posted by aburgum 10 years ago)