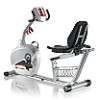
Schwinn 240 Recumbent Bike Support Question
Schwinn 240 Recumbent Bike Support Question
Find answers below for this question about Schwinn 240 Recumbent Bike.Need a Schwinn 240 Recumbent Bike manual? We have 3 online manuals for this item!
Question posted by craigmal55 on December 3rd, 2021
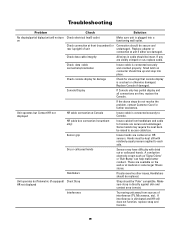
Noise Internal From Pedal Area
When I pedal, there is a loud scratching noise coming from the pedal area internally
Current Answers
Answer #1: Posted by SonuKumar on December 4th, 2021 7:54 AM
SonuKumar

Member since:
May 9th, 2021 Points: 16,622,280

Member since:
May 9th, 2021 Points: 16,622,280
Why is my stationary bike making noise?
Causes. Improper use causes of exercise bike noise include the surface on which the bike is placed and riding the bike incorrectly. Mechanical causes include worn bearings and belts or loose belts and other parts. ... Magnetic resistance bikes are more quiet than air, fly wheel or direction tension resistance bikes.
https://www.sportsrec.com/326578-my-exercise-bike-is-making-noise.html
https://www.fixya.com/support/t29771044-schwinn_a10_exercise_bike_makes_scraping
https://www.bicycling.com/repair/a20017229/easy-bottom-bracket-repair/
Please respond to my effort to provide you with the best possible solution by using the "Acceptable Solution" and/or the "Helpful" buttons when the answer has proven to be helpful.
Regards,
Sonu
Your search handyman for all e-support needs!!
Related Schwinn 240 Recumbent Bike Manual Pages
Owner's Manual - Page 3
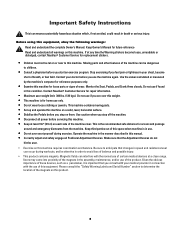
... surface. • Stabilize the Pedals before servicing this equipment, obey the following warnings: Read and understand the complete Owner's Manual.
Monitor the Seat, Pedals, and Crank Arms closely. This... wear loose clothing or jewelry. Users may come into proximity of the magnets in death or serious injury. Stop exercising if you start an exercise program. If at least 19.7" (0.5 ...
Owner's Manual - Page 6
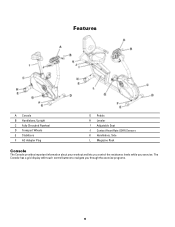
... C Fully Shrouded Flywheel D Transport Wheels E Stabilizers F AC Adapter Plug
G Pedals H Leveler I Adjustable Seat J Contact Heart Rate (CHR) Sensors K Handlebars, Side L Magazine Rack
Console
The Console provides important information about your workout and lets you control the resistance levels while you through the exercise programs.
6 The
Console has a grid display with touch control...
Owner's Manual - Page 8
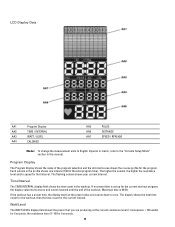
.../Interval
The TIME/INTERVAL display field shows the time count in the profile shows one interval (1/40 of the program selection and the dot-matrix area shows the course profile for 6 seconds.
8
Each column in the workout.
Owner's Manual - Page 9
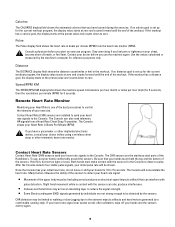
... per minute (BPM) from a Heart Rate Chest Strap Transmitter. Contact your doctor before you start an exercise program. If no calorie goal is set up for 6 seconds. Speed/RPM KM
The SPEED/RPM KM...before you use , put your hands and the sensors and try again.
9 Stop exercising if you have burned during the exercise.
The Console will be detected by the sensors. Hold firm, but not too ...
Owner's Manual - Page 10
....
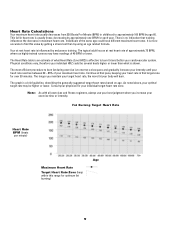
Individuals of approximately 72 BPM, where as highly trained runners may be several beats higher or lower than by age 60. Note: As with all exercises and fitness regimens, always use your best judgment when you maintain your target heart rate, the more accurate to find this range for over 20 minutes.
Owner's Manual - Page 11
... even when you use the machine again.
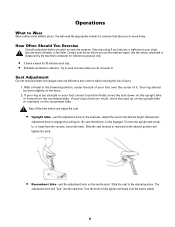
Seat Adjustment
Correct seat placement encourages exercise efficiency and comfort, while reducing the risk of your foot cannot touch the Pedal, move the seat up on the upright bike or rearward on the recumbent bike. The
adjustment knob will need the appropriate clothes for 30 minutes each day...
Owner's Manual - Page 12
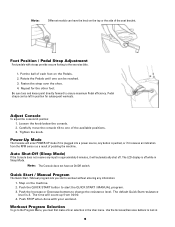
...button to start a workout without entering any input in position for the other foot.
Pedal straps can be left in approximately 5 minutes, it receives an indication from 00:00...pedals with your workout.
Note: The Console does not have the knob on the top or the side of each foot on the machine. 2.
Be sure toes and knees point directly forward to the exercise bike...
Owner's Manual - Page 13
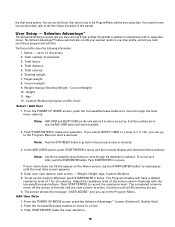
... want to save your name does not fill the spaces on each letter, push the START/ENTER button.
Name - Weight change (Starting Weight -
Enter your fitness progress and edit data. Push START/ENTER to the User Setup procedure in use the Guest User option to go to the Program Menu to...
Owner's Manual - Page 15
...you set up your heart rate increases. Enter the pacer speed with information about fitness zones, please refer to exercise in beats per minute (BPM) from the Contact Heart Rate (CHR) sensors ...the Increase and Decrease buttons to see your heart rate reaches the "Test Zone." Fitness Test
The Fitness Test measures the improvements of your age and other users. If you will work ...
Owner's Manual - Page 16
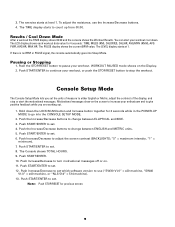
...positive feedback while you set which software version to stop or start your workout. Push the Increase/Decrease buttons to change between ELLIPTICAL and BIKE. 3. Note: Push STOP/RESET for 4 seconds: TIME, MILES (KM), CALORIES, CAL/HR, AVG/MPH (KMH), AVG PWR,... set . 8. The LCD display shows each workout data value for previous screen.
16 Hold down . The exercise starts at 1.
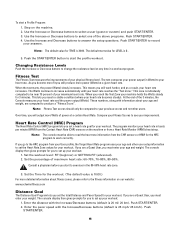
Owner's Manual - Page 17
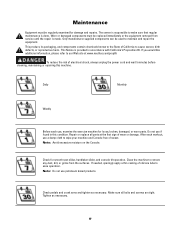
...moisture on the Console.
Tighten as necessary. The owner is responsible to maintain and repair the equipment.
Check pedals and crank arms and tighten as necessary.
17 Only manufacturer supplied components can be used to make sure ...equipment removed from the surfaces. Do not use , examine the exercise machine for smooth seat slider, handlebar slider, and console tilt operation.
Owner's Manual - Page 18
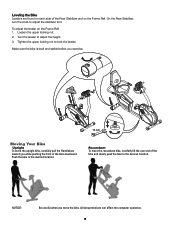
... leveler to the desired location. Recumbent To move the bike. Make sure the bike is level and stable before you exercise.
13 mm
Moving Your Bike
Upright To move the upright bike, carefully pull the Handlebars toward you move the recumbent bike, carefully lift the rear end of the bike and slowly push the bike to adjust the height. 3.
Loosen...
Owner's Manual - Page 19
... replace cable. HR cable box connection (recumbent only)
Insure cables from sources of unit
undamaged. These are damaged. Make sure strap is directly against skin and contact area is eliminated and HR still does not ...intact.
Check connection at medical or some larger fitness stores. Dry or calloused hands
Sensors may require the seat back be "Polar" compatible.
Owner's Manual - Page 20
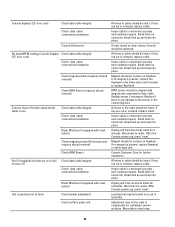
...in place on flywheel.
All wires in cable should be turned in or out to level bike. Reconnect to outlet. Leveling feet may not be intact.
If any damage to the sensor ... from electrical outlet for 3 minutes.
After Console powers up and snap into place. Move bike to level area.
20 If tests reveal no magnet is connected securely and oriented properly. If any are ...
Owner's Manual - Page 21
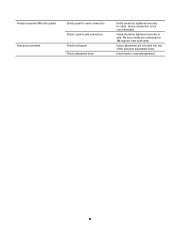
... holes. Insure knob is securely tightened.
21 Be sure cranks are connected at 180 degrees from each other. Crank should be tightened securely to crank.
Pedals loose/unit difficult to pedal Seat post movement
Check pedal to crank connection Check crank to axle connection Check locking pin Check adjustment knob...
Warranty - Page 1
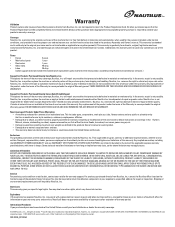
...not possible, Nautilus, Inc. This includes gyms, corporations, work places, clubs, fitness centers and any machine that has a machine for Products Purchased Directly from defects in... REMEDIES FOR ANY BREACH OF WARRANTY. Expirations If the warranty has expired, Nautilus, Inc.
International Purchases If you specific legal rights. Contact a Nautilus® office for warranty coverage.
...
Assembly Manual - Page 4
...
the holes. 5. The assembly requires 2 people.
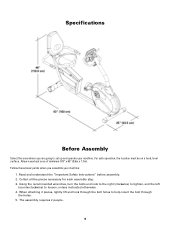
4 Follow these basic points when you are going to set up and operate your machine:
1. Allow a workout area of minimum 103" x 65" (2.6m x 1.7m). Specifications
Before Assembly
Select the area where you assemble your machine. For safe operation, the location must be on a hard, level surface.
Assembly Manual - Page 6
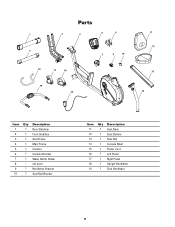
... Bracket
10
1 Seat Rail Bracket
Item Qty Description
11
1 Seat Back
12
1 Seat Bottom
13
1 Seat Rail
14
1 Console Mast
15
1 Power Cord
16
1 Left Pedal
17
1 Right Pedal
18
1 Upright Handlebar
19
1 Side Handlebar
6
Assembly Manual - Page 21
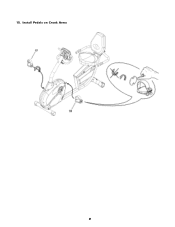
Install Pedals on Crank Arms 21 15.
Assembly Manual - Page 24
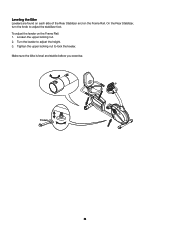
... nut. 2. To adjust the leveler on the Frame Rail. Tighten the upper locking nut to adjust the stabilizer foot. Make sure the bike is level and stable before you exercise.
13 mm
24 On the Rear Stabilizer, turn the knob to lock the leveler. Turn the leveler to adjust the height. 3. Leveling...
Similar Questions

Right Pedal For 240 Model Recumbent Cycle
What size bolt for replacement pedal do I consider or what is the recommended replacement? Thank you
What size bolt for replacement pedal do I consider or what is the recommended replacement? Thank you
(Posted by harerandy 9 months ago)


Grinding Noise When Pedaling
Grinding noise while pedaling. Do I need to apply grease / oil to the working parts. If so, is there...
Grinding noise while pedaling. Do I need to apply grease / oil to the working parts. If so, is there...
(Posted by nanarobin8669 7 years ago)
