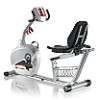
Schwinn 240 Recumbent Bike Support Question
Schwinn 240 Recumbent Bike Support Question
Find answers below for this question about Schwinn 240 Recumbent Bike.Need a Schwinn 240 Recumbent Bike manual? We have 3 online manuals for this item!
Question posted by harerandy on July 26th, 2023
Right Pedal For 240 Model Recumbent Cycle
What size bolt for replacement pedal do I consider or what is the recommended replacement? Thank you
Current Answers
Answer #1: Posted by HelpHero on July 26th, 2023 6:23 PM
HelpHero

Member since:
September 3rd, 2022 Points: 523,390

Member since:
September 3rd, 2022 Points: 523,390
For the Schwinn 240 Recumbent Bike, the recommended replacement pedal bolt size is 9/16" x 20 TPI (threads per inch). You can look for a pedal with this bolt size, and it should be compatible with your bike. It's always a good idea to check the owner's manual or contact the manufacturer or customer support for the most accurate and up-to-date information regarding replacement parts for your specific model.
I hope this is helpful? PLEASE "ACCEPT" and mark it "HELPFUL" to complement my little effort. Hope to bring you more detailed answers.
Helphero
Answer #2: Posted by SonuKumar on July 26th, 2023 8:13 PM
SonuKumar

Member since:
May 9th, 2021 Points: 16,604,580
Member since:
May 9th, 2021 Points: 16,604,580
Please respond to my effort to provide you with the best possible solution by using the "Acceptable Solution" and/or the "Helpful" buttons when the answer has proven to be helpful.
Regards,
Sonu
Your search handyman for all e-support needs!!
Related Schwinn 240 Recumbent Bike Manual Pages
Owner's Manual - Page 3
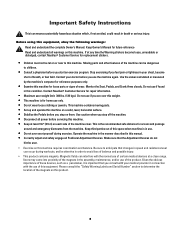
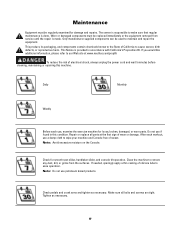
...level, horizontal surface. • Stabilize the Pedals before you start an exercise program. Stop exercising if you step on them. Do not...unreadable or dislodged, contact Nautilus® Customer Service for replacement stickers.
• Children must not be let on ....
3
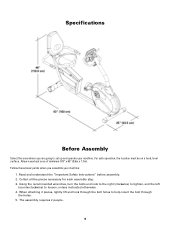
Before using this space when machine is the recommended safe distance for reference purposes only.
• Examine this...
Owner's Manual - Page 4
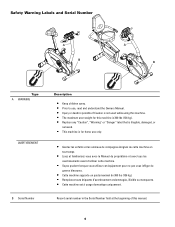
... Caution is for this manual.
4 Record serial number in the Serial Number field at the beginning of this machine is 300 lbs (136 kg). • Replace any "Caution", "Warning" or "Danger" label that is illegible, damaged, or
removed.
• This machine is not used while using this machine. • The maximum...
Owner's Manual - Page 6
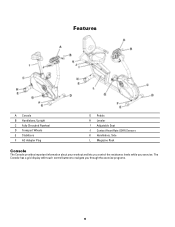
The
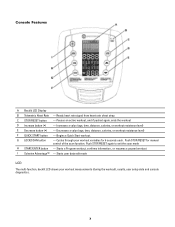
Console has a grid display with touch control buttons to navigate you exercise. Features
A Console B Handlebars, Upright C Fully Shrouded Flywheel D Transport Wheels E Stabilizers F AC Adapter Plug
G Pedals H Leveler I Adjustable Seat J Contact Heart Rate (CHR) Sensors K Handlebars, Side L Magazine Rack
Console
The Console provides important information about your workout and lets you ...
Owner's Manual - Page 7
.... G LOCK/SCAN button
- Begins a Quick Start workout. Push STOP/RESET for 6 seconds each. Starts a Program workout, confirms information , or resumes a paused workout
I Schwinn Advantage™ - Cycles through your workout measurements (during the workout), results, user setup data and console diagnostics.
7 Push STOP/RESET again to exit the scan mode
H START/ENTER...
Owner's Manual - Page 9
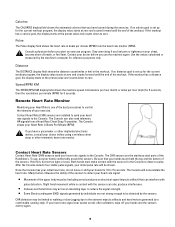
... If no calorie goal is set up for 10 to control the intensity of your exercise.
The CHR sensors are installed to send your heart rate signals to the Console. ...signal:
• Movement of the sensors to detect a pulse. Be sure that you start an exercise program. Use the values calculated or measured by a comfortable running style. Many factors influence the ability ...
Owner's Manual - Page 10
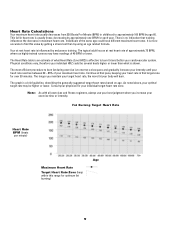
...that pace, keeping your cardiovascular system. The most efficient procedure to burn fat during exercise is influenced by using an age related formula. The graph is effective to burn ...linear, decreasing by age 60.
Physical conditions vary, therefore your exercise time or intensity. Note: As with all exercises and fitness regimens, always use your best judgment when you maintain your body...
Owner's Manual - Page 11
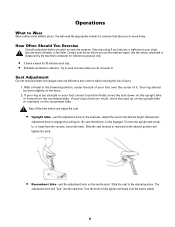
... you adjust the seat.
• Upright bike-pull the adjustment knob on the recumbent bike. Your leg should be bent slightly at the knee. 2. Stop exercising if you to . Seat Adjustment
Correct seat placement encourages exercise efficiency and comfort, while reducing the risk of your foot cannot touch the Pedal, move the upright seat closer to...
Owner's Manual - Page 12
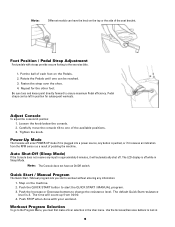
... your workout. Put the ball of pedaling the machine. Be sure toes and knees point directly forward to the exercise bike.
1.
Quick Start / Manual Program
The Quick Start / ... 4. Rotate the Pedals until one of the seat bracket. Fasten the strap over the shoe. 4. Carefully move the console tilt to start a workout without entering any information. 1. Note:
Different models can be left in...
Owner's Manual - Page 13
... 7.
Push START/ENTER to the Program Menu.
Enter your workout data, refer to the Program Menu without user setup data. Push START/ENTER make your fitness progress and edit data. the User menu options. You can go back to move through the User menu options. If you go to the User...
Owner's Manual - Page 15
...rate.
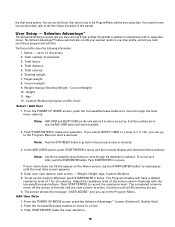
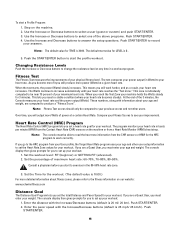
Fitness Test
The Fitness Test measures the improvements of the 3 minutes, the Console measures your heart rate in the 80-90% heart rate zone.
3. This lets you to exercise in ...Over time, you are computed to your heart rate increases. Set the workout level: FIT (beginner) or GETTING FIT (advanced). 2. Note: The default value for your workout.
Set the Time for the...
Owner's Manual - Page 16
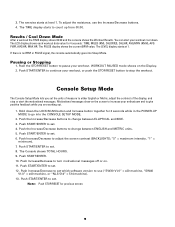
...Console shows TOTAL HOURS. 9. Push Increase/Decrease to set the units of measure to go into Sleep Mode. The exercise starts at 1. To adjust the resistance, use ("SW30 V1.0" = x20 machine, "SW40
V1.0" = x40 ...screen to increase your workout. Push the STOP/RESET button to change between ELLIPTICAL and BIKE. 3. Push START/ENTER to count up from 00:00.
WORKOUT PAUSED mode shows on the...
Owner's Manual - Page 17
... the repair is provided in this machine. Check pedals and crank arms and tighten as necessary.
17 Note: Avoid excessive moisture on the Console. This Notice is made. Repair or replace all bolts and screws are tight. Daily
Monthly
Weekly
Before each workout, use , examine the exercise machine for smooth seat slider, handlebar slider...
Owner's Manual - Page 18
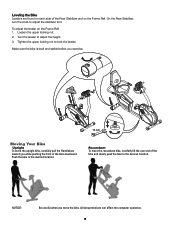
... move the recumbent bike, carefully lift the rear end of the bike and slowly push the bike to adjust the stabilizer foot. On the Rear Stabilizer, turn the knob to the desired location. Push the bike to the desired location. NOTICE:
Be careful when you move the upright bike, carefully pull the Handlebars toward you exercise.
13...
Owner's Manual - Page 19
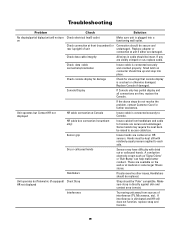
... web or at front (recumbent) or Connection should be secure and
rear (upright) of interference (TV, Microwave, etc).
If interference is moist. Replace adapter or
connection at Console... to access cable box. Check connection at medical or some larger fitness stores. Replace Console if damaged.
Some models may have difficulty with relatively equal pressure applied to Console. Hands ...
Owner's Manual - Page 21
... is securely tightened.
21
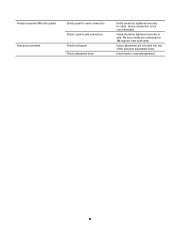
Insure knob is locked into one of the seat post adjustment holes. Pedals loose/unit difficult to pedal Seat post movement
Check pedal to crank connection Check crank to axle connection Check locking pin Check adjustment knob
Pedal should be tightened securely to axle. Insure connection is not cross-threaded.
Warranty - Page 1
... Product Registration Card. reserves the right to substitute material of equal or better quality if identical materials are not required to refund only a pro-rata value.
Nautilus, Inc. Any replacement of the product under the terms of warranty period. This includes gyms, corporations, work places, clubs, fitness centers and any public or privately...
Assembly Manual - Page 4
... these basic points when you are going to help insert the bolt through the bolt holes to set up and operate your machine:
1. When attaching 2 pieces, lightly lift and look through
the holes. 5. Using the recommended wrenches, turn the bolts and nuts to the right (clockwise) to tighten, and the left
(counterclockwise) to loosen, unless...
Assembly Manual - Page 6
... Bracket
10
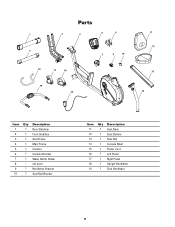
1 Seat Rail Bracket
Item Qty Description
11
1 Seat Back
12
1 Seat Bottom
13
1 Seat Rail
14
1 Console Mast
15
1 Power Cord
16
1 Left Pedal
17
1 Right Pedal
18
1 Upright Handlebar
19
1 Side Handlebar
6
Assembly Manual - Page 21
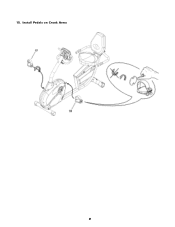
Install Pedals on Crank Arms 21 15.
Assembly Manual - Page 24
... level and stable before you exercise.
13 mm
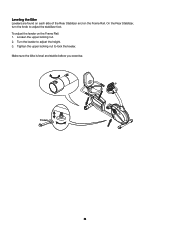
24 Leveling the Bike
Levelers are found on each side of the Rear Stabilizer and on the Frame Rail: 1. Loosen the upper locking nut. 2. On the Rear Stabilizer, turn ...
Similar Questions

Resistance Device Cycles Non Stop
The resistance device (Schwin 240 recumbant) constantly cycles up and down from zero resistance to s...
The resistance device (Schwin 240 recumbant) constantly cycles up and down from zero resistance to s...
(Posted by mborz1 3 months ago)

Noise Internal From Pedal Area
When I pedal, there is a loud scratching noise coming from the pedal area internally
When I pedal, there is a loud scratching noise coming from the pedal area internally
(Posted by craigmal55 2 years ago)
Right Pedal Assembly Came Off Control Arm. Appears That The Control Arm Is Strip
Appears that the control arm is strippe
Appears that the control arm is strippe
(Posted by randypopa 3 years ago)
Part 7
Need part 7 right pedal arm assembly for Schwinn elliptical 418
Need part 7 right pedal arm assembly for Schwinn elliptical 418
(Posted by kindlebalman 3 years ago)