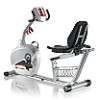
Schwinn 240 Recumbent Bike Support Question
Schwinn 240 Recumbent Bike Support Question
Find answers below for this question about Schwinn 240 Recumbent Bike.Need a Schwinn 240 Recumbent Bike manual? We have 3 online manuals for this item!
Question posted by acbl243d on February 25th, 2022
Pedals Locked Up. Will Not Turn
The person who posted this question about this Schwinn product did not include a detailed explanation. Please use the "Request More Information" button to the right if more details would help you to answer this question.
Current Answers
Answer #1: Posted by SonuKumar on February 25th, 2022 8:11 AM
SonuKumar

Member since:
May 9th, 2021 Points: 16,621,300

Member since:
May 9th, 2021 Points: 16,621,300
https://www.youtube.com/watch?v=SFeH4G59mkg
https://www.youtube.com/watch?v=Nm2Q3cGcTf8
https://www.fixya.com/support/t16836092-fix_frozen_pedals_schwinn_222_recumbent
https://www.livestrong.com/article/293164-how-to-repair-the-magnetic-resistance-for-exercise-bikes/
Please respond to my effort to provide you with the best possible solution by using the "Acceptable Solution" and/or the "Helpful" buttons when the answer has proven to be helpful.
Regards,
Sonu
Your search handyman for all e-support needs!!
Related Schwinn 240 Recumbent Bike Manual Pages
Owner's Manual - Page 3
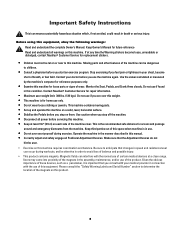
... when machine is in order to determine the location of the product. Monitor the Seat, Pedals, and Crank Arms closely. Keep third parties out of the machine can be dangerous
to children... injury. This is important that the Adjustment Devices do not
hit the user. • Exercise on this equipment, obey the following warnings: Read and understand the complete Owner's Manual. ...
Owner's Manual - Page 6
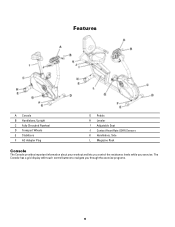
The
Console has a grid display with touch control buttons to navigate you exercise. Features
A Console B Handlebars, Upright C Fully Shrouded Flywheel D Transport Wheels E Stabilizers F AC Adapter Plug
G Pedals H Leveler I Adjustable Seat J Contact Heart Rate (CHR) Sensors K Handlebars, Side L Magazine Rack
Console
The Console provides important information about your workout and lets you ...
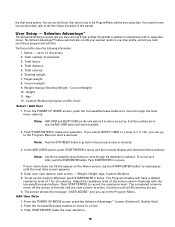
Owner's Manual - Page 7
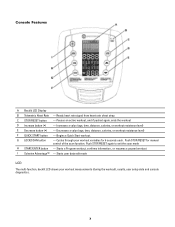
... a Program workout, confirms information , or resumes a paused workout
I Schwinn Advantage™ - Increases a value (age, time, distance, calories, or workout resistance level)
E Decrease button (▼) - G LOCK/SCAN button
- Push STOP/RESET for 6 seconds each. Begins a Quick Start workout. Cycles through your workout measurements (during the workout), results, user setup data and...
Owner's Manual - Page 9
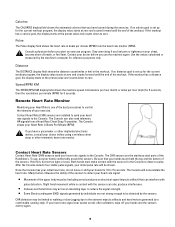
...Calluses and hand lotion may be limited to walking or slow jogging due to send your exercise. Slight hand movement while in Beats Per Minute (BPM).
Distance
The DISTANCE display field shows...Pulse
The Pulse display field shows the heart rate in the workout. Stop exercising if you have burned during the exercise. Contact your heart rate signals to zero. Use the values calculated or...
Owner's Manual - Page 10
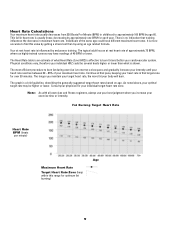
... or intensity. The longer you increase your cardiovascular system. The graph is shown. Note: As with all exercises and fitness regimens, always use your best judgment when you maintain your target heart rate, the more accurate to find this range for over 20 minutes. Individuals ...
Owner's Manual - Page 11
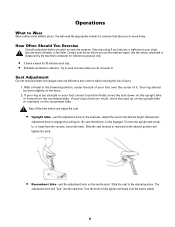
... the adjustment knob on the recumbent bike. Try to work out even when you use the machine again. Release the
adjustment knob to . Slide the seat to fully tighten and make sure the seat is too straight or your doctor before you start an exercise program. With a Pedal in advance. Turn the knob to the...
Owner's Manual - Page 12
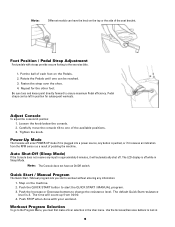
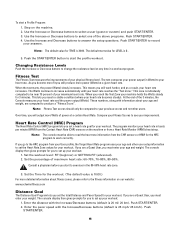
... into a power source, any information. 1. Foot Position / Pedal Strap Adjustment
Foot pedals with your workout. Loosen the knob below the console. 2. Rotate the Pedals until one of each foot on the Pedals. 2. The LCD display is 3. Be sure toes and knees point directly forward to the exercise bike.
1. Push STOP when done with straps provide secure...
Owner's Manual - Page 13
... spaces until all columns. The User profile stores the following information: 1. Total hours 4. Note: ADD USER and GUEST USER are in this manual. Enter your fitness progress and edit data. To set . 6. The completed columns move through the alphabet (or numbers). Push the Increase/Decrease buttons to a User. 3. Total number of...
Owner's Manual - Page 15
...from the Contact Heart Rate (CHR) sensors on the machine. 2. Set the workout level: FIT (beginner) or GETTING FIT (advanced). 2. Enter the pacer speed with the Increase/Decrease buttons (default is individually computed.../ENTER.
15 Push START/ENTER to set up your heart rate increases. When you to exercise in a workout program. Over time, you will output more power (Watts) at a ...
Owner's Manual - Page 16
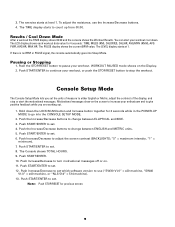
.../Decrease to turn motivational messages off or on the screen to increase your workout cool down the LOCK/SCAN button ...stop the workout. Push START/ENTER to change between ELLIPTICAL and BIKE. 3. The LCD display shows each workout data value for previous ...HR, AVG/MPH (KMH), AVG PWR, AVG/HR, MAX HR. The exercise starts at 1. WORKOUT PAUSED mode shows on the Display. 2. Push the Increase...
Owner's Manual - Page 17
....com/prop65
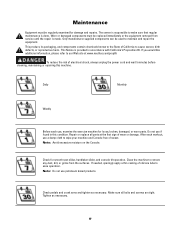
To reduce the risk of sweat. After each use petroleum based products. Note: Do not use , examine the exercise machine for loose, broken, damaged, or worn parts.
Check pedals and crank arms and tighten as necessary.
17 Daily
Monthly
Weekly
Before each workout, use if found in accordance with California...
Owner's Manual - Page 18
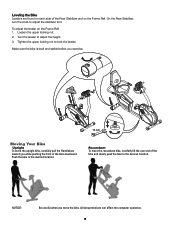
..., turn the knob to lock the leveler.
All abrupt motions can affect the computer operation. 18
Tighten the upper locking nut to adjust the stabilizer foot. Make sure the bike is level and stable before you exercise.
13 mm
Moving Your Bike
Upright To move the upright bike, carefully pull the Handlebars toward you move the recumbent bike, carefully...
Owner's Manual - Page 19
... compatible.
HR cable box connection (recumbent only)
Insure cables from sources of unit
undamaged.
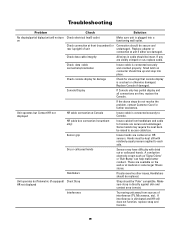
Troubleshooting
Problem
Check
Solution
No display/partial diplay/unit will not turn Check electrical (wall) outlet on
Make.... Replace adapter or
connection at medical or some larger fitness stores. Dry or calloused hands
Sensors may require the seat back be kept still with...
Owner's Manual - Page 20
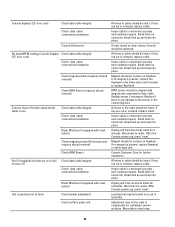
.... If any are cut or crimped, replace cable. Leveling feet may not be turned in or out to level bike. Console displays "E2" error code
Check data cable integrity
Check data cable connections...(Technician onlyrequires shroud removal)
Check RPM Sensor
Fan (if equipped) will not turn on or will not turn off
Check data cable integrity
Check data cable connections/orientation
Unit rocks/does not ...
Owner's Manual - Page 21
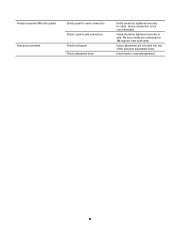
... sure cranks are connected at 180 degrees from each other. Insure adjustment pin is not cross-threaded. Insure knob is securely tightened.
21
Pedals loose/unit difficult to pedal Seat post movement
Check pedal to crank connection Check crank to axle connection Check locking pin Check adjustment knob
Pedal should be tightened securely to axle.
Assembly Manual - Page 4
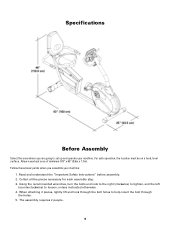
Follow these basic points when you are going to set up and operate your machine:
1. Using the recommended wrenches, turn the bolts and nuts to the right (clockwise) to tighten, and the left
(counterclockwise) to help insert the bolt through
the holes. 5. When attaching 2 pieces, ...
Assembly Manual - Page 5
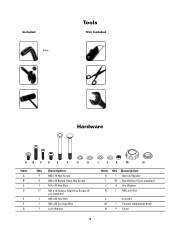
... Button Head Hex Screw
1
M7 x 30 Hex Bolt
17
M8 x 16 Button Head Hex Screw (9
pre-installed)
1
M8 x 85 Hex Bolt
1
M8 x 85 Carriage Bolt
1
Lock Washer
I
J
K
M
N
Item H I J K
Qty Description 1 Narrow Washer 23 Flat Washer (9 pre-installed) 4 Arc Washer 1 M8...
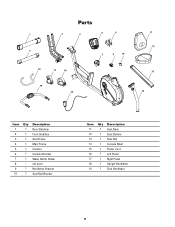
Assembly Manual - Page 6
...
10
1 Seat Rail Bracket
Item Qty Description
11
1 Seat Back
12
1 Seat Bottom
13
1 Seat Rail
14
1 Console Mast
15
1 Power Cord
16
1 Left Pedal
17
1 Right Pedal
18
1 Upright Handlebar
19
1 Side Handlebar
6 Parts
1
3
4
5
6
2
18
17
16
19 15
7
9
10
11 12
13 14
Item Qty Description
1
1 Rear Stabilizer
2
1 Front Stabilizer...
Assembly Manual - Page 21
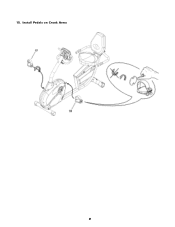
Install Pedals on Crank Arms 21 15.
Assembly Manual - Page 24
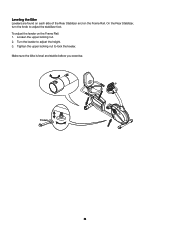
... Stabilizer and on the Frame Rail: 1. Loosen the upper locking nut. 2. Make sure the bike is level and stable before you exercise.
13 mm
24 To adjust the leveler on the Frame Rail. Turn the leveler to adjust the stabilizer foot. On the Rear Stabilizer, turn the knob to adjust the height. 3. Tighten the upper...
Similar Questions

Right Pedal For 240 Model Recumbent Cycle
What size bolt for replacement pedal do I consider or what is the recommended replacement? Thank you
What size bolt for replacement pedal do I consider or what is the recommended replacement? Thank you
(Posted by harerandy 9 months ago)

Power Plug Input On Bike
is it possible to replace the power input plug. Seems to be broken and will not hold plug i
is it possible to replace the power input plug. Seems to be broken and will not hold plug i
(Posted by peggyfarley 1 year ago)

Noise Internal From Pedal Area
When I pedal, there is a loud scratching noise coming from the pedal area internally
When I pedal, there is a loud scratching noise coming from the pedal area internally
(Posted by craigmal55 2 years ago)

Where Can Find A Replacement Seat Bottom Cushion?
Does anyone know where I can find a replacement seat cushion/bottom for the Schwinn 213 recumbent bi...
Does anyone know where I can find a replacement seat cushion/bottom for the Schwinn 213 recumbent bi...
(Posted by nfoong 2 years ago)

My Resistance Isn't Adjusting Properly On My Schwinn 130 Exercise Bike
How to fix the bike resistance?
How to fix the bike resistance?
(Posted by buck2time 3 years ago)