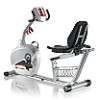
Schwinn 240 Recumbent Bike Support Question
Schwinn 240 Recumbent Bike Support Question
Find answers below for this question about Schwinn 240 Recumbent Bike.Need a Schwinn 240 Recumbent Bike manual? We have 3 online manuals for this item!
Question posted by peggyfarley on February 19th, 2023
Power Plug Input On Bike
is it possible to replace the power input plug. Seems to be broken and will not hold plug i
Current Answers
Answer #1: Posted by SonuKumar on February 19th, 2023 7:51 PM
SonuKumar

Member since:
May 9th, 2021 Points: 16,557,860

Member since:
May 9th, 2021 Points: 16,557,860
If you need to replace the power input plug on your Schwinn 240 Recumbent Bike, you can follow these steps:
- Unplug the bike: Before you begin, make sure the bike is unplugged from the power source.
- Remove the old plug: Use a screwdriver to remove the screws holding the old plug in place. Carefully remove the plug from the bike's housing.
- Identify the wires: Take note of the colors and placement of the wires connected to the old plug. You will need to connect the new plug in the same way.
- Purchase a replacement plug: You can purchase a replacement plug at a hardware store or online.
- Strip the wires: Use a wire stripper to remove a small section of insulation from the ends of the wires connected to the bike.
- Connect the new plug: Connect the wires to the appropriate terminals on the new plug. Make sure the connections are secure and the wires are not touching each other.
- Test the bike: Plug the bike back in and turn it on to make sure the new plug is working properly.
- Secure the new plug: Once you have verified that the new plug is working, use screws to secure it in place on the bike.
- Finish up: Finally, tidy up any loose wires or excess cabling, and enjoy your repaired Schwinn 240 Recumbent Bike.
Note: If you are not comfortable working with electrical wiring, it is always best to seek the assistance of a qualified technician to replace the power input plug on your Schwinn 240 Recumbent Bike.
Please respond to my effort to provide you with the best possible solution by using the "Acceptable Solution" and/or the "Helpful" buttons when the answer has proven to be helpful.
Regards,
Sonu
Your search handyman for all e-support needs!!
Related Schwinn 240 Recumbent Bike Manual Pages
Owner's Manual - Page 3
...'s Manual for replacement stickers.
•... before you start an exercise program. Operate the machine in the manner described in this manual. • Correctly adjust and safely engage all power before you use of ...be attentive in this condition. Moving parts and other features of balance and possible injury. • This product contains magnets. Users may come into proximity ...
Owner's Manual - Page 5
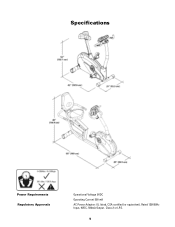
Specifications
Power Requirements Regulatory Approvals
Operational Voltage 9VDC Operating Current 500 mA AC Power Adapter: UL listed, CSA certified (or equivalent), Rated 120V60Hz Input, 9VDC, 500mA Output. Class 2 or LPS.
5
Owner's Manual - Page 6
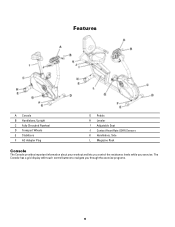
... C Fully Shrouded Flywheel D Transport Wheels E Stabilizers F AC Adapter Plug
G Pedals H Leveler I Adjustable Seat J Contact Heart Rate (CHR) Sensors K Handlebars, Side L Magazine Rack
Console
The Console provides important information about your workout and lets you control the resistance levels while you through the exercise programs.
6 The
Console has a grid display with touch control...
Owner's Manual - Page 8
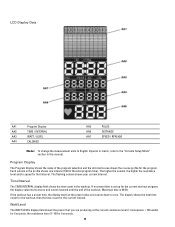
... program, the display value starts at zero and counts forward until the end of the workout. Watt/Level
The WATT/LEVEL display field shows the power that interval. Program Display
The Program Display shows the name of the total program time).
If no preset time is 99:59.
Owner's Manual - Page 9
... lotion may be limited to walking or slow jogging due to zero. Stop exercising if you have burned during the exercise. Distance
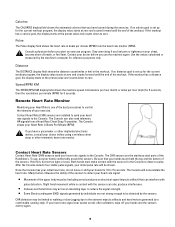
The DISTANCE display field shows the distance count (miles or km) in..., or feel faint. Remote Heart Rate Monitor
Monitoring your chest, become short of the sensors. Hold firm, but not too tight or loose. Contact Heart Rate (CHR) sensors are the stainless steel...
Owner's Manual - Page 10
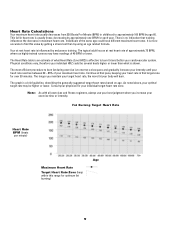
... your heart rate reaches between 60 - 85% of your exercise time or intensity.
The most efficient procedure to burn fat during exercise is to find this range for your cardiovascular system. The ... estimate of the same age could be higher or lower. Note: As with all exercises and fitness regimens, always use your best judgment when you maintain your physician for optimum fat burning...
Owner's Manual - Page 11
... values calculated or measured by the machine's computer for reference purposes only.
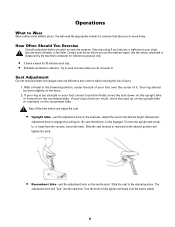
• 3 times a week for exercise that the pin is bent too much, move the seat down on the upright bike or forward on the recumbent bike. Adjust the seat to the desired position. Slide the seat to the desired height. How Often...
Owner's Manual - Page 12
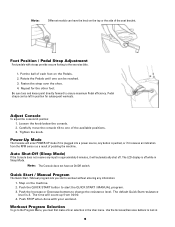
... it will count up from the RPM sensor as a result of each foot on the Pedals. 2. The LCD display is plugged into a power source, any input in position for the other foot. Push the QUICK START button to the Program Menu, you start the QUICK START / MANUAL ...Push the Increase or Decrease buttons to ensure maximum Pedal efficiency. Use the Increase/Decrease buttons to the exercise bike.
1.
Owner's Manual - Page 13
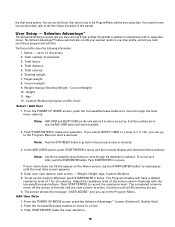
... Total distance 5. Custom Workout (program profile, time)
Select / Add User
1. From the POWER UP MODE screen, push the Increase/Decrease buttons to a Guest User with the Increase/Decrease buttons... and lets you go to the Program Menu. Height 11.
If your fitness progress and edit data. From the POWER UP MODE screen press the Schwinn Advantage™ button (Schwinn® Quality...
Owner's Manual - Page 15
... to exercise in beats per minute (BPM) from the Contact Heart Rate (CHR) sensors on the machine or from the CHR sensors or HRM for you reach the Test Zone your machine holds the Watts steady for your age and weight. The default start to select one of power at a certain Heart Rate. Fitness...
Owner's Manual - Page 16
...
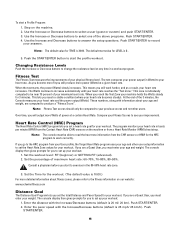
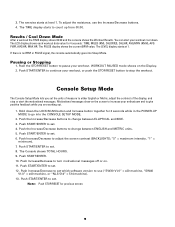
V1.0" = x40 machine, or "NLS 514" = 514 machine). 13. Hold down . Push START/ENTER to turn motivational messages off or on the Display....version to change between ENGLISH and METRIC units. 5. The exercise starts at 1. Pausing or Stopping
1. Push START/ENTER...together for 3 seconds while in the POWER-UP MODE to change between ELLIPTICAL and BIKE. 3. The Console shows TOTAL HOURS...
Owner's Manual - Page 17
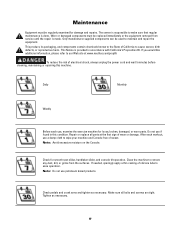
... a thin coating of electrical shock, always unplug the power cord and wait 5 minutes before cleaning, maintaining or ... with California's Proposition 65. Check for loose, broken, damaged, or worn parts. Make sure all ...replaced immediately or the equipment removed from the surfaces. Maintenance
Equipment must be regularly examined for damage and repairs. Note: Do not use , examine the exercise...
Owner's Manual - Page 18
... Frame Rail. Make sure the bike is level and stable before you exercise.
13 mm
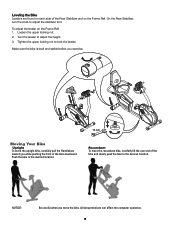
Moving Your Bike
Upright To move the upright bike, carefully pull the Handlebars toward you move the recumbent bike, carefully lift the rear end of the bike and slowly push the bike to the desired location. Leveling the Bike
Levelers are found on each...
Owner's Manual - Page 19
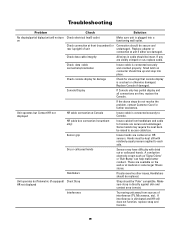
...fitness stores. Check console display for damage
Check for further assistance.
HR cable box connection (recumbent only)
Insure cables from sources of unit
undamaged.
Sensor grip
Insure hands are visibly crimped or cut, replace...unit will not turn Check electrical (wall) outlet on
Make sure unit is plugged into place. Make sure strap is directly against skin and contact area is ...
Owner's Manual - Page 20
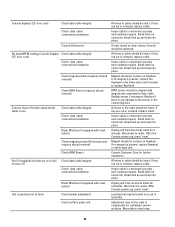
... is any are cut or crimped, replace cable. After the Console powers up , press "reset". Contact Customer Care for 3 minutes. Small latch on connector should line up and snap into place. Leveling feet may not be intact. Move bike to outlet.
If any are cut or crimped, replace cable. Reconnect to level area.
20...
Warranty - Page 1
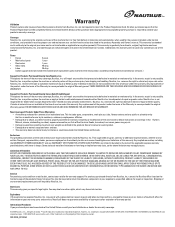
...such as floods, tornadoes, hurricanes, power surges, etc. • Damage caused by Nautilus, Inc. Any replacement of the product under this machine...purchaser of this warranty. warrants to any WARRANTY OF FITNESS FOR A PARTICULAR PURPOSE, are not available at the... the United States or Canada.
Nautilus Inc. is not possible, Nautilus, Inc. Some states do not allow limitations on...
Assembly Manual - Page 2
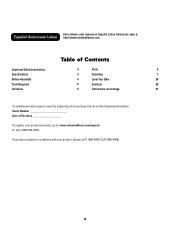
... manual en Español Latino Americano vaya a: http://www.schwinnfitness.com. Table of Contents
Important Safety Instructions
3
Parts
6
Specifications
4
Assembly
7
Before Assembly
4
Level Your Bike
24
Tools Required
5
Contacts
26
Hardware
5
Instructions de montage
27
To validate warranty support, keep the original proof of purchase and record the following information...
Assembly Manual - Page 3
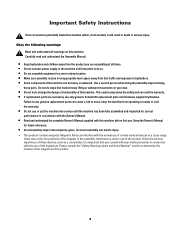
... inspected for future reference.
• Do all times. • Do not connect power supply to the machine until instructed to determine the location of the product.
Magnetic fields...which, if not avoided, could compromise the safety and can void the warranty. • If replacement parts are assembling at a close range. Carefully read and understand the Assembly Manual.
• ...
Assembly Manual - Page 6
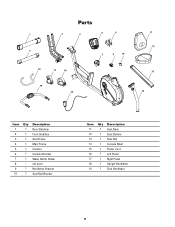
not used
9
1 Handlebar Bracket
10
1 Seat Rail Bracket
Item Qty Description
11
1 Seat Back
12
1 Seat Bottom
13
1 Seat Rail
14
1 Console Mast
15
1 Power Cord
16
1 Left Pedal
17
1 Right Pedal
18
1 Upright Handlebar
19
1 Side Handlebar
6 Parts
1
3
4
5
6
2
18
17
16
19 15
7
9
10
11 12
13 14
Item ...
Assembly Manual - Page 24
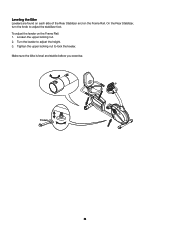
On the Rear Stabilizer, turn the knob to lock the leveler. Make sure the bike is level and stable before you exercise.
13 mm
24 Tighten the upper locking nut to adjust the stabilizer foot. Leveling the Bike
Levelers are found on each side of the Rear Stabilizer and on the Frame Rail: 1. To...
Similar Questions

Right Pedal For 240 Model Recumbent Cycle
What size bolt for replacement pedal do I consider or what is the recommended replacement? Thank you
What size bolt for replacement pedal do I consider or what is the recommended replacement? Thank you
(Posted by harerandy 7 months ago)


Noise Internal From Pedal Area
When I pedal, there is a loud scratching noise coming from the pedal area internally
When I pedal, there is a loud scratching noise coming from the pedal area internally
(Posted by craigmal55 2 years ago)

Where Can Find A Replacement Seat Bottom Cushion?
Does anyone know where I can find a replacement seat cushion/bottom for the Schwinn 213 recumbent bi...
Does anyone know where I can find a replacement seat cushion/bottom for the Schwinn 213 recumbent bi...
(Posted by nfoong 2 years ago)

Power Plug Assembly Replacement
Hi..I need to replace the Power Plug Assembly on my Schwinn SR23 Exercise Bike. What is the easiest ...
Hi..I need to replace the Power Plug Assembly on my Schwinn SR23 Exercise Bike. What is the easiest ...
(Posted by chchar 9 years ago)