Ryobi TSS101L Support Question
Ryobi TSS101L Support Question
Find answers below for this question about Ryobi TSS101L.Need a Ryobi TSS101L manual? We have 4 online manuals for this item!
Question posted by lampkinl on October 22nd, 2011
Short
some time when i pull the switch it trips my 20 amp breaker, after 3 or 4 cuts. a new saw
Current Answers
Related Ryobi TSS101L Manual Pages
English Manual - Page 2

...not work in a reasonable time, but, in the design of this product making its RYOBI® power tools with the original product. The replacement power tool will complete the work properly... Adjustments...32-33 Maintenance...34 Parts Ordering / Service...36
INTRODUCTION
This tool has many features for making it was purchased. When you request warranty service, you must ...
English Manual - Page 3

...tools sharp and clean for recommended accessories. Consult the operator's manual for better and safer performance. The use outdoors and so marked.
KEEP BLADES CLEAN, SHARP, and with sufficient set. Wear a face or dust mask if the cutting...moving parts. Be sure switch is damaged should be ...times.
MAINTAIN TOOLS WITH CARE. READ ALL INSTRUCTIONS
KNOW YOUR POWER TOOL...
English Manual - Page 4

...the tool's plug.
DO NOT MODIFY the plug provided. Stay constantly aware of your saw with saw table at a time. ...cut .
MAKE SURE THE MITER TABLE AND SAW ARM (BEVEL FUNCTION) ARE LOCKED IN POSITION BEFORE OPERATING YOUR SAW.
If repair or replacement of the workpiece in any other moving parts during use common sense. Do not rush.
DO NOT USE TOOL IF SWITCH...
English Manual - Page 5

... use to be cut .
ALWAYS carry the tool only by the carrying handle.
AVOID direct eye exposure when using the laser guide.
This saw blade to come to a work using the saw.
ALWAYS TURN OFF THE SAW before any part of the saw blade.
ALWAYS release the power switch and allow familiarity...
English Manual - Page 6
...
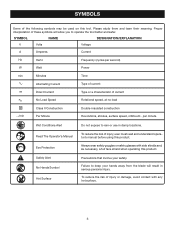
Voltage
A
Amperes
Current
Hz
Hertz
Frequency (cycles per second)
W
Watt
Power
min
Minutes
Time
Alternating Current
Type of current
Direct Current
Type or a characteristic of current
no
No Load...Precautions that involve your hands away from the blade will allow you to operate the tool better and safer. Proper interpretation of injury, user must read and understand operator's ...
English Manual - Page 7

... signal words and meanings are intended to explain the levels of any power tool can result in foreign objects being thrown into your eyes, which can result in severe eye damage. Before beginning ...power tool operation, always wear safety goggles or safety glasses with side shields. We recommend Wide Vision ...
English Manual - Page 8
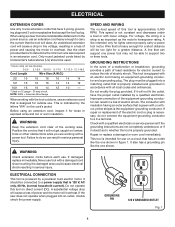
...tool is equipped with a power tool.
If the saw...on lumber, tools or other ...20 amp circuit. This is as important as to a live terminal. Failure to do not connect the equipment-grounding conductor to whether the tool... is not constant and decreases under a load or with all local codes and ordinances. Never use tool with the tool...tool is heavy enough for a short...power tool ...
English Manual - Page 9
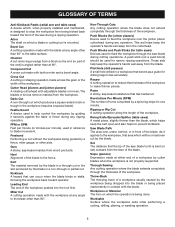
... ripping operations.
As it securely against the table or fence during a ripping operation. Through Sawing Any cutting operation where the blade extends completely through the thickness of the blade. Workpiece or Material The item on which a blade or cutting tool is not properly supported. Arbor The shaft on which the operation is bent (or...
English Manual - Page 10

... with Miter at 0°/Bevel 45°: Maximum nominal lumber sizes 2 x 12
Cutting Capacity with Miter at 45°/Bevel 45°: Maximum nominal lumber sizes 2 x 8
slide lock knob
Bevel Lock lever
upper blade guard
Bevel Scale
"D" HANDLE
Switch Trigger
Dust bag
slide bar
work shaft knob
work clamp
MITER FENCE
lower...
English Manual - Page 11

...176;, 30°, and 45° on the tool and in Down Position Fig. 3
11
The left and right side of the blade. slide bar
When unlocked, the saw arm and lock it in . thick or 6 ... all cuts. The bevel lock lever is spring loaded and is made .
13 AMP MOTOR
The saw has a powerful 13 amp motor with sufficient power to 2 in the down position by pulling the lever away from the saw . ...
English Manual - Page 12
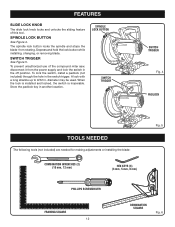
... used. When the lock is installed and locked, the switch is inoperable. Spindle Lock Button
Switch trigger
Switch Trigger
Fig. 4
Padlock
TOOLS NEEDED
The following tools (not included) are needed for making adjustments or installing ...of the compound miter saw, disconnect it from rotating.
A lock with a long shackle up to 9/32 in the switch trigger. To lock the switch, install a padlock...
English Manual - Page 14

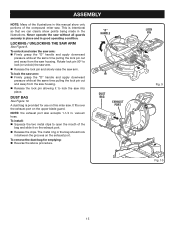
...replaced. NOTE: This tool is complete. To release the saw arm, push down position.
Four bolt holes have carefully inspected and satisfactorily operated the product. The saw is misuse and ... saw . WARNING:
This saw can occur during shipping. Do not discard the packing material until you have been provided in the down on the "D" handle, cut the tie-wrap, and pull ...
English Manual - Page 15
... intentional so that we can clearly show only portions of the compound miter saw.
To lock the saw arm: Firmly grasp the "D" handle and apply downward
pressure while at the same time pulling the lock pin out and away from the saw housing.
Release the lock pin allowing it on the exhaust port...
English Manual - Page 18
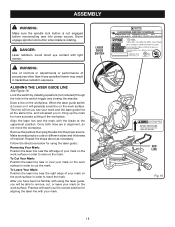
... in the switch trigger and closing the shackle. Remove the padlock then plug the saw into the power source. Make several practice cuts on the work surface in hazardous radiation exposure. To Cut Your Mark:...the steps above as necessary. After you have become familiar with the blade at the same time, and will assist you will teach you see your mark on the workpiece. ASSEMBLY
WARNING:
...
English Manual - Page 20
...20
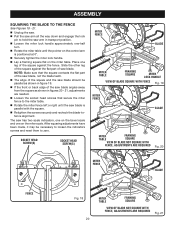
MITER TABLE
FRAMING SQUARE
VIEW OF Blade NOT SQUARE WITH FENCE, ADJUSTMENTS ARE REQUIRED
Fig. 21
ASSEMBLY
SQUARING THE BLADE TO THE FENCE
See Figures 18 - 21.
Unplug the saw. Pull the saw... arm all the way down and engage the lock
pin to hold the saw arm in transport position. Loosen the miter ...
English Manual - Page 24
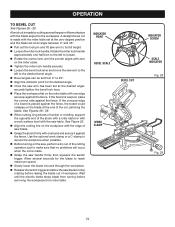
... Pull out the lock pin and lift saw arm to the left to the workpiece. See Figure 32.
Align the cutting line on the blade at the end of the cut is placed... the saw handle firmly then squeeze the switch trigger.
A bevel cut is warped, place the convex side against the fence. OPERATION
TO Bevel Cut
See Figures 28 - 29. See Figures 38 - 39.
When cutting long...
English Manual - Page 25

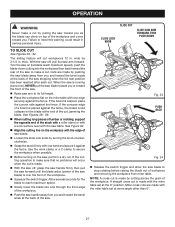
....
Slowly lower the blade into and through the workpiece.
Release the switch trigger and allow the saw arm to the left to Compound Miter Cut
See Figures 30 - 31. Compound Miter Cut
C-CLAMP
Fig. 30
Align the cutting line on the miter table must be rotated to the correct angle and the...
English Manual - Page 27
... saw off , pull the saw blade to
stop rotating before raising the blade out of the saw stopping when the full rear position has been reached after each cut. Fig. 33
PUSH BACK
Fig. 34 Release the switch trigger and allow the saw arm forward. Miter cross cuts are made with the saw . SLIDE LOCK KNOB
slide Cut
SLIDE SAW...
English Manual - Page 32
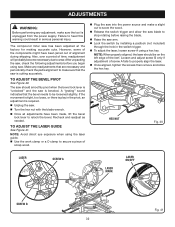
... all adjustments have been jarred out of alignment during shipping.
However, some of
scrap wood.
Plug the saw into the power source and make a slight cut to score the wood.
Release the switch trigger and allow the saw blade to wear. To Adjust THE BEvel pivot
See Figure 40.
After unpacking the...
English Manual - Page 34
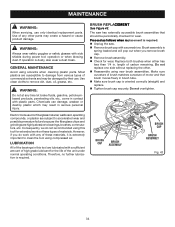
... grindings are lubricated with a screwdriver. Brush REPLACEMENT
See Figure 43. GENERAL MAINTENANCE
Avoid using new brush assemblies. Electric tools used on these materials, it is required.
Most plastics are susceptible to remove dirt, dust, oil, grease, etc. The saw . Remove brush cap with a sufficient amount of high grade lubricant for the life...
Similar Questions

Is There A Replacement For Ryobi Tss101l D Handle & Switch?
Part #s for above: 089100121610 089100121112 Have apparently discontinued. Does anyone have a fix?
Part #s for above: 089100121610 089100121112 Have apparently discontinued. Does anyone have a fix?
(Posted by Math72285 3 years ago)

Short Pause Before Starting
re180pl has a short pause then startsWhat could be the caus
re180pl has a short pause then startsWhat could be the caus
(Posted by Anonymous-165535 4 years ago)

Ryobi Js651l Stopped Working
I have used this new saw only a few times. Now only the light works. No movement from motor. No soun...
I have used this new saw only a few times. Now only the light works. No movement from motor. No soun...
(Posted by Denniskolis 8 years ago)

Ryobi Tss101l Laser Not Working?
I have a brand new Ryobi TSS101L and I see no evidence of a laser working. I looked through the manu...
I have a brand new Ryobi TSS101L and I see no evidence of a laser working. I looked through the manu...
(Posted by linexyc 11 years ago)

Ryobi Tss101l Won't Start.
My 10" mitre saw is getting electricity to the switch and when I pull the trigger the current return...
My 10" mitre saw is getting electricity to the switch and when I pull the trigger the current return...
(Posted by dtwood1 11 years ago)