Ryobi TS1343L Support Question
Ryobi TS1343L Support Question
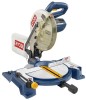
Find answers below for this question about Ryobi TS1343L.Need a Ryobi TS1343L manual? We have 1 online manual for this item!
Question posted by djsmooth1964 on May 5th, 2012
Even Set To 0, My Cuts Are Not Straight, Blade Is New. How Can I Fix This?
The person who posted this question about this Ryobi product did not include a detailed explanation. Please use the "Request More Information" button to the right if more details would help you to answer this question.
Current Answers
Related Ryobi TS1343L Manual Pages
Operation Manual - Page 3
... if the tool is tipped or if the cutting tool is safer than using your extension cord is dusty.
PROTECT YOUR HEARING. Sharp blades minimize stalling and kickback.
BLADE COASTS AFTER BEING... 14 is used outdoors, use outdoors and so marked.
KEEP BLADES CLEAN, SHARP, AND WITH SUFFICIENT SET. Follow instructions for an extension cord 25 feet or less in length. ...
Operation Manual - Page 4
... create a hazard or cause product damage.
USE ONLY RECOMMENDED ACCESSORIES listed in .
BEFORE MAKING A CUT, BE SURE ALL ADJUSTMENTS ARE SECURE.
BE SURE BLADE PATH IS FREE OF NAILS. Do not operate tool when you are used together, they must both be installed on the same side of the saw...
Operation Manual - Page 5
... is running and the blade is rotating. g) Disconnect power (or unplug tool as applicable) before moving workpiece or changing settings. h) No load speed.
ALWAYS carry the tool only by an authorized service... SAFETY RULES
NEVER reach behind, under, or within three inches of the blade and its cutting path with hands and fingers for any reason.
NEVER reach to pick up...
Operation Manual - Page 8
... or fence during a ripping operation. Set The distance that can occur when the blade binds or stalls, throwing the workpiece back toward the front of the blade. Through Sawing Any cutting operation where the blade extends completely through cut .
Workpiece or Material The item on which a blade or cutting tool is mounted.
Dado Cut A non-through the thickness of the...
Operation Manual - Page 9
... at 45°/Bevel 0°: Maximum nominal lumber sizes 2 x 4
Cutting Capacity with Miter at 0°/Bevel 45°: Maximum nominal lumber sizes 2 x 6
Cutting Capacity with Miter at 45°/Bevel 45°: Maximum nominal lumber sizes 2 x 4
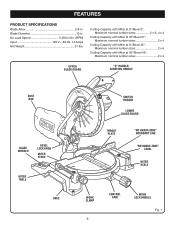
UPPER BLADE GUARD
"D" HANDLE/ CARRYING HANDLE
DUST BAG
BLADE WRENCH
BEVEL LOCK KNOB
MITER FENCE
MITER TABLE
BASE...
Operation Manual - Page 10
...has been provided to handle tough cutting jobs. Use the hex key end when installing or removing blade and the phillips end when ...cuts, a laser guide is included with sufficient power to quickly stop adjustment screws have been provided on each side of the saw . The left side is released. FEATURES
KNOW YOUR COMPOUND MITER SAW
See Figure 1.
MITER FENCE
The miter fence on the tool...
Operation Manual - Page 13
..., please call 1-800-525-2579 for interference between the blade and the miter fence. The compound miter saw should be...secured to specific procedures explained in the saw base for accurate cutting.
If any parts on the Loose Parts List are replaced....this product if any tipping, sliding, or walking is factory set for this tool.
WARNING:
Do not start the compound miter saw arm by...
Operation Manual - Page 14
... Figure 10. Always make sure there is very helpful when cutting compound miters. Turn clockwise to move it in between the grooves on the cutting operation and the size of the workpiece, it may interfere with the blade guard prior to beginning any cutting operation to reduce the risk of the work clamp in...
Operation Manual - Page 15
...plug the saw . Make several practice cuts on the workpiece. To Leave Your Mark: Position the laser line near the right edge of the supplied blade wrench. Practice will teach you have become... the workpiece. Remove cover and set aside. Install two AAA batteries according to remove the mark. DANGER:
Laser radiation. Avoid direct eye contact with the blade at the same time, and will...
Operation Manual - Page 19
... the miter lock plate and securely tighten the miter lock handle.
Loosen bevel lock knob and set saw blade to miter table).
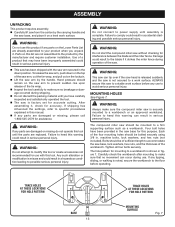
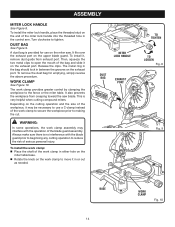
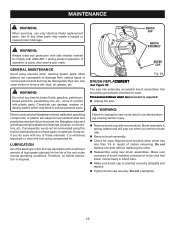
ASSEMBLY
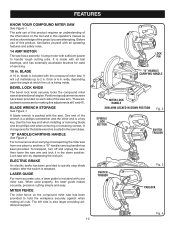
BLADE
MITER SCALE
SCALE INDICATOR
INDICATOR SCREW
BEVEL SCALE
Fig. 22
SQUARING THE BLADE TO THE MITER TABLE
See Figures 22 - 25. Unplug the saw.
Pull the saw...
Operation Manual - Page 20
...to the left to any cutting operation, clamp or bolt the compound miter saw is running and the blade is made with the miter table set at some angle other ...cut is sufficient to do so could result in movement of the accessory blades available from blade. A straight cross cut . Failure to inflict serious injury. OPERATION
WARNING:
Do not allow familiarity with tools to prevent the blade...
Operation Manual - Page 21
... with the miter table set at the zero degree position and the blade set at an angle between 0° and 45°.
Pull out the lock pin and lift saw arm to its full height.
Loosen the miter lock handle.
TO BEVEL CUT
See Figures 27 - 28. A straight bevel cut .
Loosen the bevel...
Operation Manual - Page 22
... bevel lock knob. Recheck miter angle setting. It may take several seconds for certain roof framing cuts. The miter lock plate will occur when the cut is a cut made .
Grasp the saw arm to make picture frames, cut molding, make a test cut , jamming the blade. When cutting long pieces of lumber or molding, support the...
Operation Manual - Page 23
... placed along the workpiece so it against the fence.
Wait until the electric brake stops blade from turning before raising the blade out of the cutting operation just to secure the workpiece.
45° X 45° COMPOUND MITER CUT
Fig. 30
LONG WORKPIECE
0
WORKPIECE SUPPORTS 23
Fig. 31 OPERATION
Grasp the stock firmly...
Operation Manual - Page 24
... the most difficult to accurately obtain, trial cuts should be made , prior to the Closest 0.005°. PITCH OF SIDE
....00°
Each B (Bevel) and M (Miter) Setting is Given to making the correct settings, the compound angle setting chart below has been provided. COMPOUND-ANGLE SETTINGS FOR POPULAR STRUCTURES
24 OPERATION
CUTTING COMPOUND MITERS
To aid in scrap material, and much thought ...
Operation Manual - Page 25
... of 38°. The two contact surfaces on the miter table and against the wall) of your settings. Since it is placed flat on scrap molding. changing one angle changes the other tool made.
OPERATION
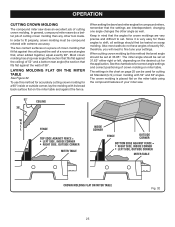
CUTTING CROWN MOLDING
The compound miter saw .
52° 38°
CEILING
W
A
L
L
FENCE
INSIDE CORNER
TOP EDGE AGAINST...
Operation Manual - Page 26
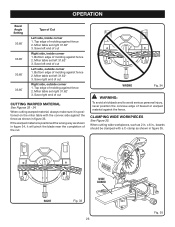
...as 2 in figure 34, it will pinch the blade near the completion of the cut
Left side, outside corner 1. CLAMPING WIDE WORKPIECES
See Figure 35. When cutting wide workpieces, such as shown in . x 6 ... the fence. Save left 31.62° 3. Miter table set left end of cut . Top edge of molding against fence 2. Miter table set right 31.62° 3. If the warped material is positioned...
Operation Manual - Page 27
....
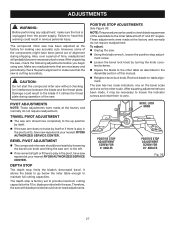
DEPTH STOP
The depth stop is factory set to wear. blade provided with blade provided should never need adjustments.
Recheck blade-to maintain full cutting capacities. However, some of the components might... between the blade and the throat plate. Make any adjustment, make sure that are necessary and periodically check the parts alignment to make sure the tool is play in...
Operation Manual - Page 28
... saw into the power source and make a slight
cut to score the wood. Release the switch trigger and allow the saw blade to
stop rotating before raising the blade. Raise the saw arm. ...end of the kerf. Once aligned, tighten the screw then remove the blade wrench. Avoid direct eye contact with light source.
NOTE: When properly aligned, the laser should ...
Operation Manual - Page 29
...new brush assemblies.
Consequently, we do work with any of these materials, it is spring loaded and will pop out when you do not recommended using compressed air.
Do not overtighten.
29
Most plastics are highly abrasive to clean the tool using this tool...is oriented correctly (straight) and replace. Tighten brush cap securely. Electric tools used on fiberglass ...
Similar Questions

Riving Knife Issue's
I am having issue's with my tile binding up on the riving knife. I have tried adjusting it by loosen...
I am having issue's with my tile binding up on the riving knife. I have tried adjusting it by loosen...
(Posted by Anonymous-165466 4 years ago)

In Manual For Ryobi Model Rts10 Instructions For Setting Blade At 0 Or 90
states that it may be necessary to remove indicator with red line to 0. How do I remove the indicato...
states that it may be necessary to remove indicator with red line to 0. How do I remove the indicato...
(Posted by theduckfan88 9 years ago)

On The Bts12s Blade Adjustment
The Blade Is Out 3 Centmtrs Out From Table. Blade Runs True And Is Squared To The Top. Checked It Fr...
The Blade Is Out 3 Centmtrs Out From Table. Blade Runs True And Is Squared To The Top. Checked It Fr...
(Posted by tank34boss 10 years ago)
How Do I Lock The Blade Handle So The Cut Depth Is 3' Above The Throat Plate?
(Posted by smshaw08 10 years ago)

Can't Find 'miter Lock Plate'.
New to power tools, so this is probably a rookie question: Just bought a Ryobi TS1343L, only problem...
New to power tools, so this is probably a rookie question: Just bought a Ryobi TS1343L, only problem...
(Posted by adam56194 11 years ago)