
Ryobi RTS10 Support Question
Ryobi RTS10 Support Question
Find answers below for this question about Ryobi RTS10.Need a Ryobi RTS10 manual? We have 4 online manuals for this item!
Question posted by labdororios on April 15th, 2014
How To Assemble A Ryobi Rts10 Table Saw
The person who posted this question about this Ryobi product did not include a detailed explanation. Please use the "Request More Information" button to the right if more details would help you to answer this question.
Current Answers
Related Ryobi RTS10 Manual Pages
English Manual - Page 1

Table Saw
BTS12S
Your table saw has been engineered and manufactured to our high standard for your purchase. Thank you years of rugged, trouble-free performance. SAVE THIS MANUAL FOR FUTURE ...
English Manual - Page 2

... top priority in your RYOBI® power tool for a particular purpose, are warranted for example, a bill of sale). table of contents
...Tools Needed...13 Loose Parts...14-15 Assembly...16-19 Operation...20-29 Adjustments...30-31 Maintenance...32 Troubleshooting...33 Parts Ordering / Service...Back page
INTRODUCTION
This tool...
English Manual - Page 5
... the cutting tool.
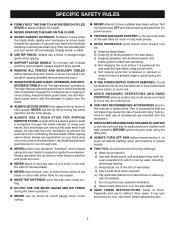
Use only recommended accessories listed in ripping or cross cutting. Use a featherboard and push blocks for safe use of accessories are not listed may cause the risk of kickback. b) Keeping rip fence parallel to see the work using the table saw.
ALWAYS TURN OFF SAW before transporting saw blade using...
English Manual - Page 9

... usually caused by the workpiece being dropped into the tool first. Leading End The end of the saw during any angle to the table surface. Resin A sticky, sap-based substance that ...trough in a workpiece that has hardened. GLOSSARY OF TERMS
Anti-Kickback Pawls (radial arm and table saws) A device which the operation is being done.
Chamfer A cut without the workpiece being kicked...
English Manual - Page 11

...or raise the blade for bevel cuts and to heed this warning could result in this tool.
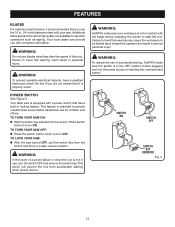
This handle is set with the blade adjusting handle on the spreader. This lever, ...front of the blade guard assembly) are provided in rip cuts. To lock the switch in case the work should kickback occur. FEATURES
KNOW YOUR TABLE SAW
See Figure 2.
This saw table, the easy-toread scale ...
English Manual - Page 12
...styles of a power failure or when the tool is not in ., 24-tooth blade provided with your saw. Your local dealer can provide you are ...tool. WARNING:
Do not use by children and others. Failure to heed this warning may cause the workpiece to prevent unauthorized and possible hazardous use blades rated less than the speed of accidental starting when power returns.
Your table saw...
English Manual - Page 15
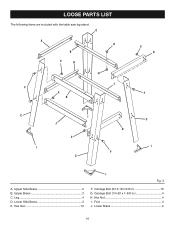
Upper Side Brace 2 B. Leg 4 D. Lower Side Brace 2 E. Hex Nut 4 I
Fig. 3
F. Lower Brace 2
15 Hex Nut 16
I . Foot 4 J. Carriage Bolt (1/4-20 x 1-5/8 in 16 G. Carriage Bolt (5/16-18 x 5/8 in 4 H. Upper Brace 2 C. LOOSE PARTS LIST
The following items are included with the table saw leg stand: C
A G
B
E
D
H
J F
E B
E A
F
C
I
C
J
D
E
I
I
F C
A.
English Manual - Page 16

... factory set to make sure the table saw is securely mounted to a workbench or an approved leg stand. hex nuts
Take 4 legs and 8 braces from the
box. Do not reach over or across the blade. ASSEMBLY
UNPACKING
This product requires assembly. Carefully remove the tool and any accessories from loose parts.
Place...
English Manual - Page 17

... leg stand and leveling feet.
Place the leg stand on the TABLE saw base
See Figure 7. Secure using 3/8 in place, tighten with a hex nut. ASSEMBLY
Mounting THE leg stand on the table saw base. Mounting Holes
The table saw must be mounted to the floor before operating. TO Install the locking handle
See Figure 9. Slide...
English Manual - Page 20
.... WARNING:
Always wear safety goggles or safety glasses with side shields when operating power tools.
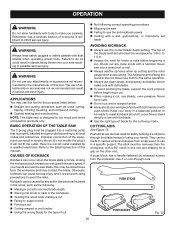
CAUSES OF KICKBACK
Kickback can result in a balanced position to be jerked loose from... the blade stalls or binds, kicking the workpiece back toward you careless. Improper connection of the TABLE Saw
The 3-prong plug must be plugged into a loose knot or nail.
Always use ...
English Manual - Page 25
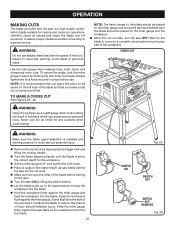
... is made, turn the saw OFF.
Never use the rip fence for the blade to come to heed this tool. Keep the workpiece flush against the saw table as it contacts the blade...saw ON by twisting the lock knob clockwise. Keep the miter gauge firmly against the miter gauge. Use the miter gauge when making cross, miter, bevel, and compound miter cuts. WARNING:
Make sure the blade guard assembly...
English Manual - Page 26
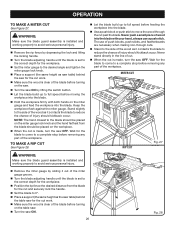
... the blade before turning on the table saw. Turn the saw ON.
26
Fig. 28 The use a push stick. MITER cut
rip cut
Fig. 27
WARNING:
Make sure the blade guard assembly is installed and working properly to ...to 0°. Place a support (the same height as the saw table) behind the saw for the cut work . Make sure the wood is clear of the blade before turning
on...
English Manual - Page 27

...the blade to avoid serious personal injury.
27
Fig. 30 WARNING:
Make sure the blade guard assembly is made, turn the saw OFF. Wait for the cut work.
Make sure the wood is at the desired...should be on the saw.
Turn the saw ON. Let the saw for the blade to come to relock it . Stand slightly to the side of the wood as saw table) behind the saw blade build up ...
English Manual - Page 32
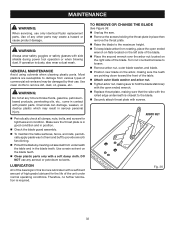
... Ryobi replacement parts.
Use a resin solvent on the blade teeth. Clean plastic parts only with a sufficient amount of the bearings in contact with side shields during power tool operation...36. Unplug the saw. Remove the screws holding the throat plate in position.
Check the blade guard assembly. To maintain the table surfaces, fence, and rails,...
English Manual - Page 34

... nearest Authorized Service Center. Table Saw
BTS12S
WARNING:
Some dust created by power sanding, sawing, grinding, drilling, and ...to provide all pertinent facts when you have purchased your tool, should a need ever exist for a complete list ...following information:
• MODEL NUMBER • SERIAL NUMBER
BTS12S
RYOBI® is a registered trademark of these chemicals are specially ...
Repair Sheet - Page 3
... 1
20 9121015333301 INSERT WARNING LABEL........ 1
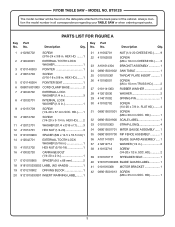
21 411062701 NUT (1/4-20 CHEESE HD.)........ 9 22 410162003 SCREW (M6 x 18 mm CHEESE HD.)...... 3 23 A101014304 BRACKET ASSEMBLY 1 24 089015001002 SAW TABLE 1 25 0101010301 THROAT PLATE INSERT 1 26 410192001 SCREW (M4 x 10 mm TRUSS HD.)......... 2 27 0101141303 RUBBER WASHER 2 28 412012030 WASHER 2 29 414011002...
Repair Sheet - Page 5
PAGE 2 KEY NOS. 13 AND 16; RYOBI Table Saw - NUMBER
DESCRIPTION
QTY.
1 410182001 SCREW (M4 x 7 mm FLAT HD 6 2 089015001007 E-RING 1... SWITCH KEY 1
31 452020007 SWITCH 1
32 A101140109 MOTOR ASSEMBLY W/GUARD 1
33 0101015002 BRUSH ASSEMBLY 2
34
*** 10 in all correspondence regarding your TABLE SAW or when ordering repair parts. Always mention the model number...
Repair Sheet - Page 7

KEY NOS. 18-19 1 21 0101010102 GEAR HOUSING 1 22 420110004 NEEDLE BEARING 3 23 A101010501 JACKSHAFT ASSEMBLY (ARBOR 1 987000372 OPERATOR'S MANUAL 1
9-30-08 (REV:00)
RYOBI Table Saw - Always mention the model number in all correspondence regarding your TABLE SAW or when ordering repair parts. PARTS LIST FOR FIGURE C
KEY PART KEY PART
NO. NUMBER
DESCRIPTION
QTY.
1 ...
Repair Sheet - Page 8

...
9 411062702 HEX LOCK NUT (5/16-18)........ 16
10 410032705 CARRIAGE BOLT (1/4-20 x 1-5/8 in 4
11 411062701 HEX NUT (1/4-20 4
8 No. No. Description
Qty.
1 A101141301 COMPLETE STAND ASSEMBLY (INC. MODEL NO.
Description
Qty.
RYOBI TABLE SAW -
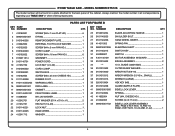
Repair Sheet - Page 9

RYOBI Table Saw - MODEL NUMBER BTS12S
POWER CORD
BLACK WHITE
SWITCH
BLACK WHITE
MOTOR CORD
MOTOR
WIRING DIAGRAM
9
Similar Questions

Dado Blade Insert For A Ryobi Rts10 Table Saw
Where can I purchase a dado blade insert for my Ryobi RTS10 10" table saw? I am having difficulty fi...
Where can I purchase a dado blade insert for my Ryobi RTS10 10" table saw? I am having difficulty fi...
(Posted by bstilton 9 years ago)


